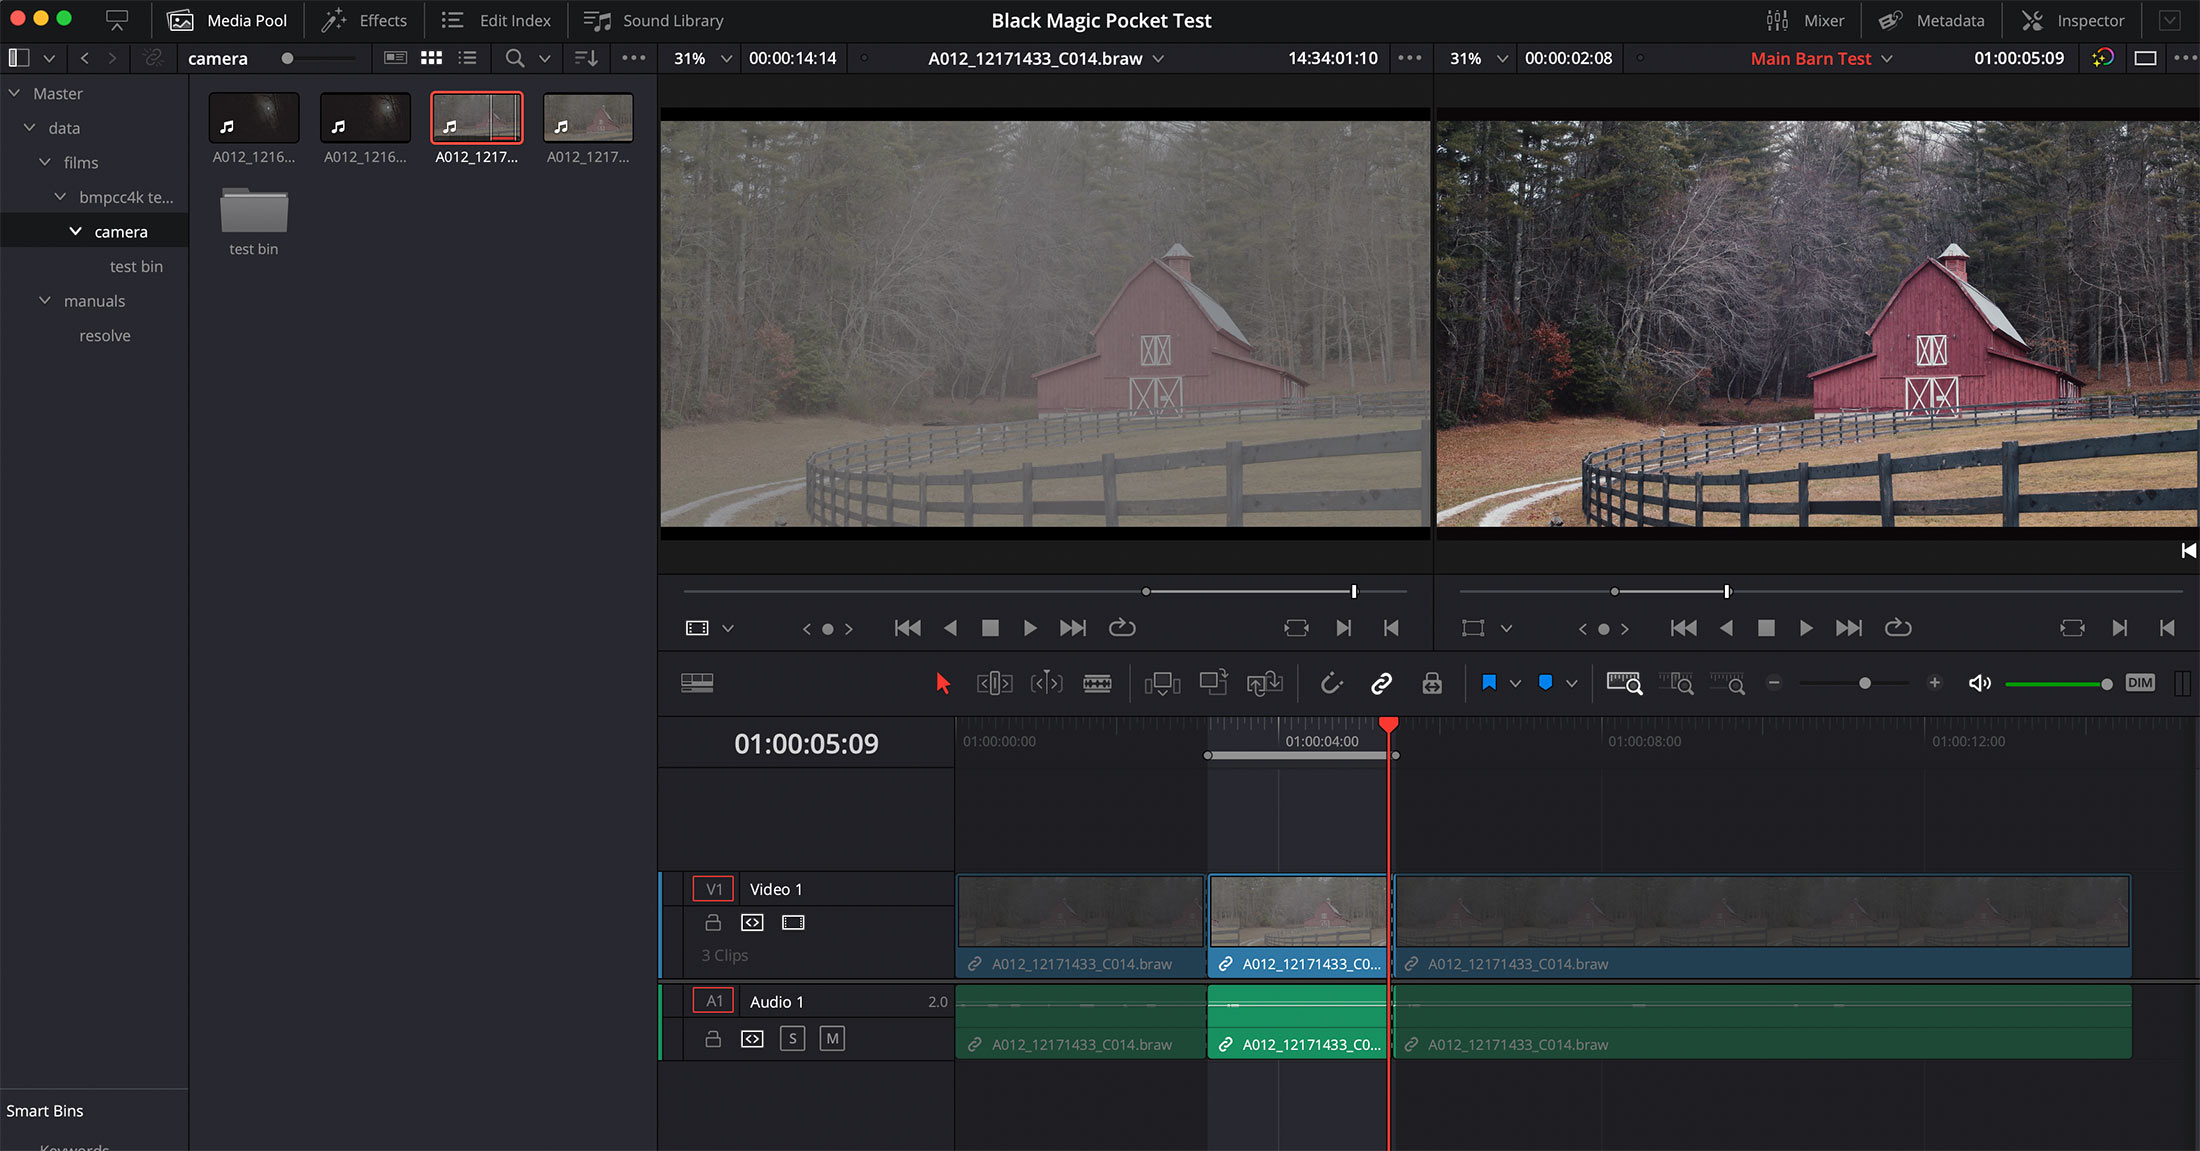
If you’re a filmmaker who cuts your own films, a common task using your NLE is to add edit marks in the timeline. In the world of DaVinci Resolve this is called ‘Splitting Clips’ or using the Blade Tool.
Split a Single Clip (Edit Page)
To quickly add an edit in DaVinci Resolve use the Blade tool. I’m assuming you already have media imported into Resolve and a timeline created with at least one clip. From the Edit Page in Resolve:
Click the blade icon to activate it (top left of timeline)
Hover over a clip in the timeline. Your mouse pointer will turn into a razor. Simply click to split the clip.
Enable the Razor or Blade Tool in DaVinci Resolve by clicking the icon over the timeline.
To disable the blade tool once enabled, simply hit "A" on your keyboard and it will deactivate.
Split Using Menu & Keyboard
If you’d rather use the menu or the keyboard, from the Edit page:
Move your playhead to where you want to split the clip and go to Timeline > Razor to add an edit at the playhead.
Hit Command B (blade tool or razor)
Hit Command \ (split clip)
Rejoin Split Clips
Sometimes you need to remove an edit mark. The great news is that it’s easy to do:
Position your playhead at the edit mark
Go to Timeline > Join Clips or Option \
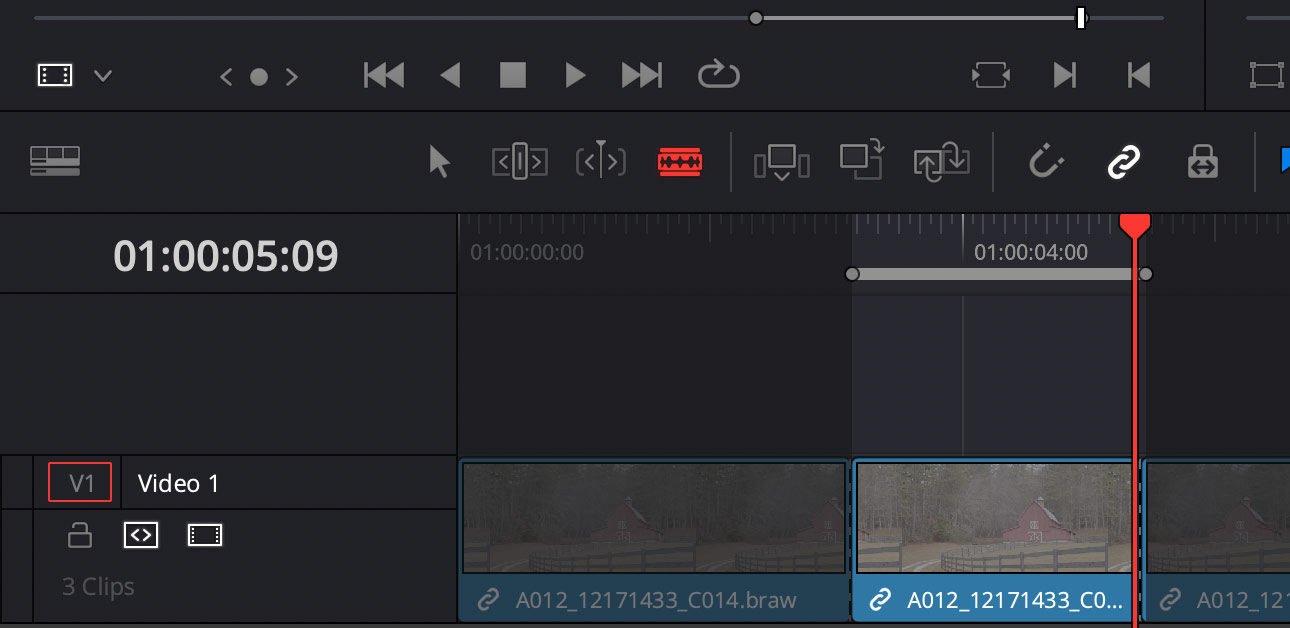
Remove Section After Splitting a Clip
A handy way to speed up cutting in Resolve is to use the split clip combined with the play head position to remove a complete section of a clip.
Cut down on your clicks by using Command + Shift + Bracket to perform faster edits.
Use the Razor (Blade) Tool to make an edit
Position the Playhead
Hit Command + Shift + Open Bracket to remove from the edit to the playhead
Hit Command + Shift + Closed Bracket to remove from the playhead to the next edit
Split Clip from the Clip Page
And yet another way to add an edit on your timeline is from the DaVinci Resolve Clip Page. Once on the clip page (second icon bottom of screen) position the playhead and then Control + Click on the very top. Then click the scissor icon to split the clip.
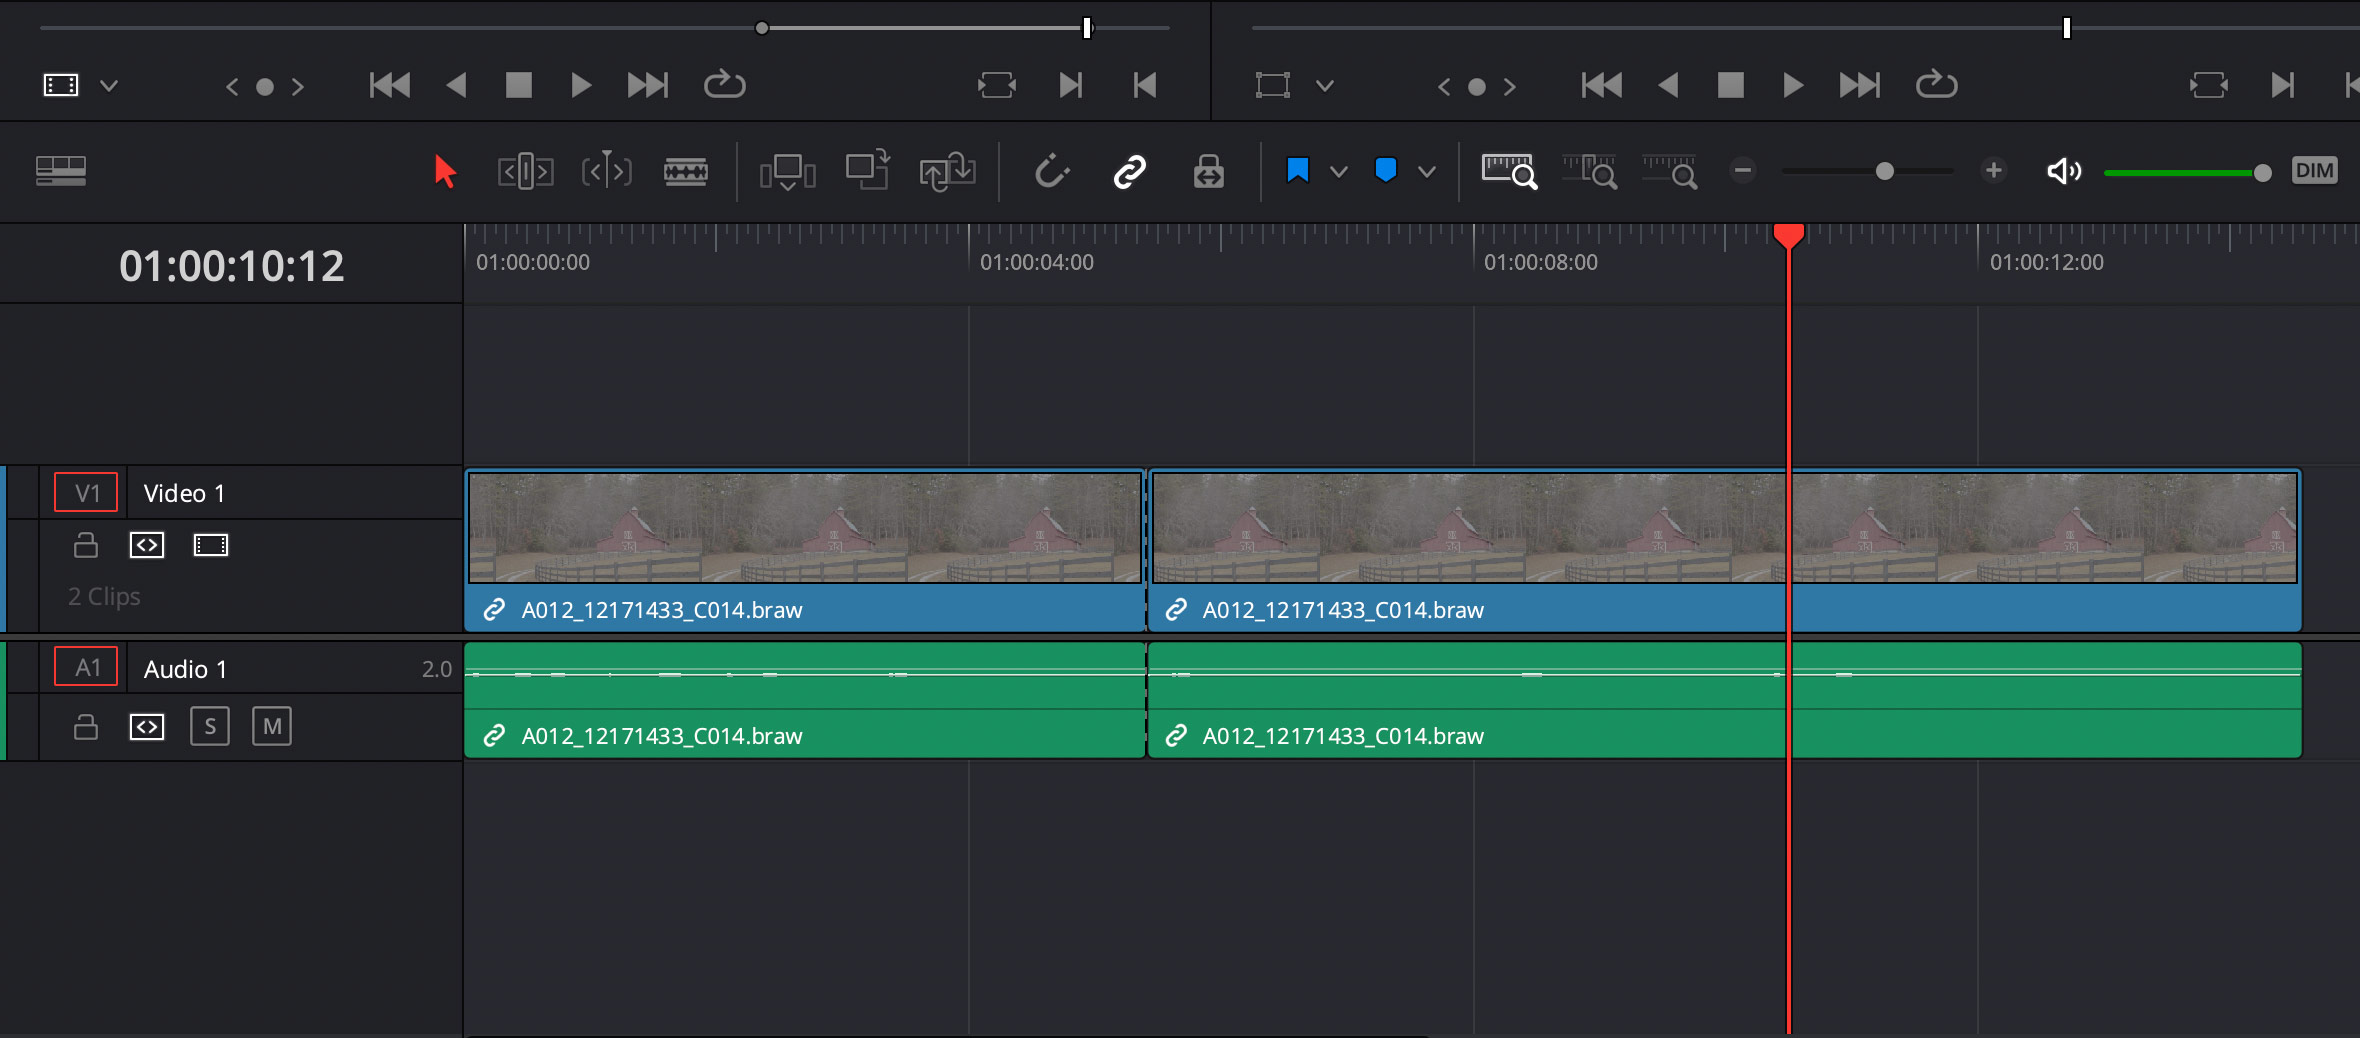
You may be wondering what the difference is between Razor, Blade and Split Clip. From everything I’ve seen, there essentially is no difference. They will all cut through multiple tracks at once. If you edit with the blade tool, you can still use the rejoin clip option from the menu.
Also, if you like to cut fast, mapping your own keys will make using the Blade tool even faster.
Setups and payoffs are crucial tools for a filmmaker.
They help your film feel fluid. Have you ever watched a movie that felt a little disjointed? More episodic than a cohesive story? Setups and payoffs can be a glue that helps your scenes stick together.
Setups and Payoffs also keep your audience closely involved in your story. They make your audience feel smart. Feel rewarded. Think back to a time when you “figured something out” in a movie. How’d that make you feel? Good right?
You need to give your audience this same experience.
Setups help your audience feel smart. Feel rewarded.
There are two main types of setups:
1) Imperative
2) Just for Fun
Imperative
Imperative setups are required for something later in your film to make sense. Want your hero to pull open a drawer and find a gun at the end? You’d better set that up at the beginning. Otherwise, your audience is going to call foul.
But here’s the trick: Setups must be entertaining, not exposition.
You can’t throw in setups that don’t provide story or character value. Meaning, if you took away the payoff, the setup should still stand on its own.
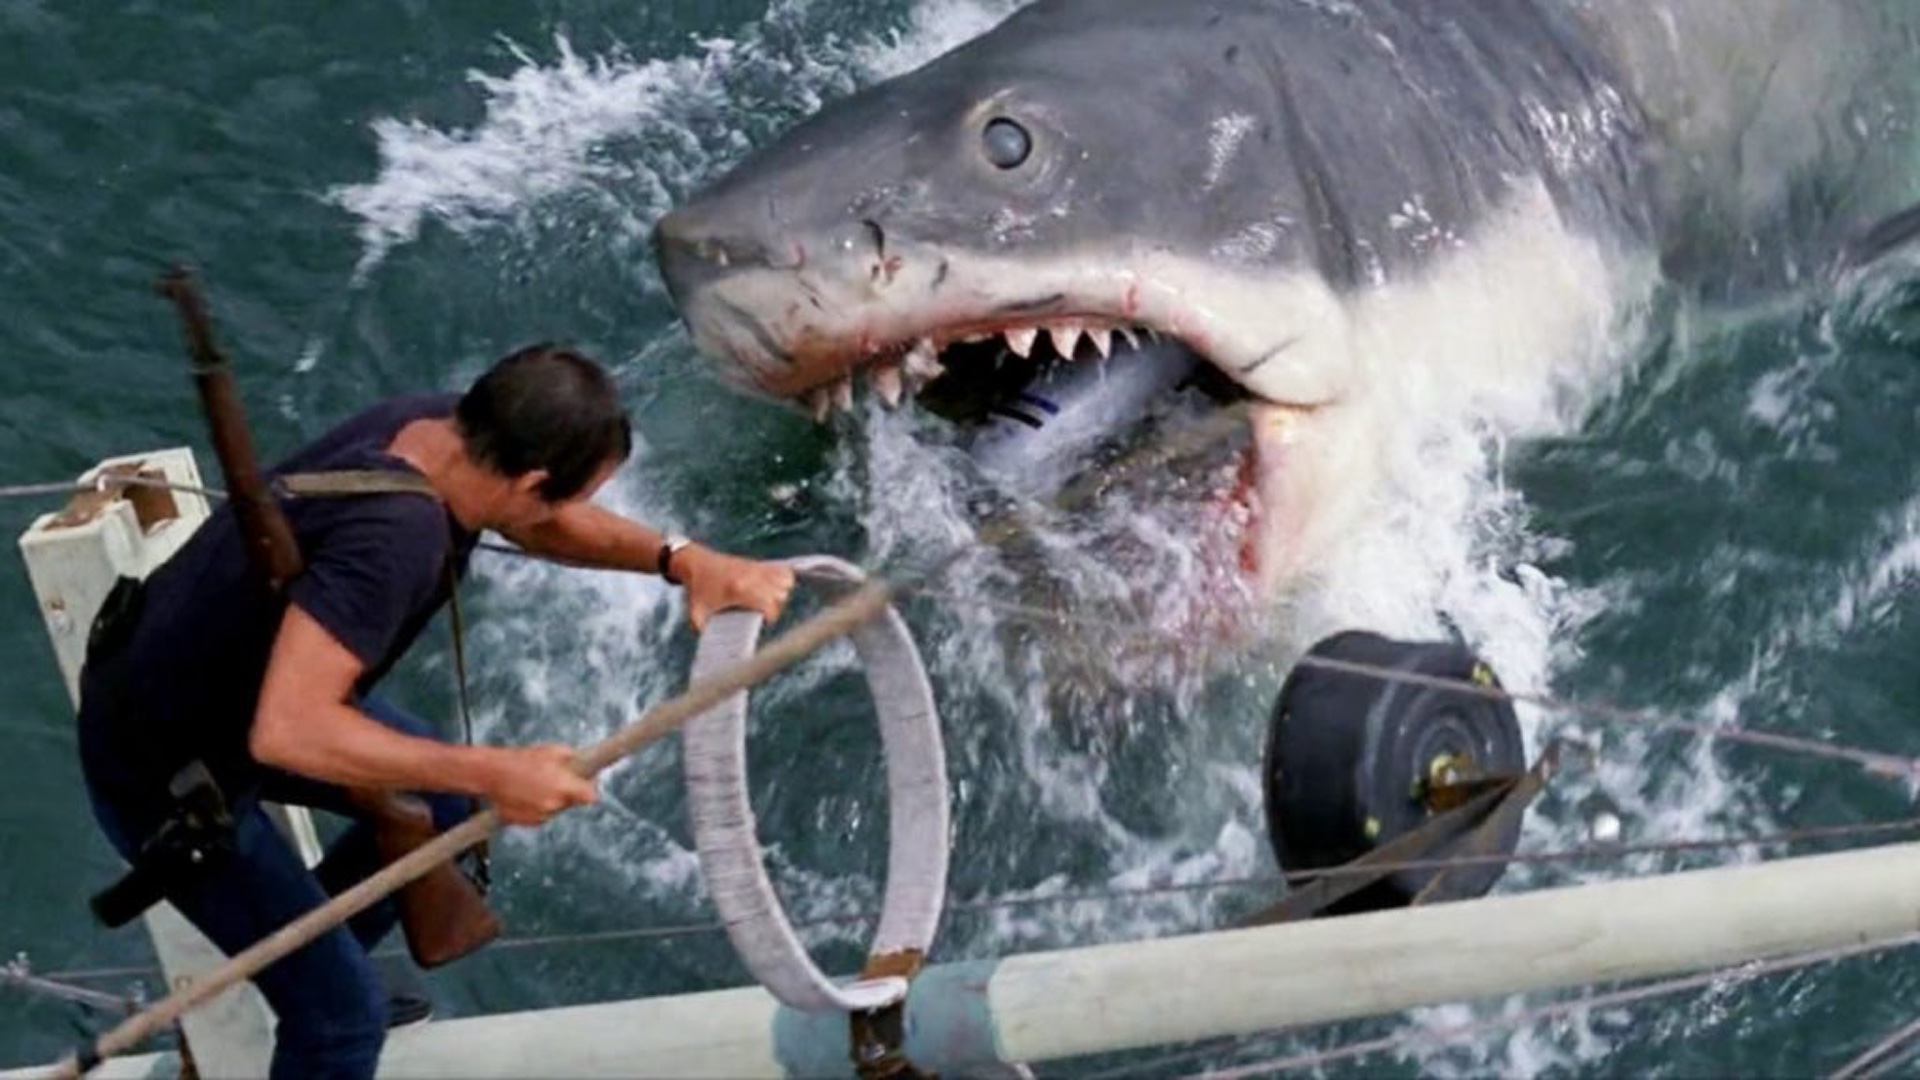
Chief Brody ends up shooting the oxygen tank to kill the shark | Image Copyright Twentieth Century Fox
Example from Jaws:
Chief Brody kills the shark by shooting a scuba tank that explodes, right?
We buy this because earlier in the film, Hooper freaks out when they drop one of his scuba tanks. He rants about how they’re highly pressurized and dangerous. So later when we see the tank explode, we just accept it.
The setup worked as a stand alone event because there was conflict between Hooper and Quint, the captain of the boat. Quint thought Hooper’s tech stuff was dumb and useless. So when the scuba tank isn’t treated with respect, it’s natural for Hooper to lose it.
You can’t throw in setups that don’t provide story or character value. A setup must stand on it’s own.
And the beauty of this entire setup in Jaws? In real life scuba tanks can’t explode if you shoot them. Spielberg (or the writer) knew they had to set this up or the entire ending of Jaws wasn’t gonna work.
Yikes, right? If nothing else shows the power of a setup, this does.
Just For Fun
So what’s an example of a just for fun setup?
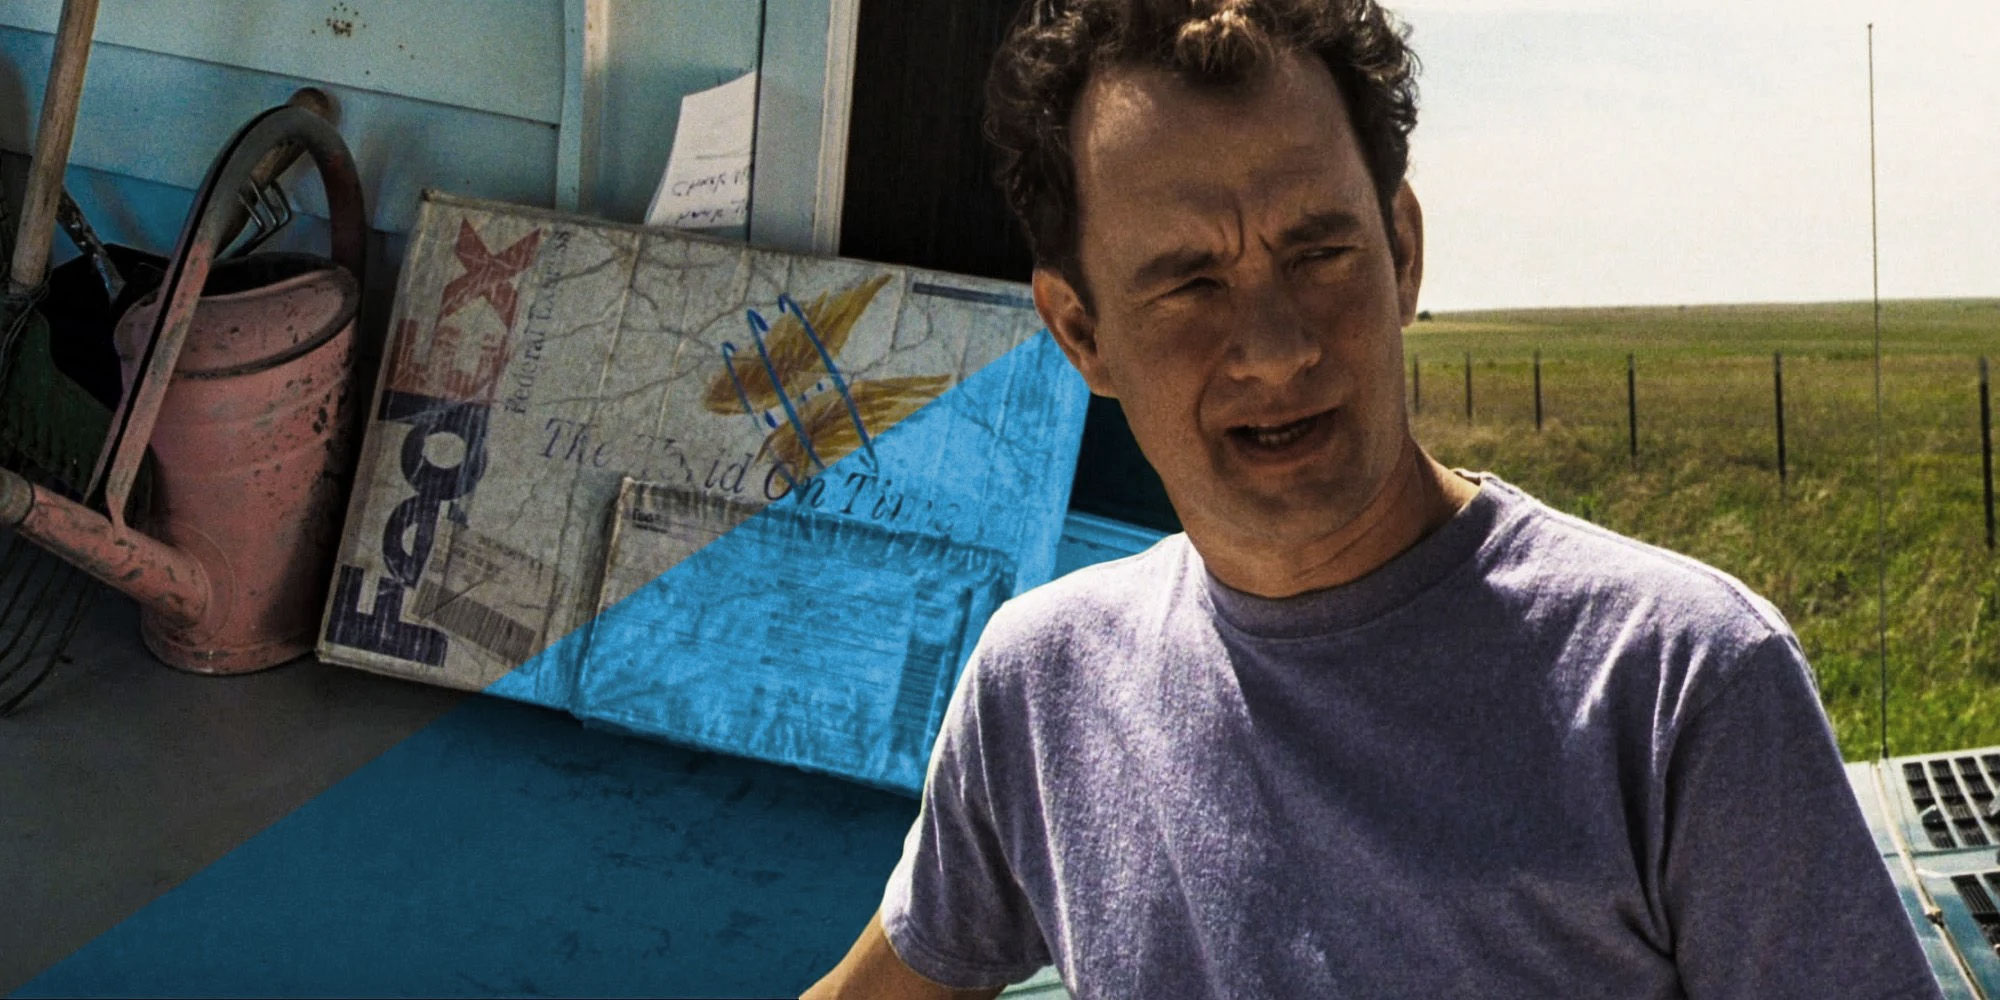
An excellent one is found in Cast Away. Chuck Noland has a tooth issue at the beginning of the film, and this has a massive payoff later when he’s stuck on an island and has to play dentist all on his own. This didn’t change the story in any way, but it added drama that I guarantee made every audience member squirm.
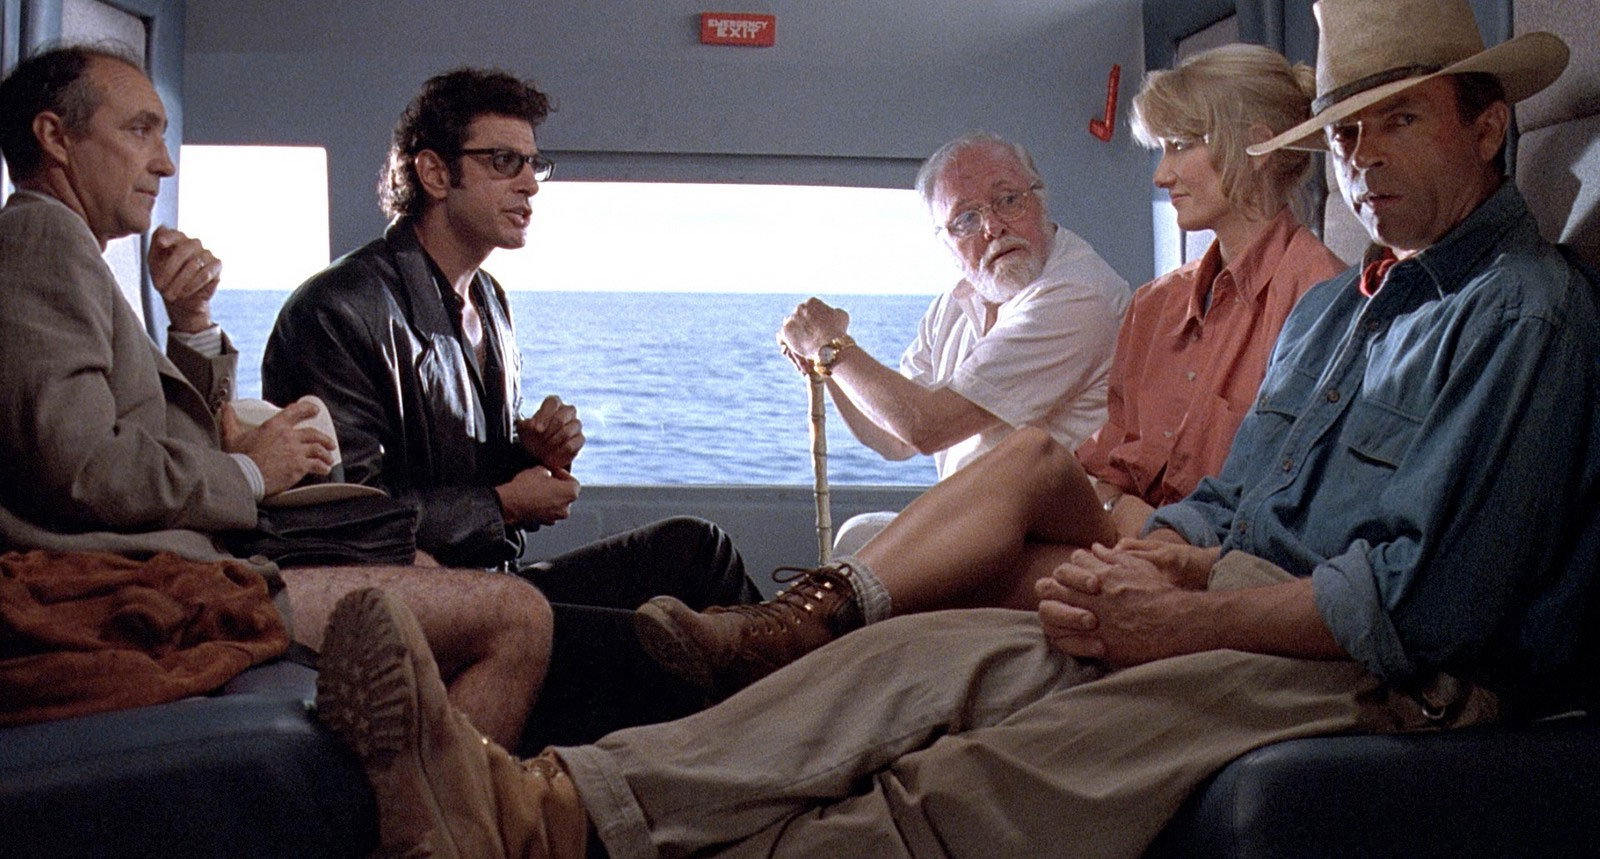
Grant’s struggle with the seat belts is a setup for Nature Finds A Way | Image Copyright Universal Studios
Another fun setup and payoff is found in Jurassic Park. When they’re in the helicopter Dr. Grant can’t find the correct ends for his seat belt, so he takes two female ends and ties them together.
This worked independently because it fit his personality. He hated technology and gadgets. He lives in the past, not the present. Anything modern just doesn’t work for him. So this was a comedic character moment.
However, it’s an incredible setup for the end of the film when they realize nature would find a way, and babies were born even though all of the dinosaurs on the island were bred as females.
This setup wasn’t required for the ending to make sense. But it was a fun setup for those audience members who were paying attention.
Cast Away Setup & Payoff | Image Copyright Twentieth Century Fox
My All Time Favorite Setup
My absolute favorite setup is also found in Cast Away. If you haven’t watched the movie, I’m not going to ruin the setup and payoff for you. But it’s subtle and incredible because it makes you as an audience member feel really, really smart when you figure it out.
This was a gem that Robert Zemeckis put in his film for audience members who were really paying attention to the story. I’ll give you a hint, it has to do with angel wings.
Do you want to become a filmmaker? Do you want to write and direct movies?
If so, the common thought is to go to film school. But is that the right choice? Is going to film school really worth it?
I attended film school in the heart of Hollywood. My directing teacher was a member of the DGA. My sound design teacher worked full time on Law and Order during the day and taught us at night. My editing teacher cut Blazing Saddles.
Needless to say, I learned a lot.
But what film school didn’t prepare me for was the sobering reality of what life would be like after graduation.
Los Angeles is saturated with people trying to break into the entertainment industry.
The Harsh Reality of Hollywood
Los Angeles is filled with people trying to make it in the industry. Just go to a restaurant and ask your waiter or waitress where they’re from and what they’re doing in LA.
So many talented people end up working jobs not even related to filmmaking just to pay bills while trying to break in. Some give up. Others finally get an industry job, only to be stuck for years in a position they never really wanted.
And guess what? If you want to write and direct the odds are even more against you.
Film school didn’t prepare me for the sobering reality of what life would be like after graduation.
What am I saying? That it’s impossible?
No way. If you really want to direct movies, nothing can stop you. Nothing. But if you want to write and direct movies, film school may not be the silver bullet you think it is.
Film school can offer a lot of top dollar gear and exceptional training. They can’t get you a job.
The Typical Film School Scenario
So is film school worth it? I’ll let you decide. Here’s a normal scenario based on my experience in attending school in Los Angeles: First, you’ll spend anywhere from $30K to $100K on your education. And school will take you 1-4 years.
After graduation, when you’ve screened your thesis project and all of the hurrah is done, you’ll be hit with one sobering fact: Nobody is going to hire you to direct a movie.
After graduation you’ll be hit with one sobering fact: Nobody is going to hire you to direct a movie.
Your shiny new degree will not land you a job in the film industry. I’m not against degrees. But like it or not, Hollywood doesn’t care about where you received your education, or even what your education is. It just doesn’t matter.
What does matter?
1) Your experience matters.
2) Your credits on IMDb.
3) Your audience.
How do you gain experience, obtain credits on IMDb and build an audience if no one will hire you?
By doing it yourself.
But how can the average person afford to make movies for free after sinking thousands of dollars into school?
When I graduated from film school I had over $60K of school debt, which meant I didn’t have the luxury of buying equipment and making movies. I had to get a job. This delayed me considerably.
So what’s the solution?
The Answer for Upcoming Filmmakers
In 2020 when wrapping post production on a film something dawned on me: I should teach people how to make movies. This was the beginning of Write & Direct.
My goal is to liberate you from the normal film school grind. I want you to spend a small amount of money on your education so you have money left over to pay rent, buy food and start making movies.
Write & Direct teaches new filmmakers how to make a movie the right way, from development through post production. The Hollywood landscape has changed.
Robert Rodriguez said this:
“Being creative is not enough in this business. You have to become technical. Creative people are born creative. You’re lucky. […] Too many creative people don’t want to learn how to be technical. So what happens? They become dependent on technical people. Become technical. You can learn that. If you’re creative and technical, you’re unstoppable.”
With Write & Direct you’ll gain more practical knowledge about making movies from start to finish than you will from most of the film schools out there. And you’ll learn it in a way that accelerates your career.
The Elephant in the Room
The obvious question most people are asking right now is, why should anyone listen to me? I’m not Steven Spielberg, Kathryn Bigelow or Edward Zwick. I haven’t won an Oscar or directed a major studio film.
So why should you listen to me?
Because first and foremost, I’m an active filmmaker who understands what it takes to make a good movie. I’ve written, produced, directed, edited, done sound design and much more. I have IMDb credits on both feature length and short films.
I know from personal experience what you need to know to get started as a filmmaker.
It’s Not For Everyone
There’s a huge problem with Write & Direct: It only works for self-motivated people. People who are willing to sacrifice. Who have an unstoppable passion for film.
Yes, I’m here to teach you every step of the process. Yes, we have a growing community that will support you. But at the end of the day, you have to do this. You have to commit. This applies to your filmmaking career regardless of how you learn.
If you’re not in this for the long haul, honestly, you probably should look at another career. Don’t make movies. Get a more predictable path. An 8-5 punch the clock life.
If you want to be a filmmaker more than anything else, Write & Direct is your ticket to getting there faster.
But if that’s not you, and you want to be a filmmaker more than anything else, Write & Direct is your ticket to getting there faster.
It will require sacrifice. You’ll have to give up time hanging out with friends. Skip that vacation. Spend money on a microphone instead of the latest toy or gadget.
Your friends may not understand. They might call your dream a “hobby.” But it doesn’t matter. Only you understand your passion. The drive to make movies.
Are you ready?
You can get on the waiting list using the form at the bottom of this page. Write & Direct will launch in the first quarter of 2022!
Robert McKee calls it the inciting incident. Blake Snyder called it the catalyst. Regardless of the term, it’s present in every good film you’ve ever watched. You could even consider it the most important structure point of any screenplay.
But wait…who am I kidding? All structure points are crucial. You really can’t live without any of them. But the inciting incident kicks off a movie like nothing else.
Flawed Heroes
To understand the inciting incident we first must realize that our heroes have flaws. It doesn’t matter if it’s Bruce Wayne, Black Panther, Erin Brockovich or Lightning McQueen. It doesn’t matter how much we love them. Every story is about a flawed hero who embarks on a journey of transformation.
But there’s a problem — Our heroes are human. Or they’re a car endowed with human traits. A common weakness of humanity is a lack of desire to change.
Think about it: Most of us are quite happy with how things are. This doesn’t mean we don’t want others to change. Or our situations to change. It doesn’t mean we don’t want to increase our skills or become smarter, faster or cooler.
Our heroes have flaws. It doesn’t matter if it’s Bruce Wayne, Black Panther, Erin Brockovich or Lightning McQueen
But what about the real stuff? The deep down stuff that we know isn’t quite right? Typically we don’t go there unless something big hits us up the side of the head. Then, as the fog clears, we realize something needs to change, and 99% of the time it’s us.
The Event Before the Crucible
As story tellers, how do we push our protagonist into a journey of transformation that they don’t want to embark on? By creating an event that hits them so hard there’s no going back. An experience that turns their reality upside down. It must be big. Life altering.
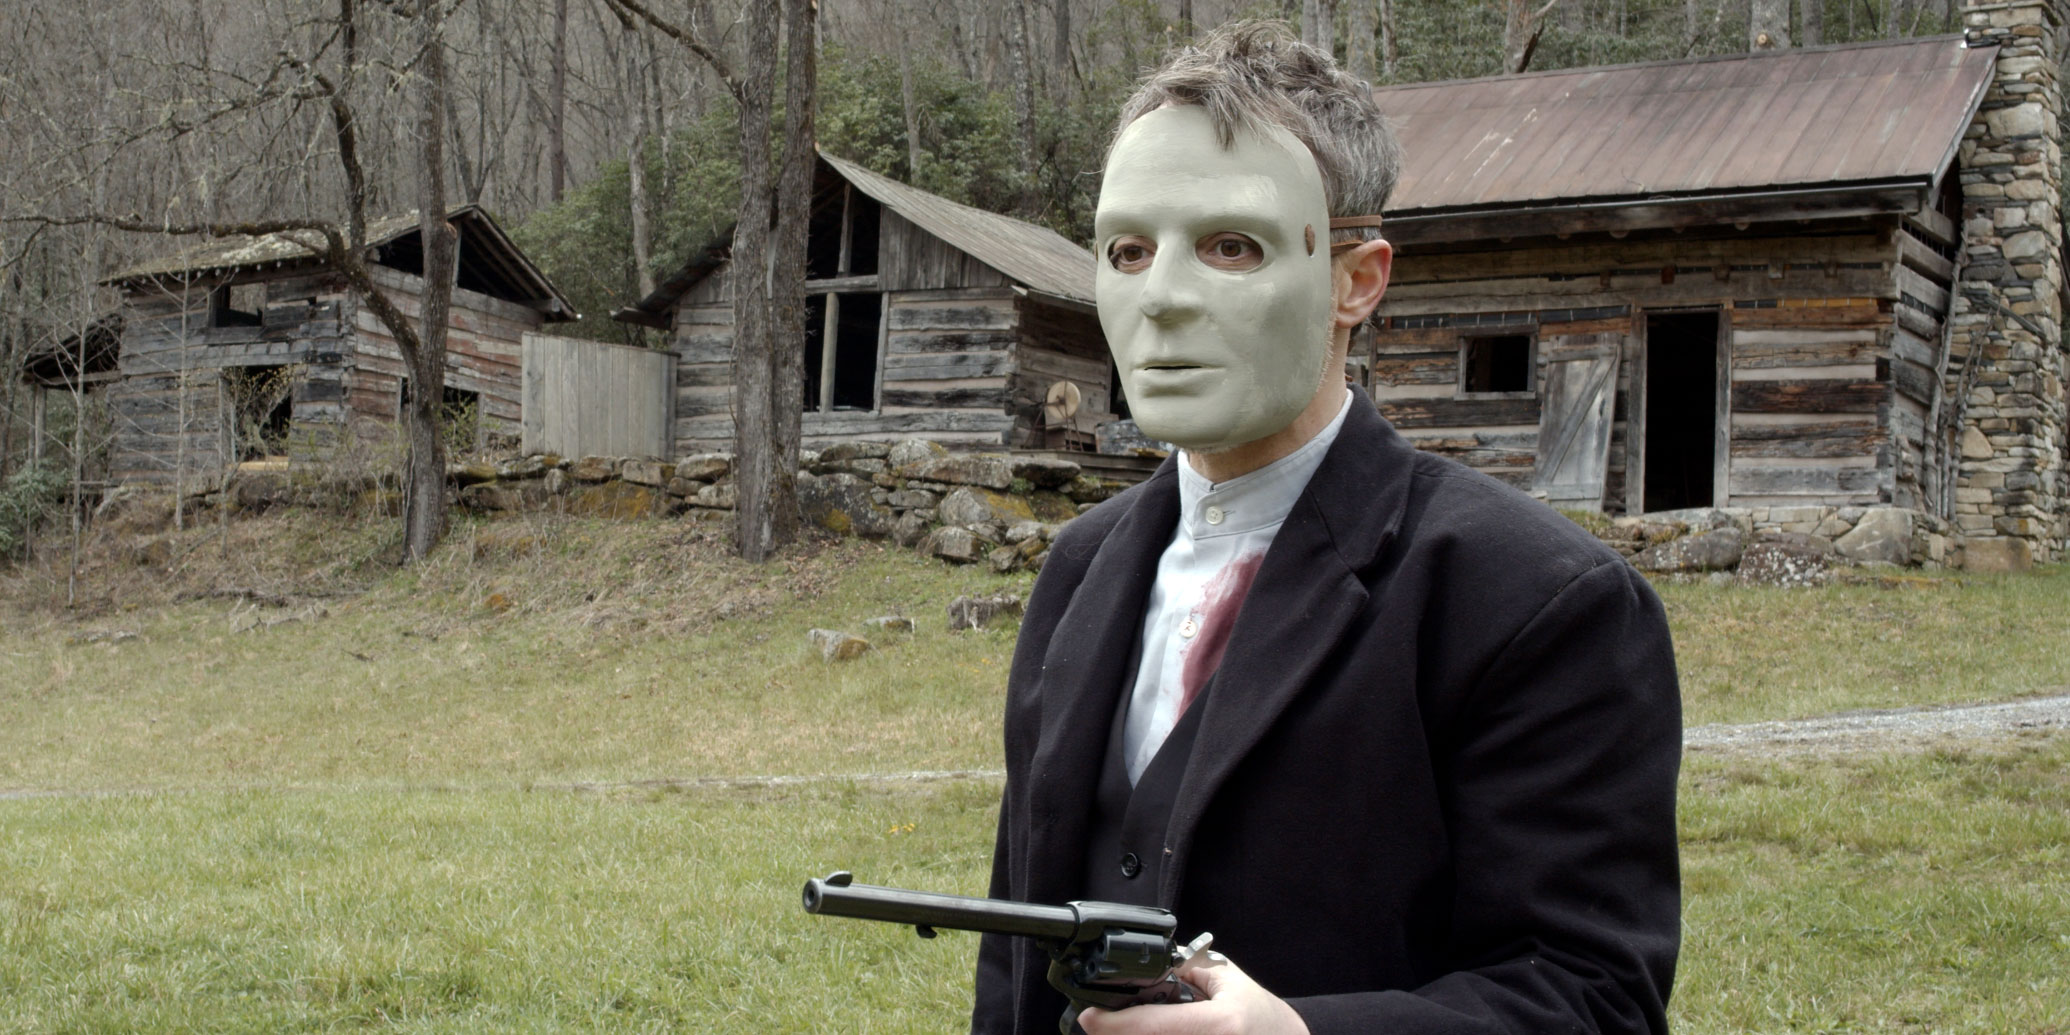
Rose Lawson witnesses the murder of her parents and her journey of change begins.
In the short film Rose and the Outlaw, Rose witnesses the murder of her parents. This event launches her onto a journey of change where she must transform from fearful girl to grasping the courage to face her biggest fear.
Stick in your favorite 4K Ultra HD Blu-ray and watch the first few minutes. Whether it’s a romantic comedy, drama or action flick, something will happen to the hero that changes everything.
Let’s consider a few studio examples:
Jaws (1975)
When Chief Brody finds the remains of a woman on the beach, his world goes from small town parking tickets to dealing with a killer shark. As the audience we know right then and there that the sheriff and the shark are going to meet. Chief Brody’s world has changed.
Star Wars (1977)
When a disgruntled farm boy named Luke works on cleaning a couple droids, he has no idea what’s about to take place. Soon a message intended for a Jedi Knight named Obi-Wan Kenobi pops up and Luke’s world flips upside down. And we all know Hasbro is glad it did.
A hacker named Neo is snoozing at his computer when Trinity hacks in and tells him to follow the white rabbit. Soon Neo meets Trinity and discovers The Matrix is real. Neo’s life will never be the same.
Gladiator (2000)
When Marcus Aurelius tells Maximus he wants him to become the leader of Rome, Maximus is shoved into a journey of transformation. We realize Maximus will have to sacrifice his life for the betterment of Rome. We just don’t know how it’s going to happen — and neither does he.
When a Hero Doesn’t Change
Most American films are about heroes who change. Neo becomes The One. Chief Brody blows up the shark. Maximus sacrifices his life for what’s right. However, some films are about people who refuse to change.
Take Michael Mann’s Heat for example. The film is about a protagonist (Al Pacino) and antagonist (Robert De Niro) who remain in their flaws and refuse to change. The good guy loses his most meaningful relationship while the bad guy loses his life. All because they couldn’t prioritize what’s meaningful in life. They refuse to change, and their worlds fall apart.
It’s Not Just For Films
Now that you know more about inciting incidents, watch for them in movies. And here’s the scary thing: they happen in real life too. If you sense an inciting incident in your own life, consider how it can change you for the better. Embrace the journey. Just like our heroes are better off when they transform, we are too.
You just typed “FADE TO BLACK” on your script. Congrats! But your script isn’t quite ready for production. A film production must run off of a locked script, so everyone has the same information. Everything is about the story, and if there are different versions of a story floating around, things become complicated.
But what if changes need to be made to a script during while shooting? It happens all of the time. Here’s what you need to do:
1) Enable Scene Numbering
Before locking your script you’ll need to add scene numbers. Why? Because a production runs off page and scene numbers. When you’re on set, talking to your Director of Photography (DP) about part of the script, you want to be able to say, “Look at scene eleven, for this I’m thinking…” To do this, you need scene numbers.
If you’re using Final Draft, go to Production > Scene Numbers.
In Fade In go to Production > Scene & Element Numbering > Check Show Numbering.
You’ll see the numbering appear typically on the left and right sides of your script page.
Bravo. But what happens if you need to make changes to a script once production starts?
2) Lock the Script
In an ideal world you’d finish your script and never make any more changes. This never happens.
When you lock a script, page numbers and scene numbers remain unchanged even if you add or remove content from the script.
Example, let’s say you want to add a new scene between scenes 3 & 4 in your completed script. The proper way to do this is add it and label the scene as 3A. This will also bump page one onto a new page called page 1A. Then all subsequent scenes and pages remain exactly the same.
If you added two new scenes between scenes 3 & 4 they would be 3A and 3B. You get it.
The good news is Final Draft and Fade In can handle this for you. Here’s how you lock a script in each:
In Final Draft go to Production > Lock Pages. You’ll see a small lock appear on the upper right of the script. Now your pages and scenes are locked. If you add a new scene heading in between two existing scenes, you’ll se that Final Draft doesn’t change the scene numbering – it leaves the new scene without a number. You can then click Production > Edit Scene and name it correctly.
In Fade In go to Production > Lock Page Numbers. This locks the pages. Next, to lock the scenes click on an actual scene heading in your script and go to Production > Lock Element Numbers. When you do this Fade In will auto-increment your new scenes for you with the corresponding letters.
3) Track Revisions
What happens if you change a scene that already exists? You need to tell Final Draft and Fade In to indicate this.
In Final Draft go to Production > Revision Mode. Everything you change or add will be marked with an asterisk. You can also manually do this by highlighting the text and going to Production > Mark Revised. To change page colors, this is done under Production > Revisions.
In Fade In go to Production > Revisions and choose the revision color. This will also place and asterisk and change the color of the text.
4) Script Revisions During Production
When changes are made to the script during production, everyone must be alerted to what has changed. To do this, you pass out page revisions that are color coded.
For example: If you were two days into shooting a film, and you made changes to page 5 of the script, that page would be reprinted on blue paper. If you made changes to page 5 again, it would be printed on pink. Then yellow. etc. Everyone in Hollywood knows the color order of revisions. Here they are:
Some TV shows have adapted their own versions of the above. But this is the official list from the WGA.
Cool, that all makes sense. But how do you track it all? Final Draft and Fade In can do this for you.
Here are the steps to prepare your script for production:
It Happens to Everyone
No production ever has a script that isn’t tweaked while shooting. So even though it’s a little unnerving to lock your script, you just need to bite the bullet and do it! It’s not as difficult as it may seem.
So you’ve got a locked script — Congrats! Now it’s time to break down your script.
Why do we do this? It helps you plan and ensure every detail is addressed for the first day of production. You don’t want to show up on set only to realize a needed prop isn’t there, someone’s costume didn’t arrive, etc.
Breaking down the script takes every single part of a screenplay, and categorizes each required item in order to assign to proper departments. On a typical film production, the 1st AD (1st Assistant Director) is the one who has the honors. But in the land of independent film, it’s often the director executing the task.
1) Divide Your Pages into 8ths
Script pages are viewed in 1/8s. If you’re discussing a scene with a department head, you wouldn’t say it’s just over a page, you’d say it’s a page and 2/8s, or whatever.
One page of script typically translates into one minute of screen time, so dividing the pages into 8ths provides extra precision. Some people might even get a ruler out and divide pages up into one inch sections. That’s hard core — whatever works best for you. Just be aware of the process.
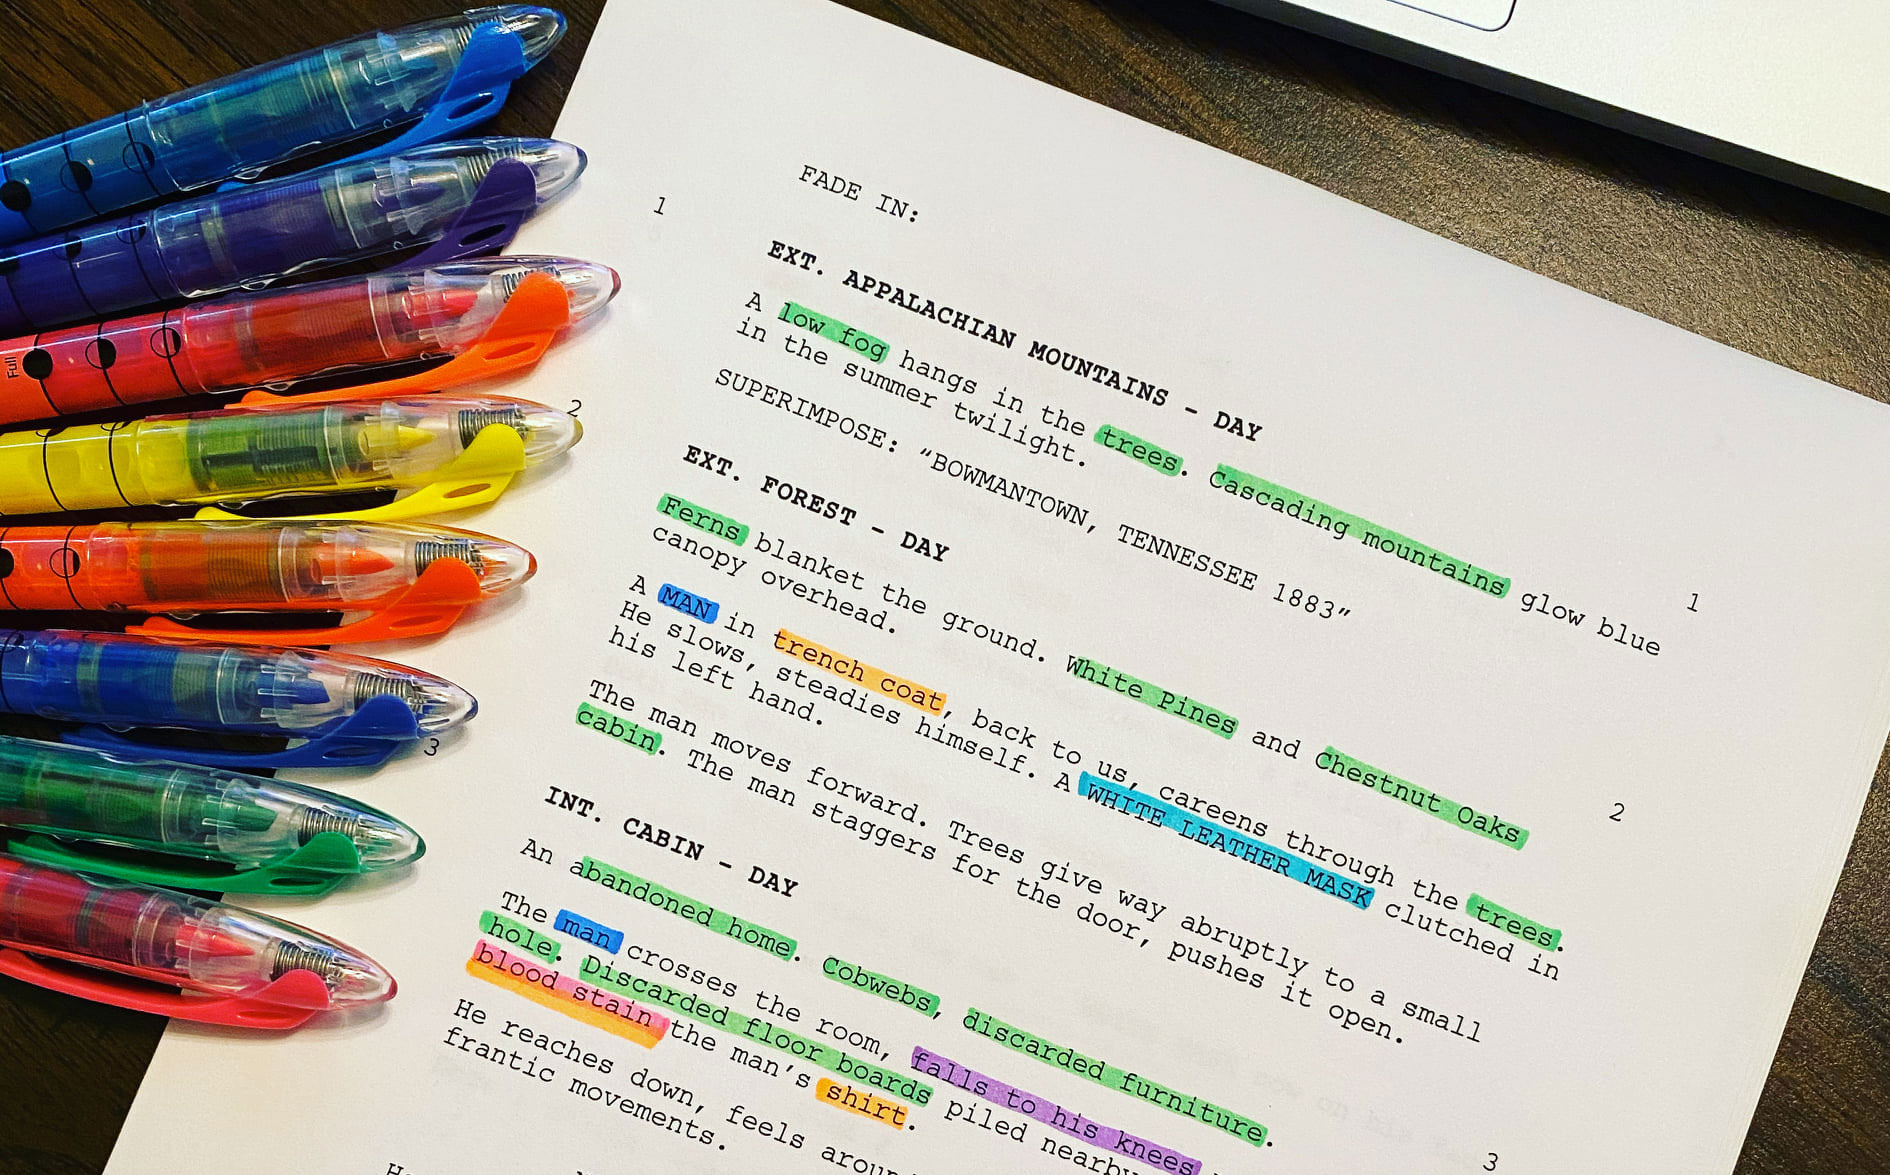
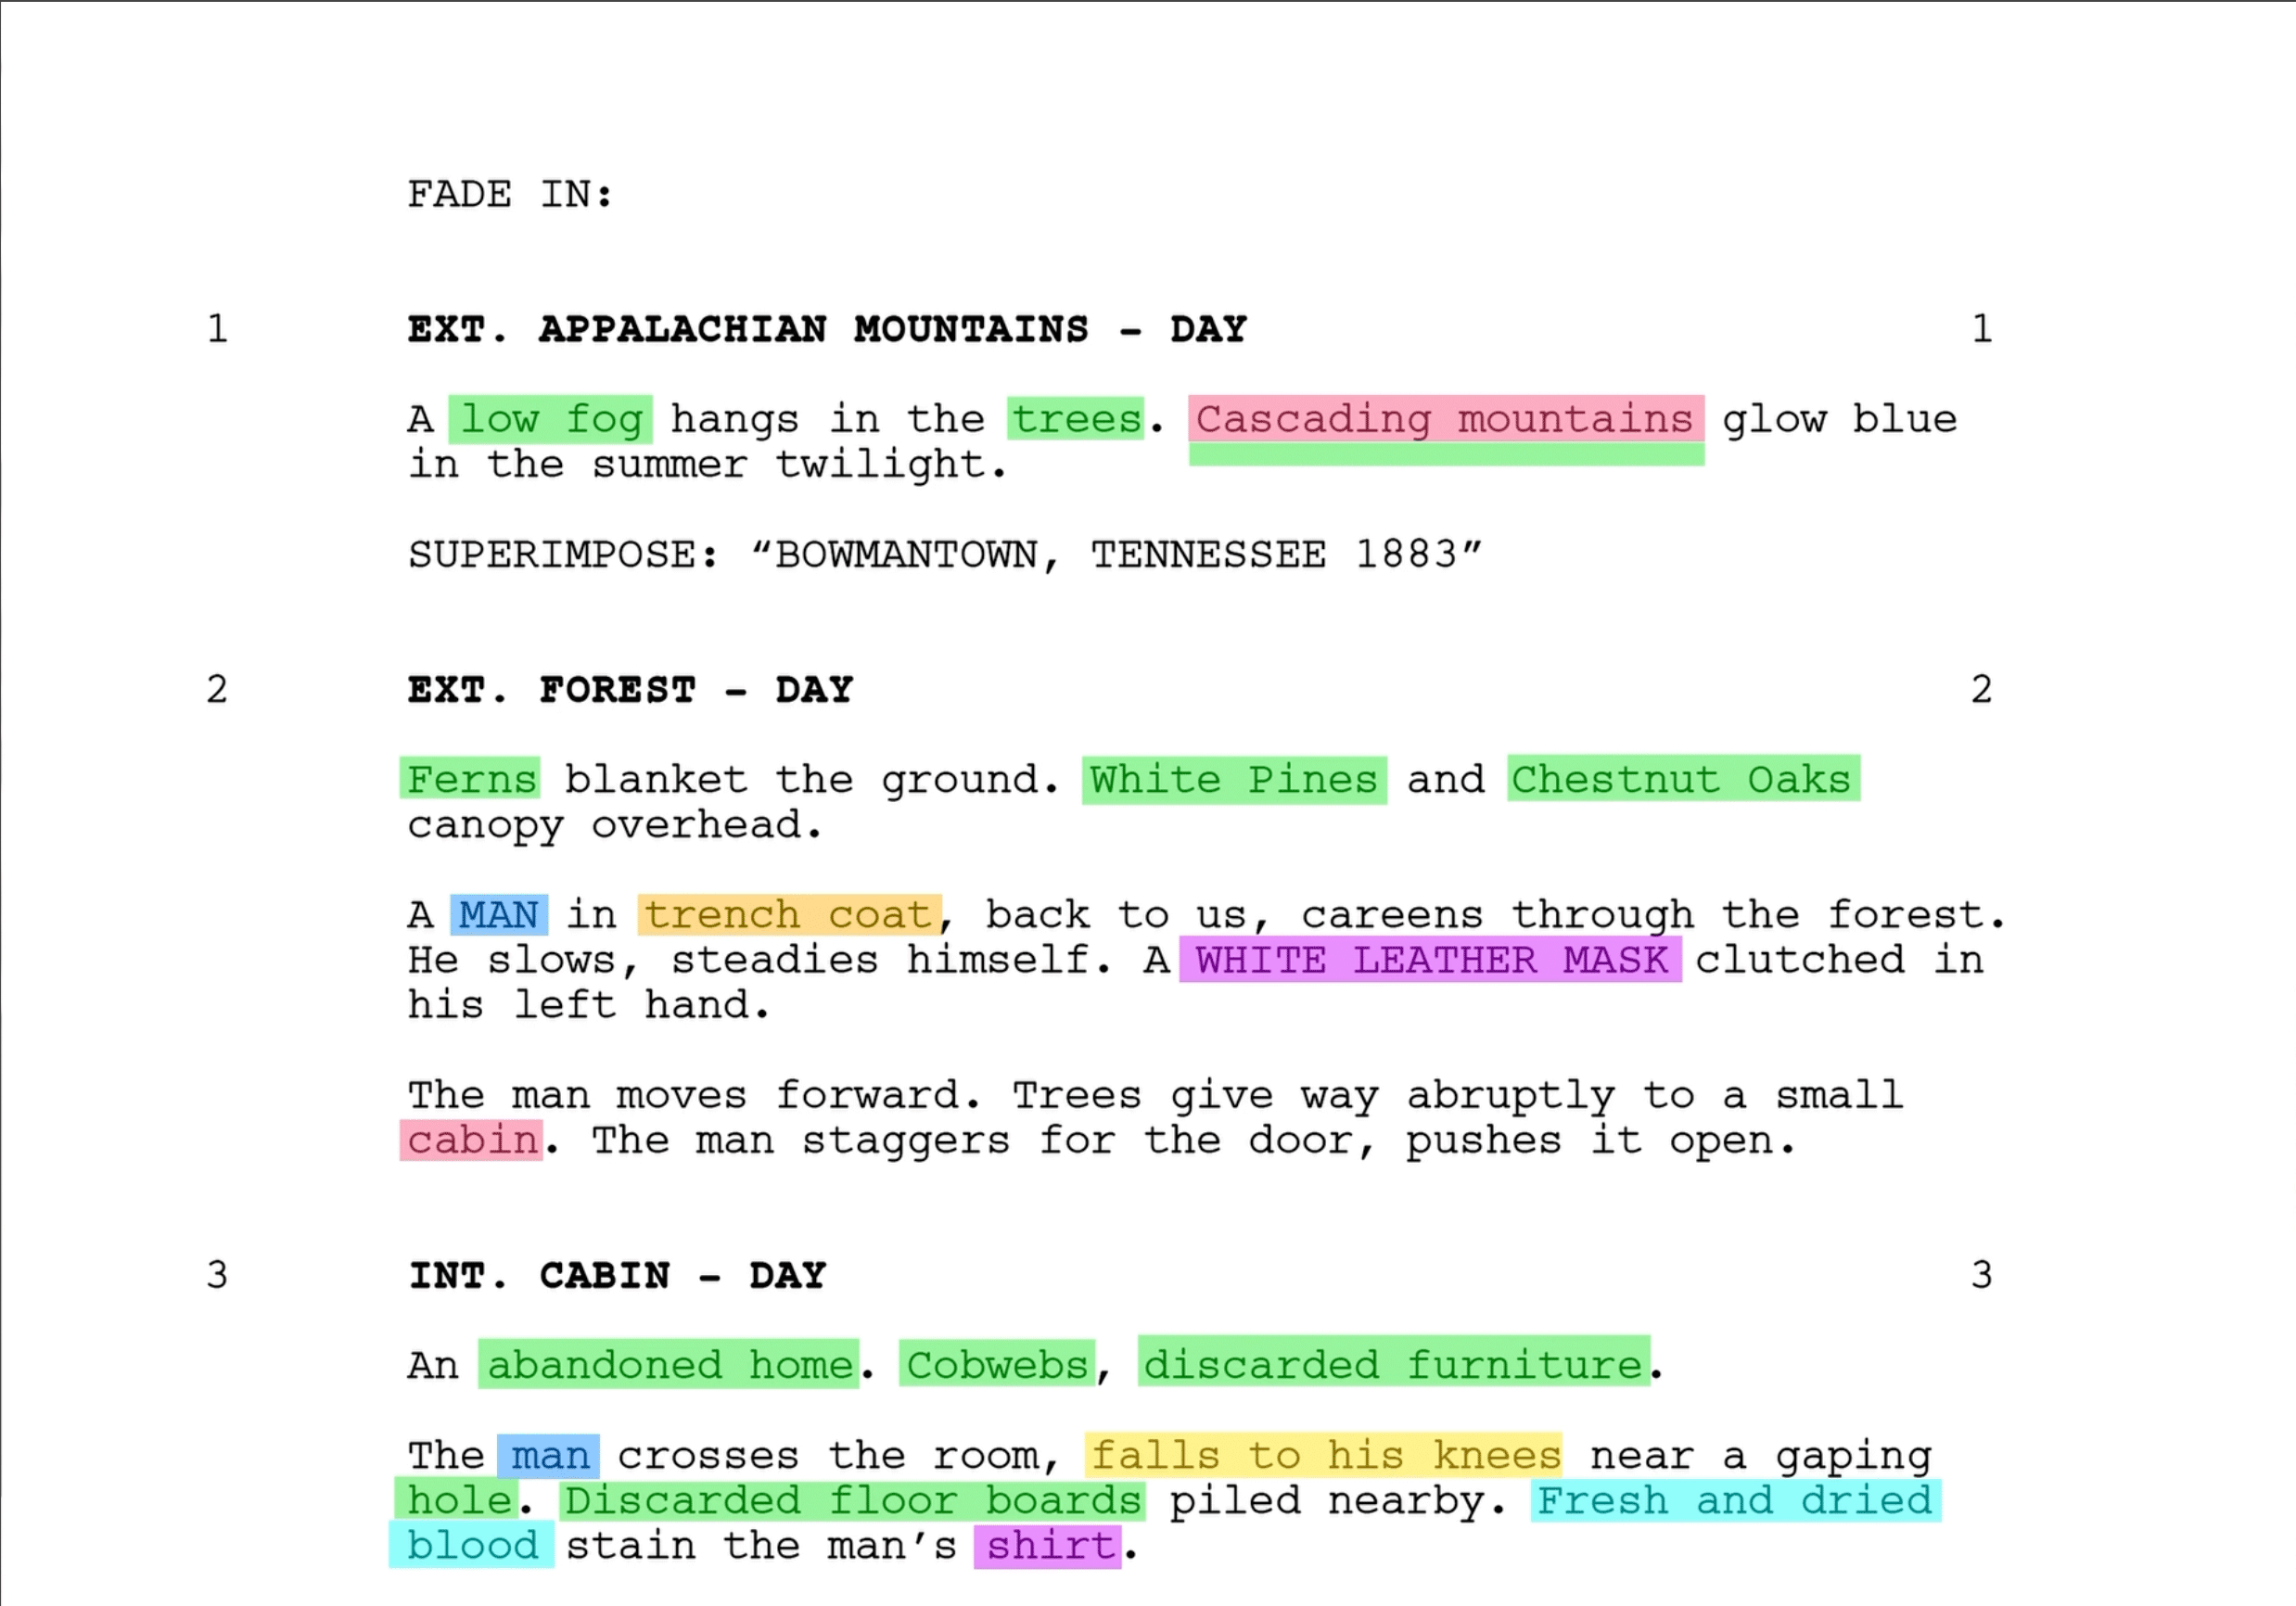
2) Grab The Highlighters
It’s time to print your script, grab the highlighters and identify all the things that need to be addressed by different departments. With a short film, you’re often all the departments, but this still helps you get everything planned out and done.
Here are common things you’ll identify in your break down:
Cast Members
Costuming
Props
Stunts (anything other than walking is a stunt)
Animal Wrangler
Set Dressing
Extras
Special FX
Make Up
Locations
There is no official color chart, so you can come up with your own. Just assign a color value to each specific item in your script. For example, if you assign GREEN to locations, then every part of the script that requires a specific location will need a green underline
*Note: Some parts you’ll be underlining with more than one color. That’s normal.
3) Fill Out Breakdown Sheets
The final step is to fill out a script breakdown sheet for each scene.
On the sheet you’ll list the scene number, location and other important items identified in step 2. I’ve attached a script breakdown sheet PDF that’ll get you going.
Now you can distribute the breakdown sheets to appropriate department heads so everyone knows what they need to do during pre-production. The breakdown sheets also assist during production to ensure all people, props, costuming and production design are ready for the shoot.
So that’s it! Now you know how to break down a script, which is a crucial pre-production task that will save you a lot of stress once production hits.
After a screenwriter is done writing the script, who do you think sees the movie first?
The Director.
Part of the director’s job during pre-production is to “see” the entire film ahead of time. By this I don’t mean some relaxed, dreamlike state on a beach sipping tropical drinks. It’s a meticulous task of visualizing every shot for every scene of the movie. This is done via story boards and a shot list.
A director must visualize the entire film ahead of time. It’s meticulous shot by shot planning.
Stick in one of your favorite films, watch the first 5 minutes and count every time the camera cuts to a different shot. A prepared director sees all of this before anyone’s holding a camera.
So you’re a one-man crew? You still need to plan your shots. Waiting until you’re on set will cause you to end up with a film that isn’t what it could have been.
As Louis Pasteur said: “Fortune favors the prepared mind.”
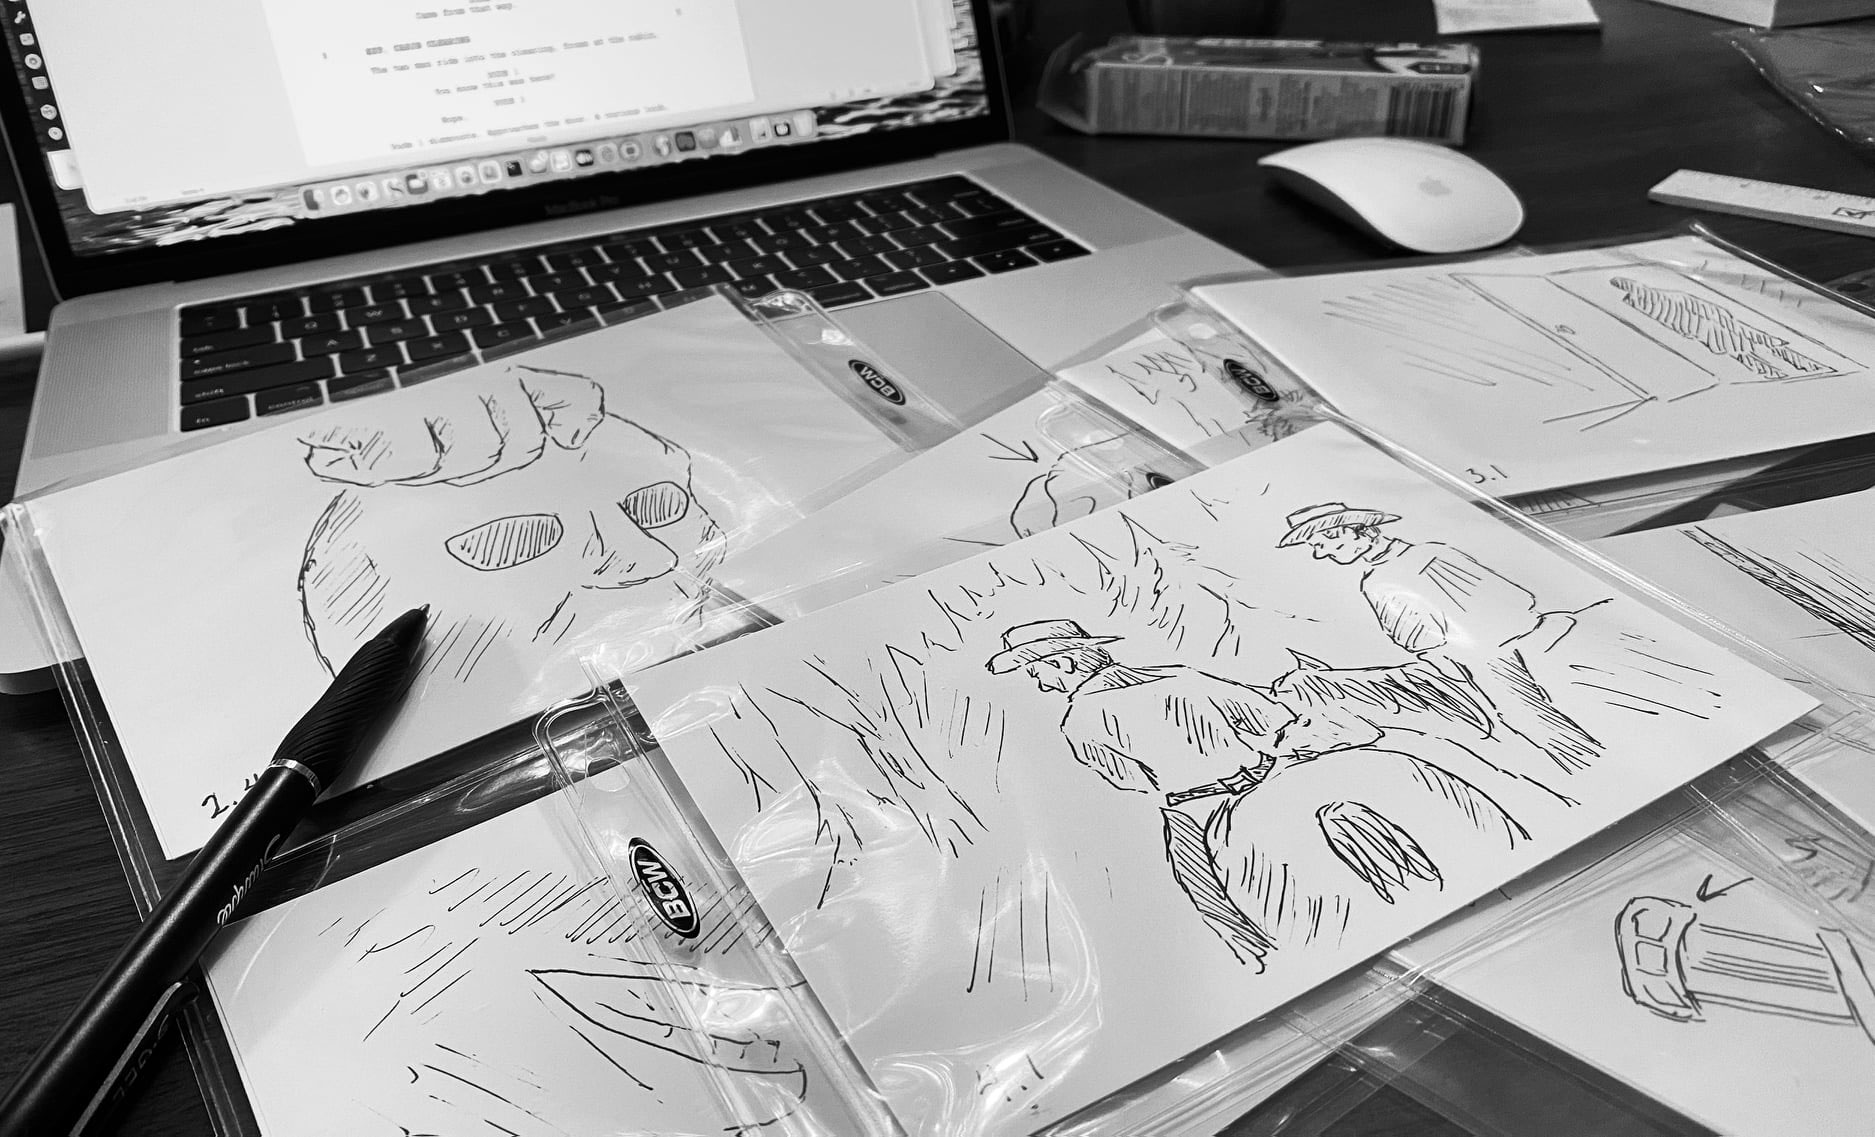
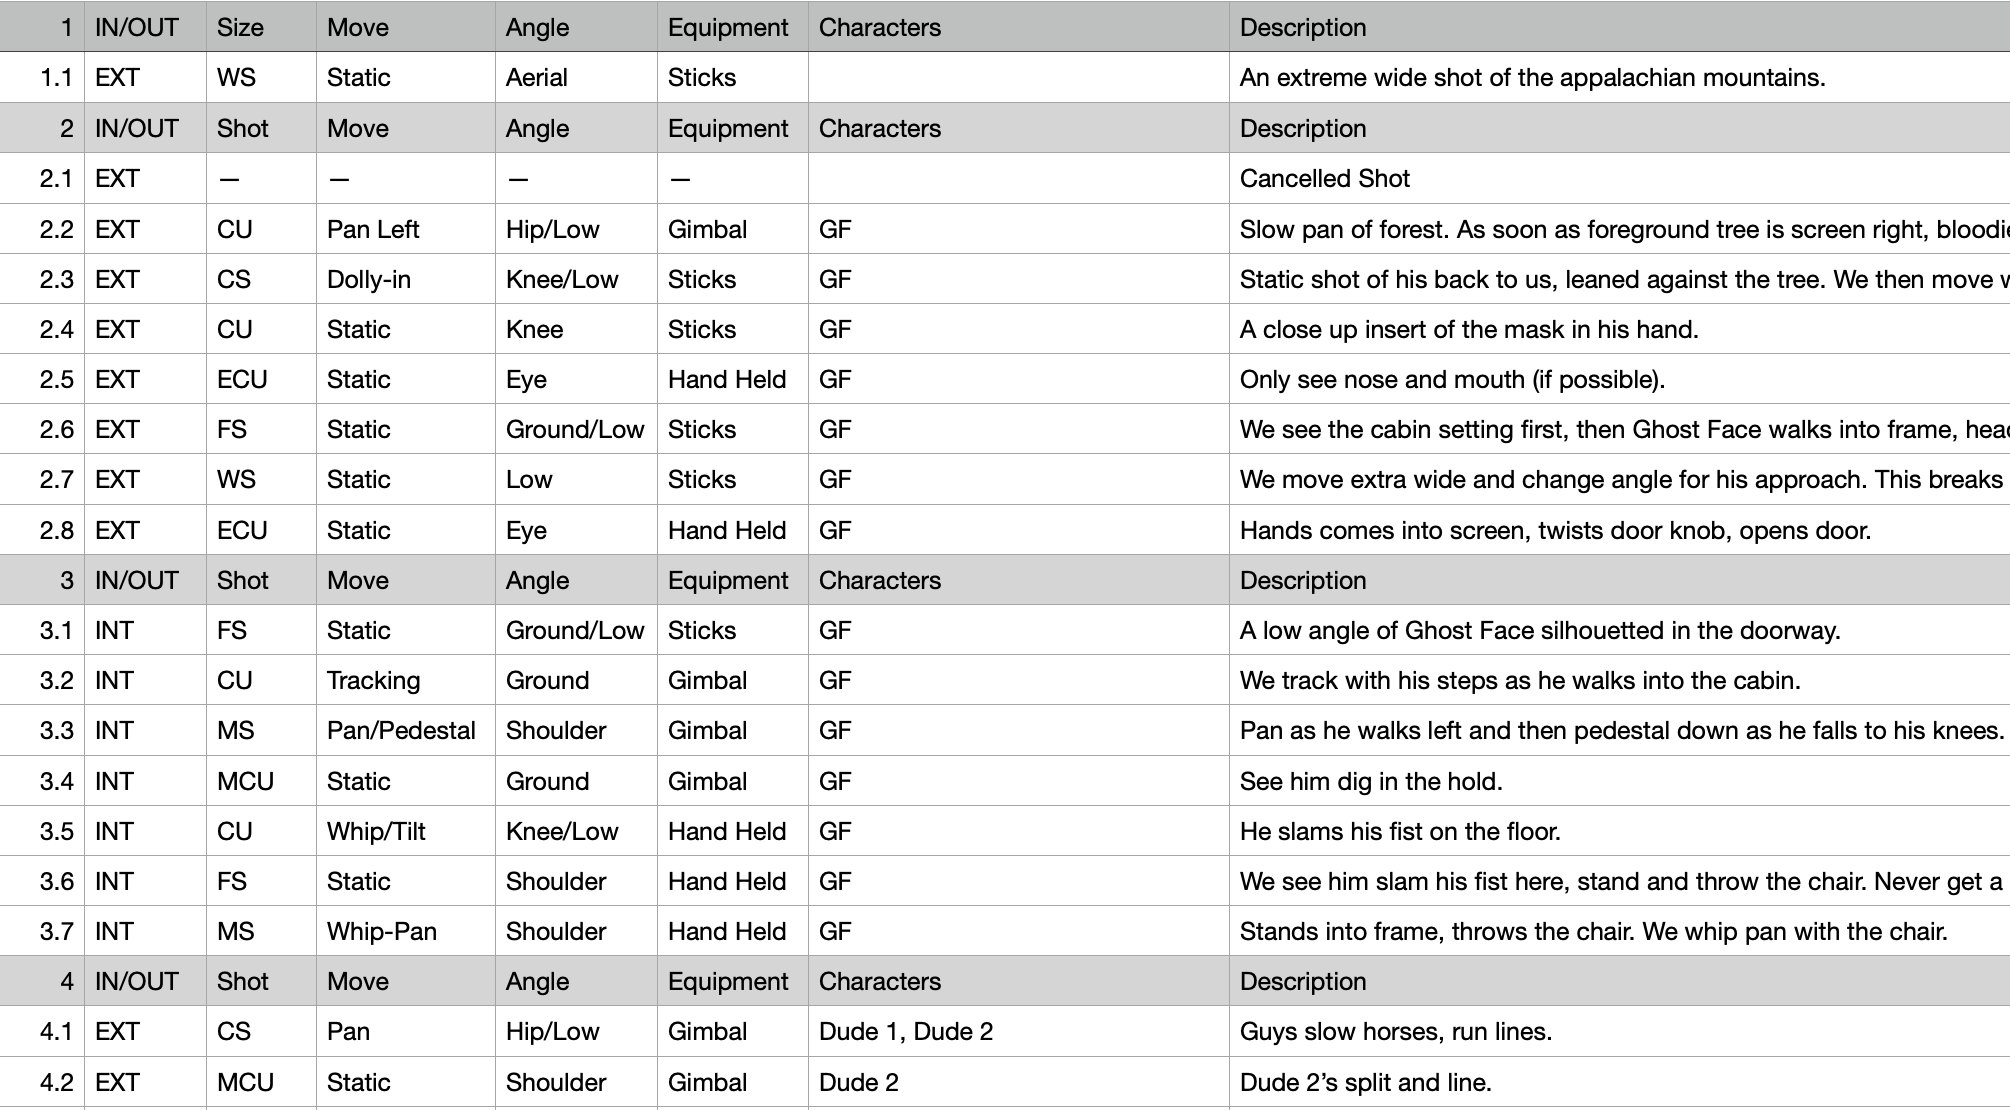
Example Shot List
Below is a sample shot list from the short film RECKONING:
Part of a shot list for the film RECKONING from Theater Eleven Pictures.
How to Create a Shot List
There isn’t a single right way to record your shots. Some filmmakers use software like Studio Binder or Celtx. Personally, I prefer a spreadsheet that references every shot with an associated story board.
1) Scene Number
When you break down your script, each scene is given a number. This allows you to map things like your shot list back to the script even when there are changes.
2) Shot Number (Setups)
Every camera setup needs a new shot number. For example, you’re shooting a wide shot of someone and want to move to a medium close up. That’s a new camera setup. As are angle changes, etc. Start with number one and assign a number to each one of your shots for a particular scene. Scene 7 might only have 3 shots while scene 22 has 15. Personally, I use a decimal system. Scene 3 setup 5 would be labeled 3.5 on the corresponding story board.
Shot Description
Describe your vision for the shot. How are you affecting tone or character? What’s the purpose of this shot? Is there action in it? What is the intended emotional charge?
Shot Size
This describes what the camera sees as it relates to your subject.
WS (Wide Shot) FS (Full Shot) CS (Cowboy Shot) MS (Medium Shot) MCU (Medium Close Up) CU (Close Up) ECU (Extreme Close Up) OTS (Over the Shoulder) POV (Point of View)
Angle
The angle of the camera drastically effects the feel of the shot. What do you want the audience to feel in this particular scene and setup?
Eye Level Low Angle High Angle Hip Level Knee Level Ground Level Shoulder Level Dutch Angle Overhead Aerial
Movement
Will this be a moving shot? A classic example is The Dark Knight when the Joker first enters the pent house party. He’s moving the entire time, and this would all be noted on the shot list.
Pan Whip-Pan Tilt Whip-Tilt Dolly Truck Pedestal Zoom
Equipment & Lens
If this is a static shot you’ll have the camera on sticks (stand). If it’s a tracking shot, are you using a gimbal or dolly? You’ll also want to be specific about the lens. Do you want a wide 24mm lens, or a 50mm for a more normal field of view? These creative choices affect your story, and require a lot of forethought. Remember, the most you prepare ahead of time, the more freedom you have to be creative during production.
Location
Is this an interior (INT) or exterior (EXT) shot?
Subject
Who or what is the subject of the shot?
The Work Pays Off
You’re no longer wondering what a shot list is, and hopefully you see how it can help you prepare for your shoot!
I can’t stress enough how crucial it is to take time and see your film in your head before you ever start shooting. A great way to get ideas is to spin up some of your favorite films and watch them without sound. This will force you to study camera movements and learn from pro filmmakers.
Have fun with this! And remember, you’re not pouring cement. You can change this during production. But the work you put in now will pay off big time later.