During pre-production your script becomes the blueprint for shooting the film. Everyone must operate off the same blueprint. But what if story changes are required? Because like it or not, it happens all the time. ESPECIALLY when you’re a filmmaker wearing many hats.
Sometimes I’ll get new story ideas while on location creating my shot list. Sometimes a tech scout reveals a location actually won’t work and this pushes a story change. The list is endless. The good news? Locking a script is actually the tool that allows for these changes. Here’s the process:
1) Enable Scene Numbering
Before locking your script you’ll need to add scene numbers. Why? Because a production runs off page and scene numbers. When you’re on set speaking with your DP about part of the script, you want to be able to say, “Look at page 2 scene 11, for this I’m thinking…” To do this, you need page and scene numbering turned on.
For Final Draft, go to Production > Scene Numbers.
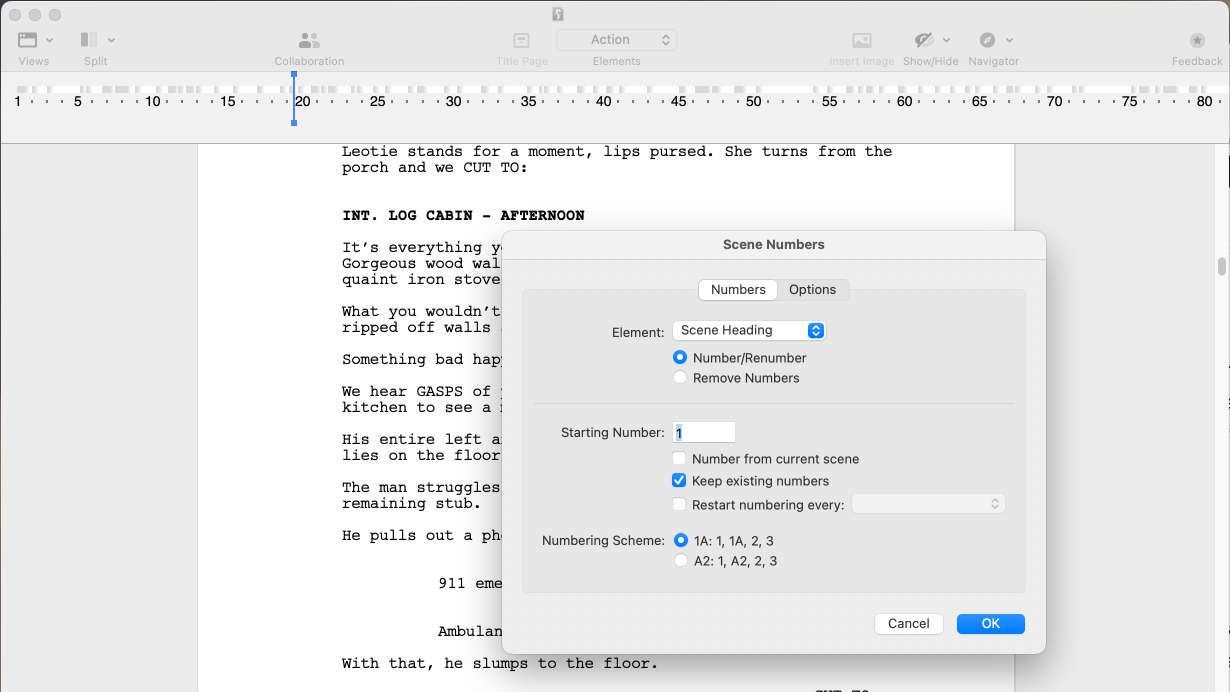
For Fade In go to Production > Scene & Element Numbering > Check Show Numbering.
You’ll see the numbering appear typically on the left and right sides of your script page.
Bravo! The scene numbers should never change from here on out. But again, what happens if you need to make changes to a script once production starts?
2) Lock the Script
The official way to prep your script for changes in pre-production and production is to lock it. When you lock a script, page numbers and scene numbers remain unchanged even if you add or remove content from the script. This is HUGE!
Example, let’s say you want to add a new scene between scenes 3 & 4 in your completed script. The proper way to do this is add it and label the scene as 3A. This will also bump page one onto a new page called page 1A. Then all subsequent scenes and pages remain exactly the same. If you added two new scenes between scenes 3 & 4 they would be 3A and 3B. You get it.
The good news? Final Draft and Fade In can handle this for you.
3) How To Lock A Script in Final Draft and Fade In
Final Draft
In Final Draft go to Production > Lock Pages. You’ll see a small lock appear on the upper right of the script. Now your pages and scenes are locked. If you add a new scene heading in between two existing scenes, you’ll notice Final Draft doesn’t change the scene numbering—it leaves the new scene without a number. You can then click Production > Edit Scene and name it correctly.
Fade In
In Fade In go to Production > Lock Page Numbers. This locks the pages. Next, to lock the scenes click on an actual scene heading in your script and go to Production > Lock Element Numbers. When you do this Fade In will auto-increment your new scenes for you with the corresponding letters.
4) Track Scene Revisions in Final Draft & Fade In
What happens if you change a scene that already exists? You need to tell Final Draft and Fade In to indicate this.
In Final Draft go to Production > Revision Mode. Everything you change or add will be marked with an asterisk. You can also manually do this by highlighting the text and going to Production > Mark Revised. To change page colors, this is done under Production > Revisions.
In Fade In go to Production > Revisions and choose the revision color. This will also place and asterisk and change the color of the text.
5) Script Revisions During Production
When changes are made to the script during production, everyone must be alerted to what has changed. To do this, you pass out page revisions that are color coded vs handing out complete new versions of the script.
For example: If you were two days into shooting a film and made changes to page 5 of the script, that page would be reprinted on blue paper. If you made changes to page 5 again, it would be printed on pink. Then yellow. etc. Everyone in Hollywood knows the color order of revisions. Here they are:
Some TV shows have adapted their own versions of the above. But this is the official list from the WGA.
Cool, that all makes sense. But how do you track it all? Final Draft and Fade In can do this for you.
It Happens to Everyone
A story is never finished in Development. Personally, I’m making story changes even in the sound design and color grading phases of a movie. That’s just me, and it’s the beauty of independent film.
I’m sure no production has ever had a script that isn’t tweaked while shooting. So even though it’s a little unnerving to lock your script, you just need to bite the bullet and do it! Locking is really about freedom. It’s not as difficult as it may seem, and modern screenwriting applications do the muscle work for you. Imagine the typewriter days!
Thanks for reading our blog! Write & Direct is an online film school for aspiring directors. You can find out more about us on our film school details page.
So you’re done with development and ready for pre-production. Congrats! Now it’s time to breakdown your script. Why do we do this? It helps you plan for every detail needed for production. You don’t want to show up on set only to realize a prop isn’t there, someone’s costume didn’t arrive, etc.
Breaking down a script takes each scene of a screenplay and categorizes each needed item in order to assign to proper departments. Is it wardrobe? Props? Production design?
On a typical film the 1st AD (1st Assistant Director) is responsible for script breakdown. But in the land of independent film, it’s often the director executing the task.
1) Divide Your Pages into 8ths
Script pages are viewed in 1/8s. If you’re discussing a scene with a department head, you wouldn’t say it’s just over a page, you’d say it’s a page and 2/8s, etc. Dividing the pages into 8ths provides extra precision. Some people might even get a ruler out and divide pages into one inch sections. That’s hard core — whatever works best for you. Just be aware of the process.
Tip: One page of a script typically translates into one minute of screen time. This can be affected by the amount of dialogue, but as a rule of thumb, this is surprisingly accurate!
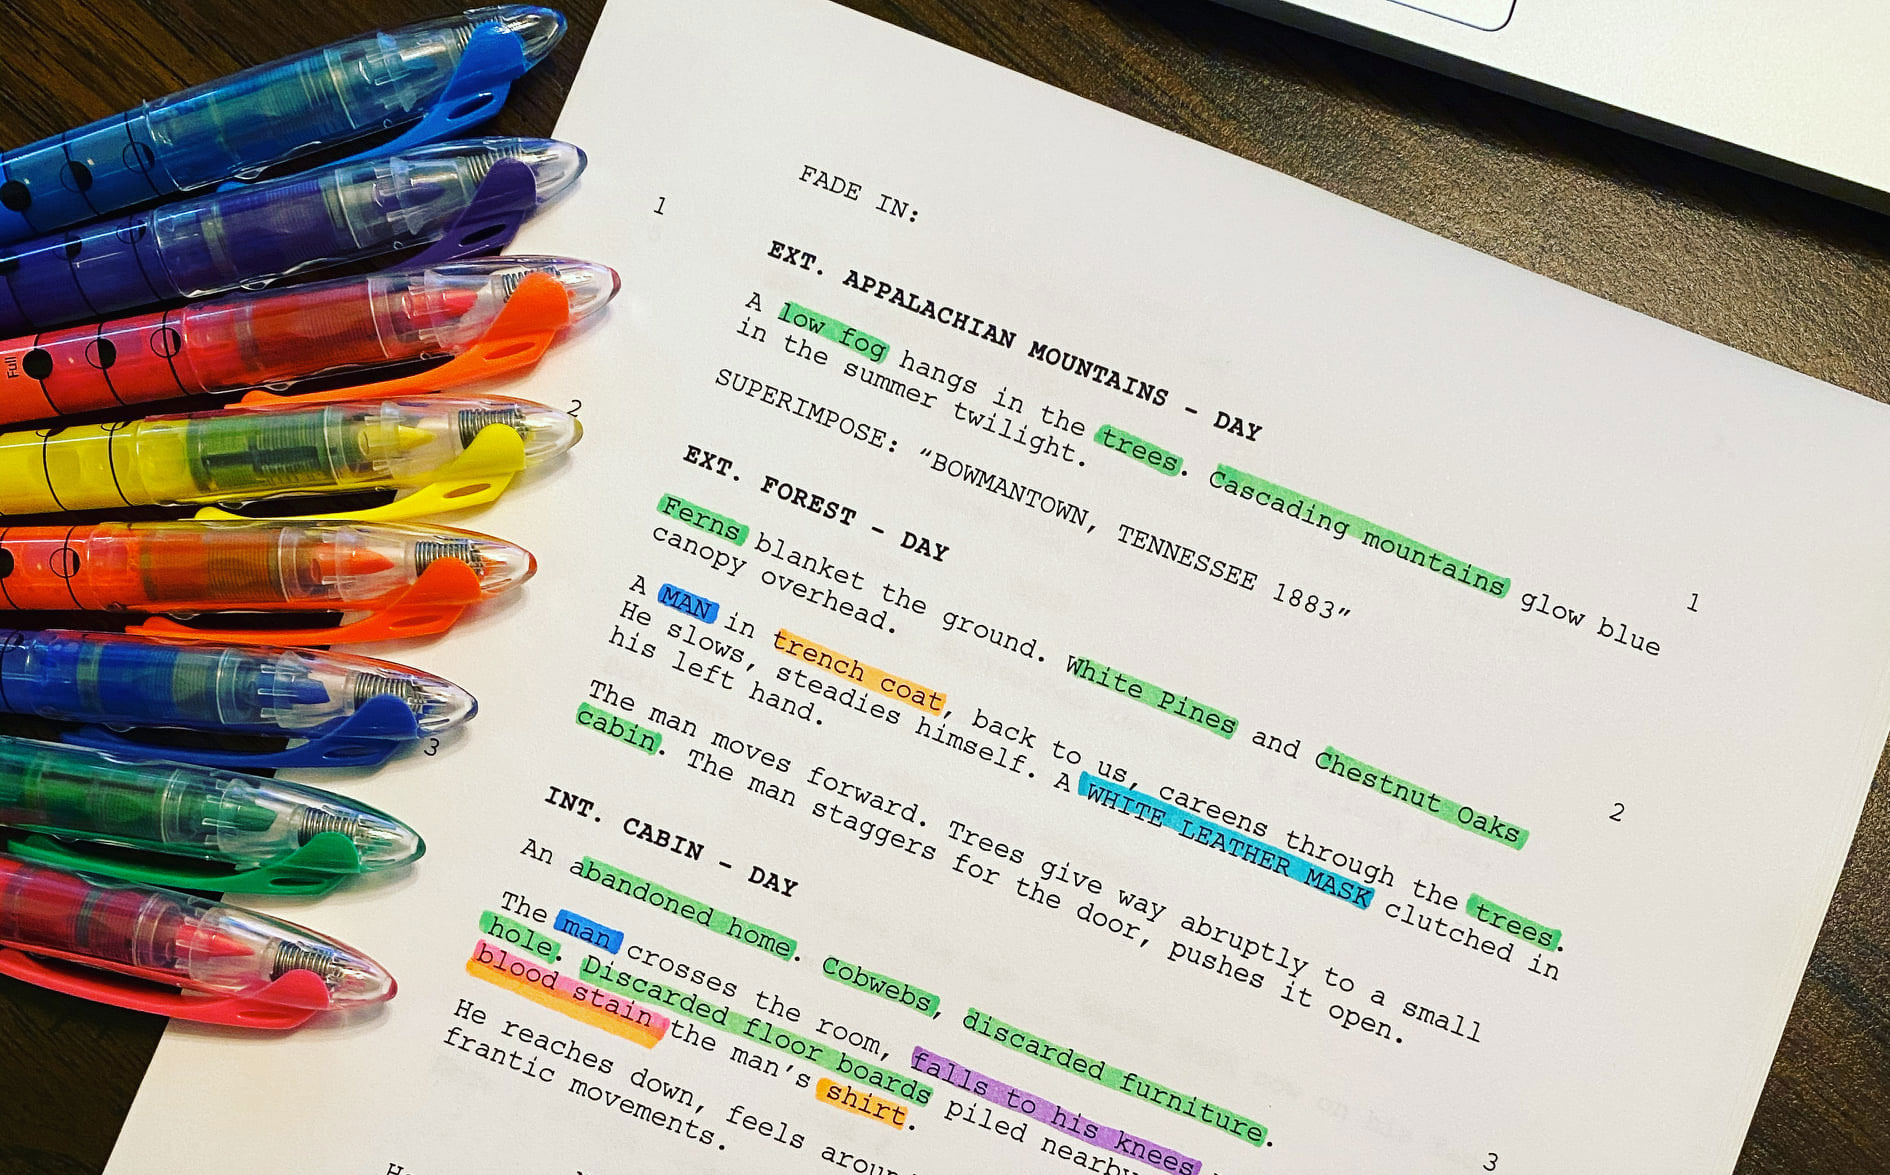
2) Use Highlighters To Identify Items
It’s time to print your script and grab highlighters. This is how you identify all the things that need to be addressed by different departments. With an indie film we are often all departments, but this is still crucial for proper planning. Here are common things you’ll identify in your break down:
Cast Members
Costuming
Props
Stunts (anything other than walking is a stunt)
Animal Wrangler
Set Dressing
Extras
Special FX
Make Up
Locations
There is no official color chart, so you can come up with your own. Just assign a color value to each specific item in your script. For example, if you assign GREEN to locations, then every part of the script that requires a specific location will need a green underline.
*Note: Some parts you will be underlining with more than one color. That’s normal.
3) Fill Out Breakdown Sheets
The final step is to fill out a script breakdown sheet for each scene. On the sheet you’ll list the scene number, location and other important items identified in step 2. I’ve attached a script breakdown sheet PDF that’ll get you going.
Remember, once we move out of development, a scene refers to a physical location. In development a single scene might span multiple locations, but for pre-production and on, it changes. This is because the script has now morphed into the blue print, and we’re planning our shoot based on locations.
4) Inform Department Heads
Now you can distribute the breakdown sheets to appropriate department heads so everyone knows what they need to do during pre-production. The breakdown sheets also assist during production to ensure all people, props, costuming and production design are ready for each day of shooting.
So that’s it! Now you know how to breakdown a script, which is a crucial pre-production task that will save you a lot of stress once production hits.
If you’re new to Write & Direct, we’re an online school for directors. We teach filmmaking from development through post production in a unique that allows directors to learn the craft and begin making movies in less time traditional education routes.
Setups and payoffs are crucial tools for a filmmaker. They help your film feel fluid. Ever watched a movie that felt a little disjointed? More episodic than a cohesive story? Setups and payoffs can be a glue that helps your scenes stick together.
Setups and Payoffs also keep your audience closely involved in your story. They make your audience feel smart. Feel rewarded. Think back to a time when you “figured something out” in a movie. How’d that make you feel? Good right?
You must give your audience these same experiences.
There are two main types of setups:
1) Imperative
2) Just for Fun
IMPERATIVE SETUPS
Imperative setups are required for something later in your film to make sense. Want your hero to pull open a drawer and find a gun at the end? You’d better set that up at the beginning. Otherwise, your audience is going to call foul.
But here’s the trick: Setups must be entertaining, not exposition.
You can’t throw in setups that don’t provide story or character value. Meaning, if you took away the payoff, the setup should still stand on its own. If your hero doesn’t pull the gun out of the drawer at the end of the film, the setup should still be an important moment in the film.
IMPERATIVE SETUP FROM JAWS
Chief Brody kills the shark by shooting a scuba tank that explodes—we buy this because earlier in the film, Hooper freaks out when they drop one of his scuba tanks. He rants about how they’re “highly pressurized and dangerous”. So later when we see the tank explode, we just accept it.
The setup worked as a stand alone event because there was conflict between Hooper and Quint (captain of the boat). Quint thought Hooper’s tech stuff was dumb and useless. So when the scuba tank isn’t treated with respect, it’s natural for Hooper to get mad.
Again, you can’t throw in setups that don’t provide story or character value. A setup must stand on it’s own. The conflict in this moment was satisfying and the setup was great even if there wasn’t a payoff.
But the payoff of this setup made the ENTIRE ENDING of Jaws. How? In real life if you shoot a scuba tank it doesn’t explode. Spielberg (or the writer) knew they had to set this up or the entire ending of of the film would fall flat. Yikes, right? If nothing else shows the power of a setup, this does.
JUST FOR FUN SETUPS
A just for fun setup is just as the name suggests—the setup and payoff are not required for plot to work. It’s just a fun moment for the audience.
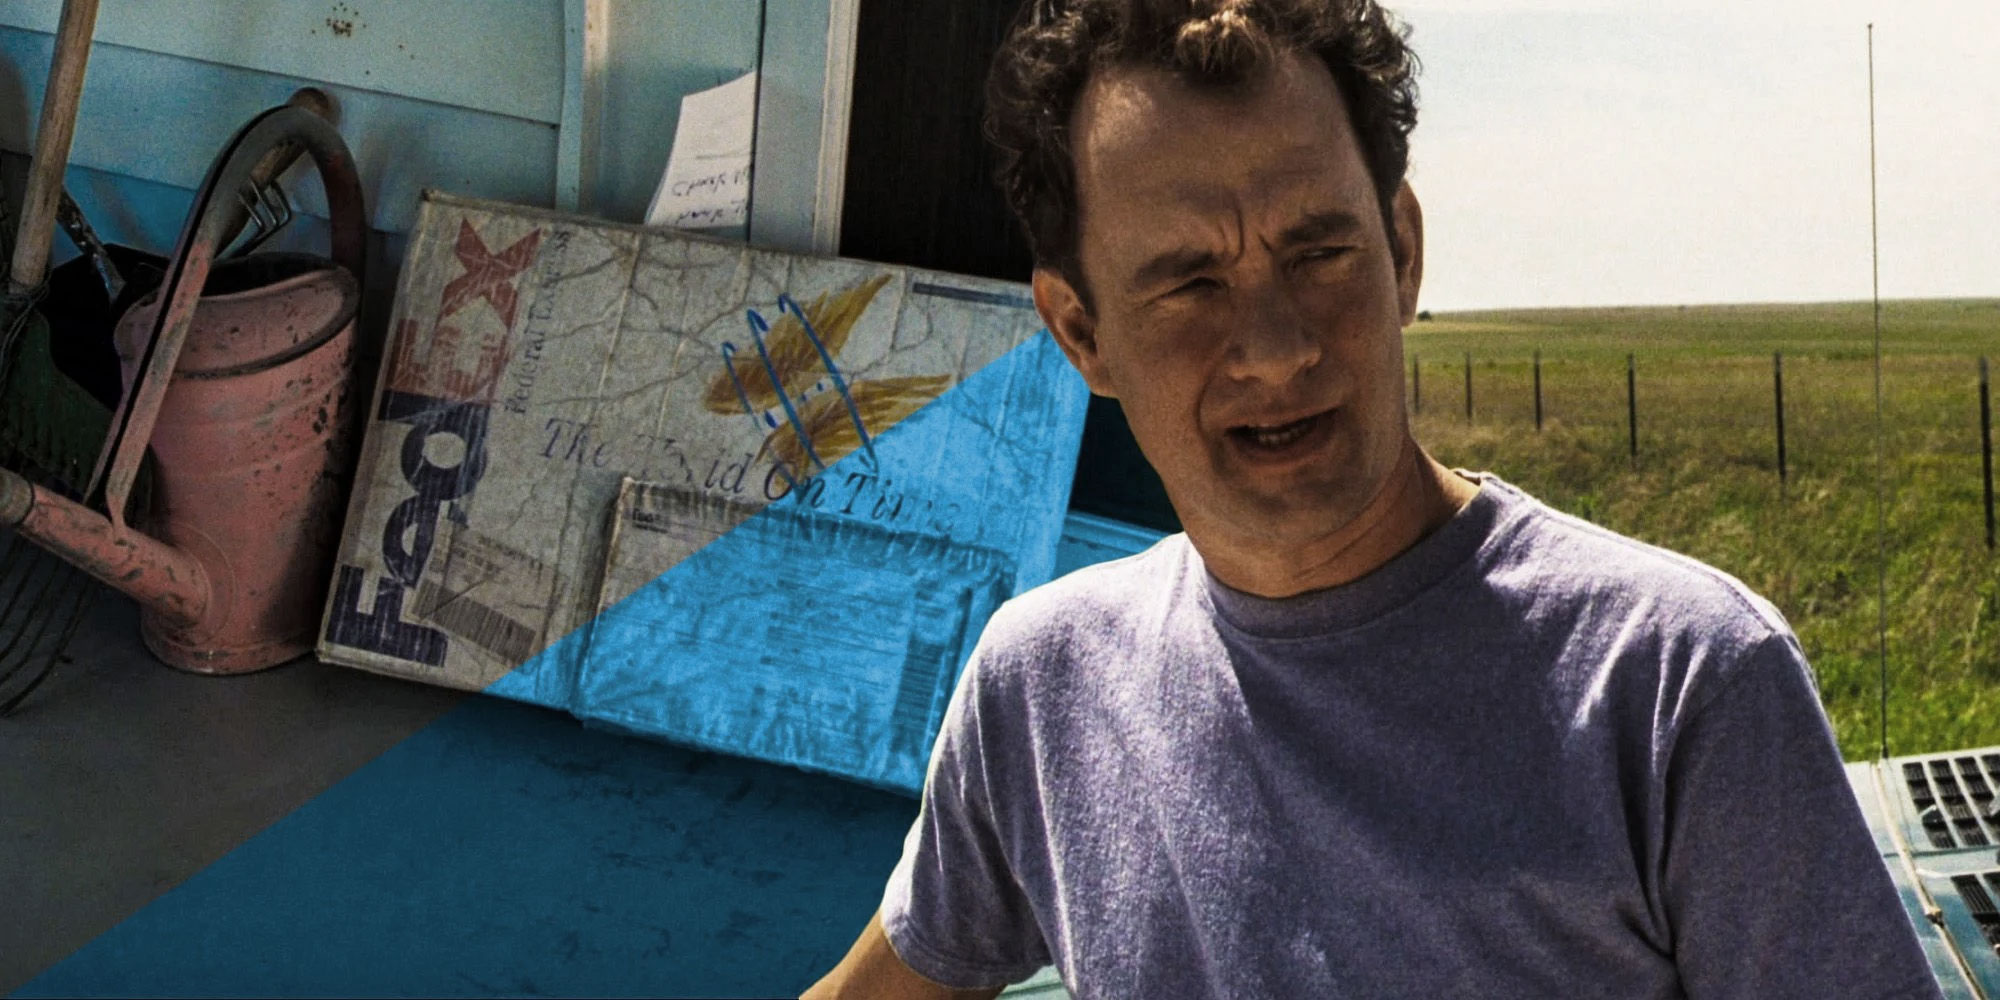
An excellent example of this is found in Cast Away. Chuck Noland has a tooth issue at the beginning of the film, and this has a massive payoff later when he’s stuck on an island and has to play dentist with an ice skate. This didn’t change the story in any way, but it added drama that I guarantee made every audience member squirm.
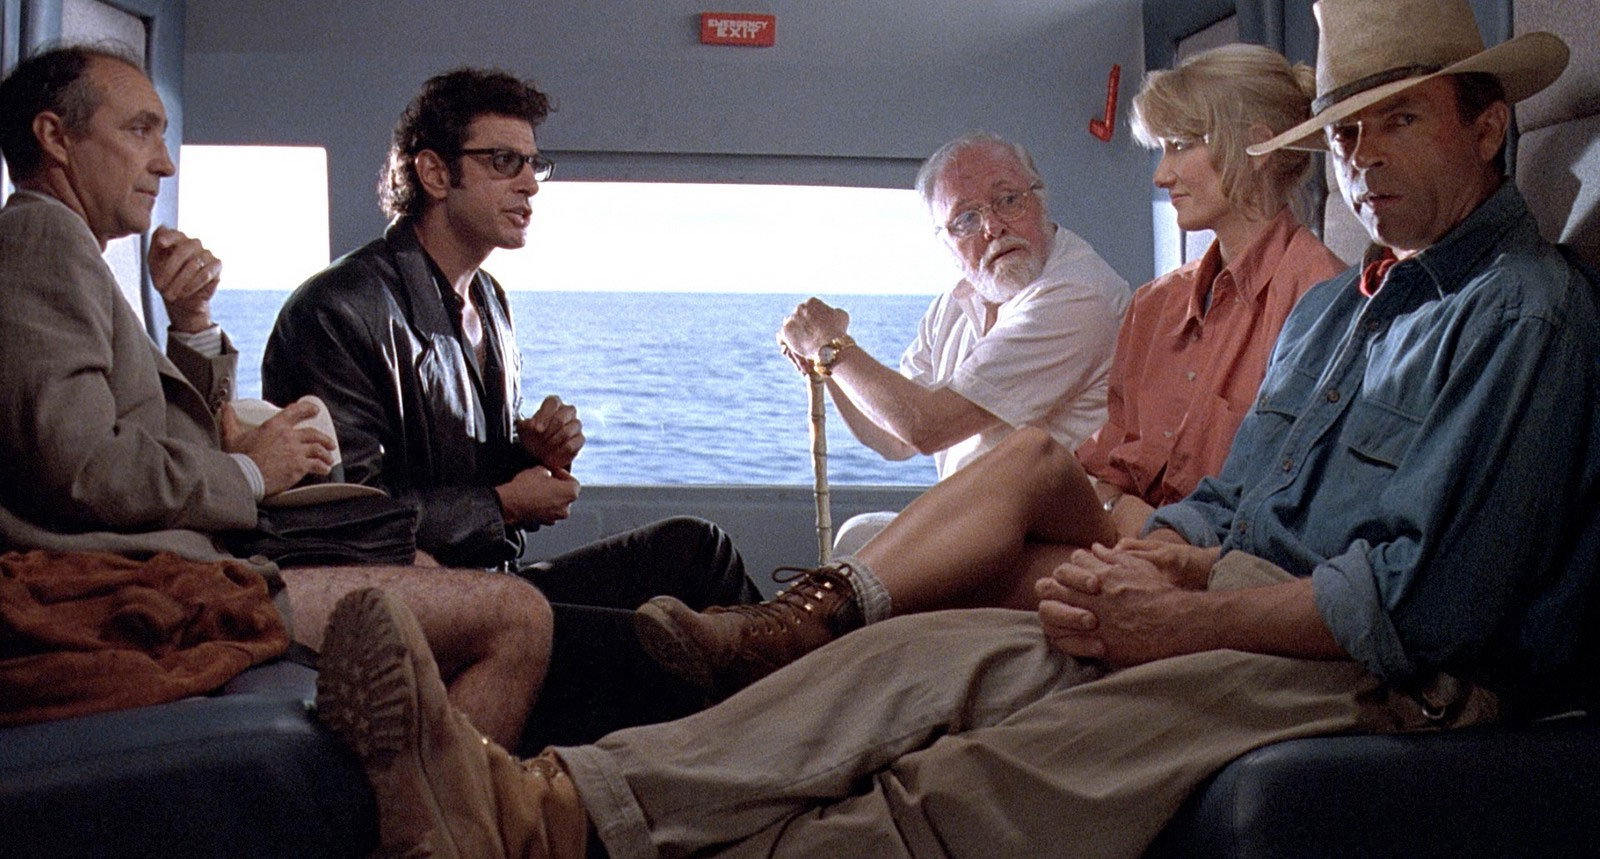
Another just for fun setup and payoff is found in Jurassic Park. When they’re in the helicopter Dr. Grant can’t find the correct ends for his seat belt, so he takes two female ends and ties them together.
This worked independently because it fit his personality. He hated technology and gadgets. He lives in the past, not the present. Anything modern just doesn’t work for him. So this was a comedic character moment. However, it’s an incredible setup for the end of the film when they realize nature would find a way, and babies were born even though all of the dinosaurs on the island were bred as females.
This setup wasn’t required for the ending to make sense. But it was a fun setup and payoff for those audience members who were paying attention.
MY ALL TIME FAVORITE—CAST AWAY
My absolute favorite setup and payoff is found in Cast Away. If you haven’t watched the movie, I’m not going to ruin the setup and payoff for you. But it’s subtle and incredible because it makes you as an audience member feel really, really smart when you figure it out.
This was a gem that Robert Zemeckis put in his film for audience members who were really paying attention to the story. I’ll give you a hint, it has to do with angel wings.
Setups and payoffs are just one of the many tools available to us as screenwriters. Story telling is a craft that makes or breaks a movie. It’s why we begin our training for aspiring directors with STORY. Without a solid understanding of story telling for the big screen, directors will never realize their dreams.
If you’re a seasoned filmmaker, you know that when it comes to editing you just can’t beat the keyboard. We’re going to take a deep dive into changing your keyboard mappings in Resolve. You can watch the video or read the article!
How To Map Commands To Specific Keys
Let’s first look at mapping three simple commands to specific keys on the keyboard. We will do Mark In, Mark Out and Clear In and Out.
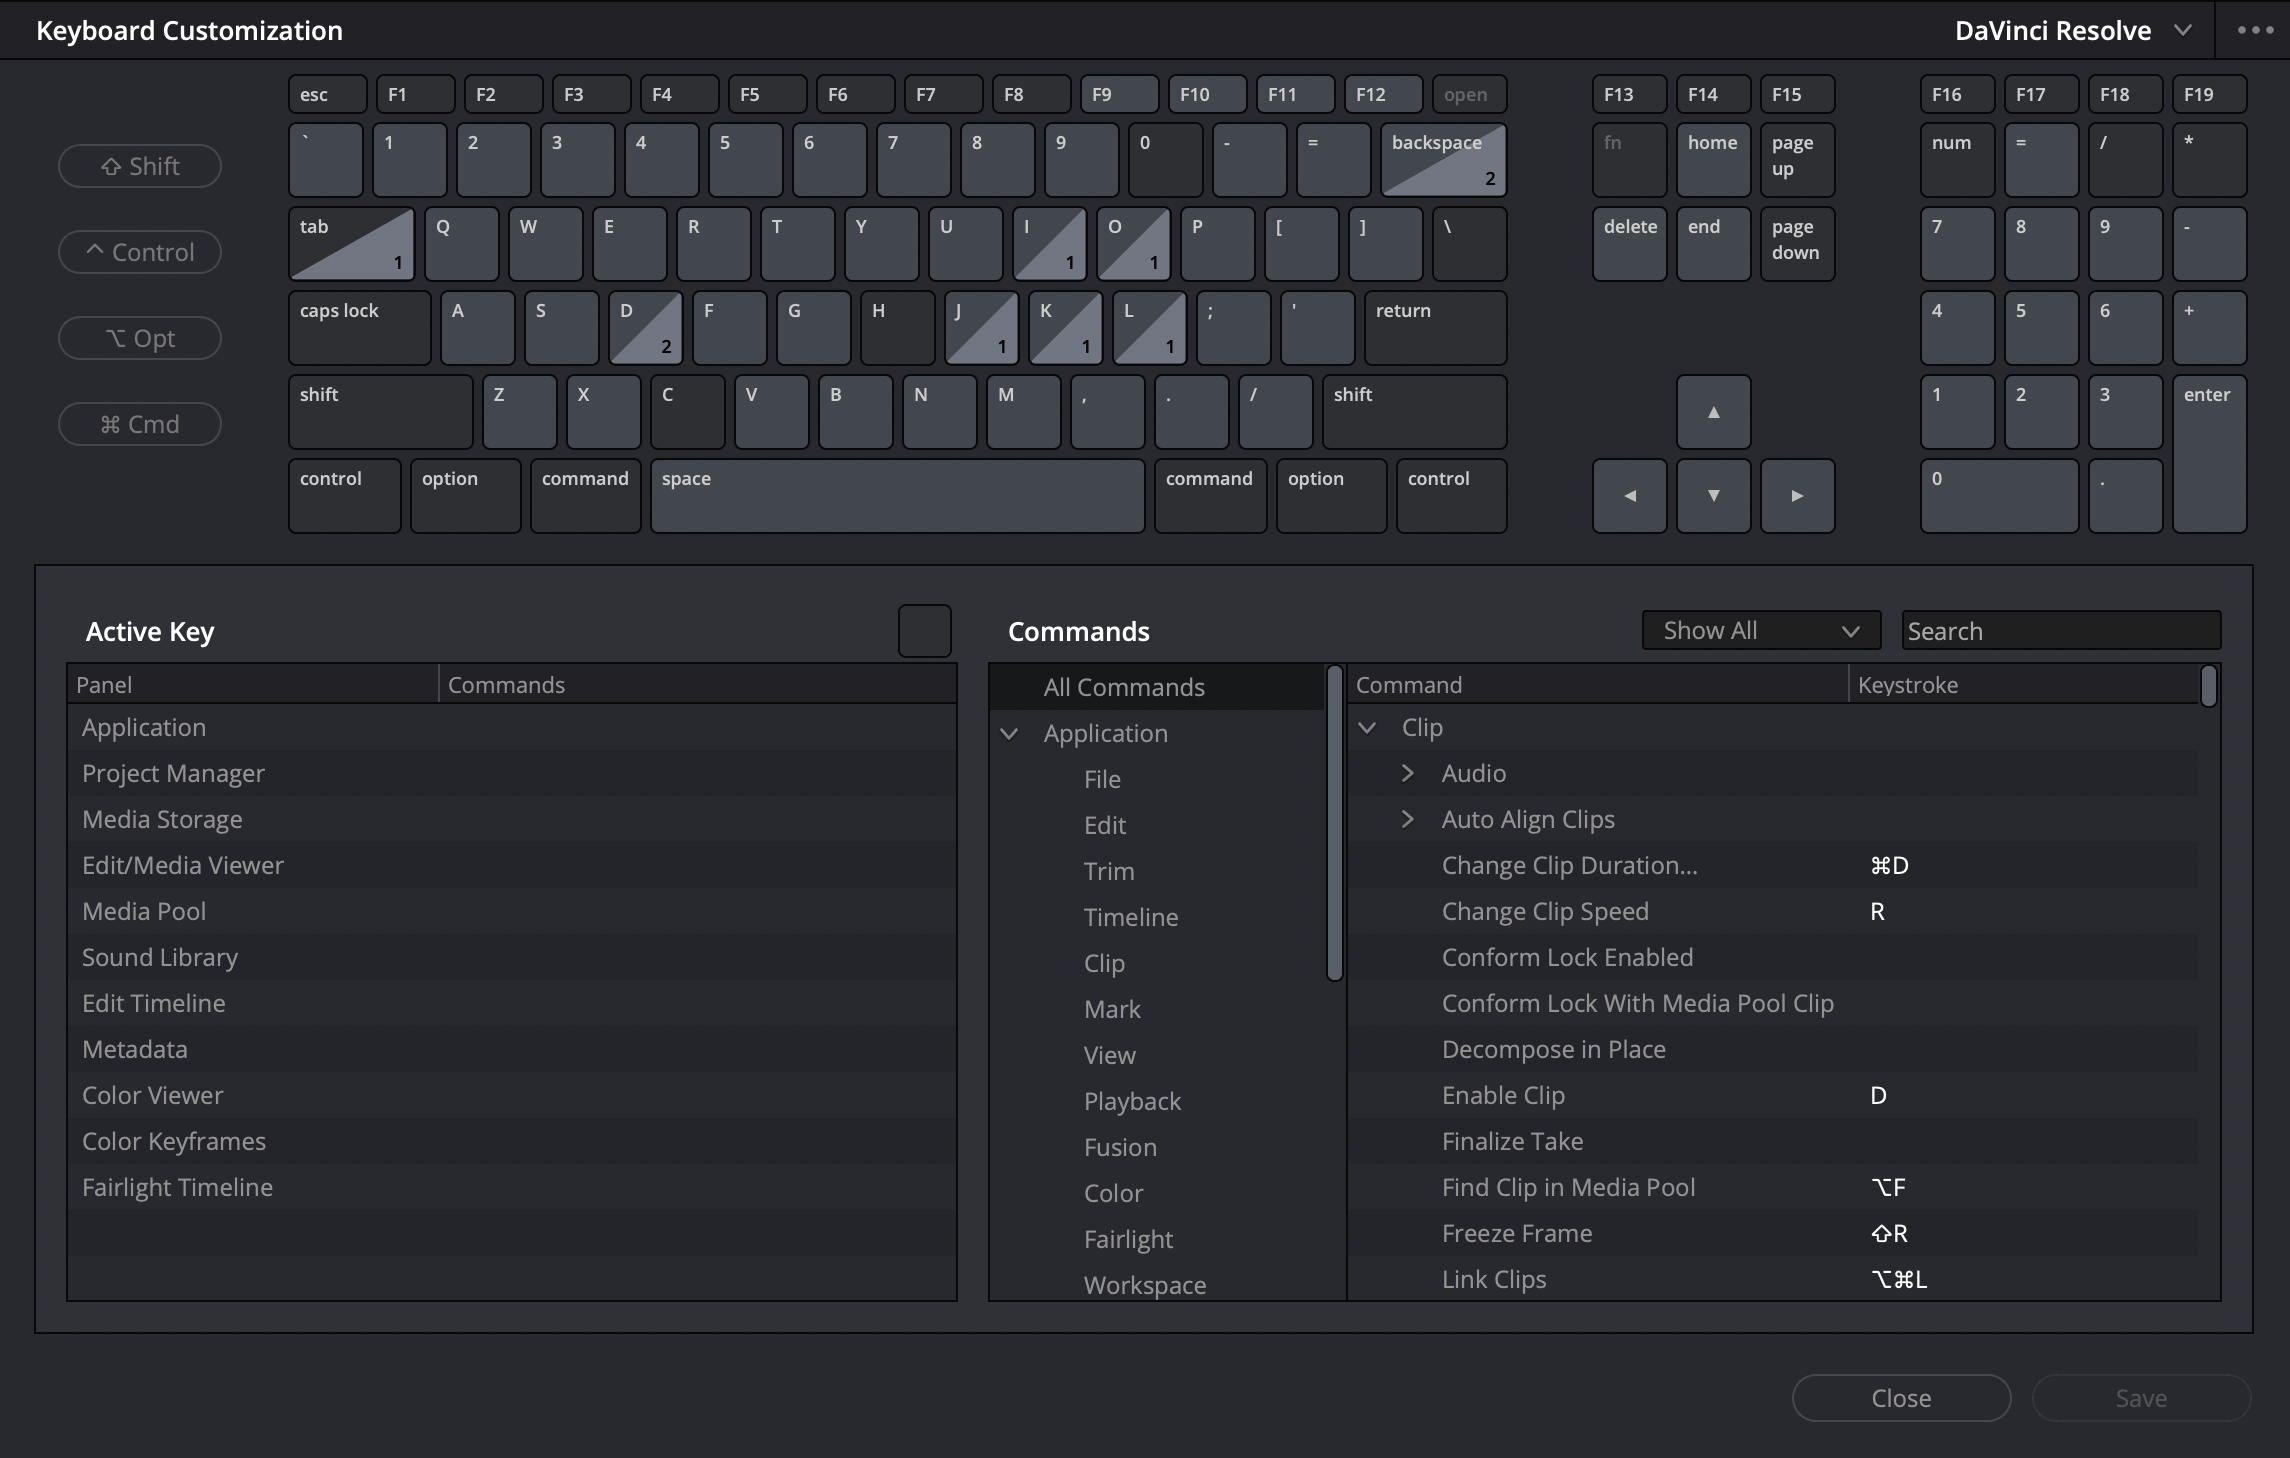
Click DaVinci Resolve in the top left and select Keyboard Customization. You can also hit Option + Command + K (macOS) on the keyboard to get to the same spot.
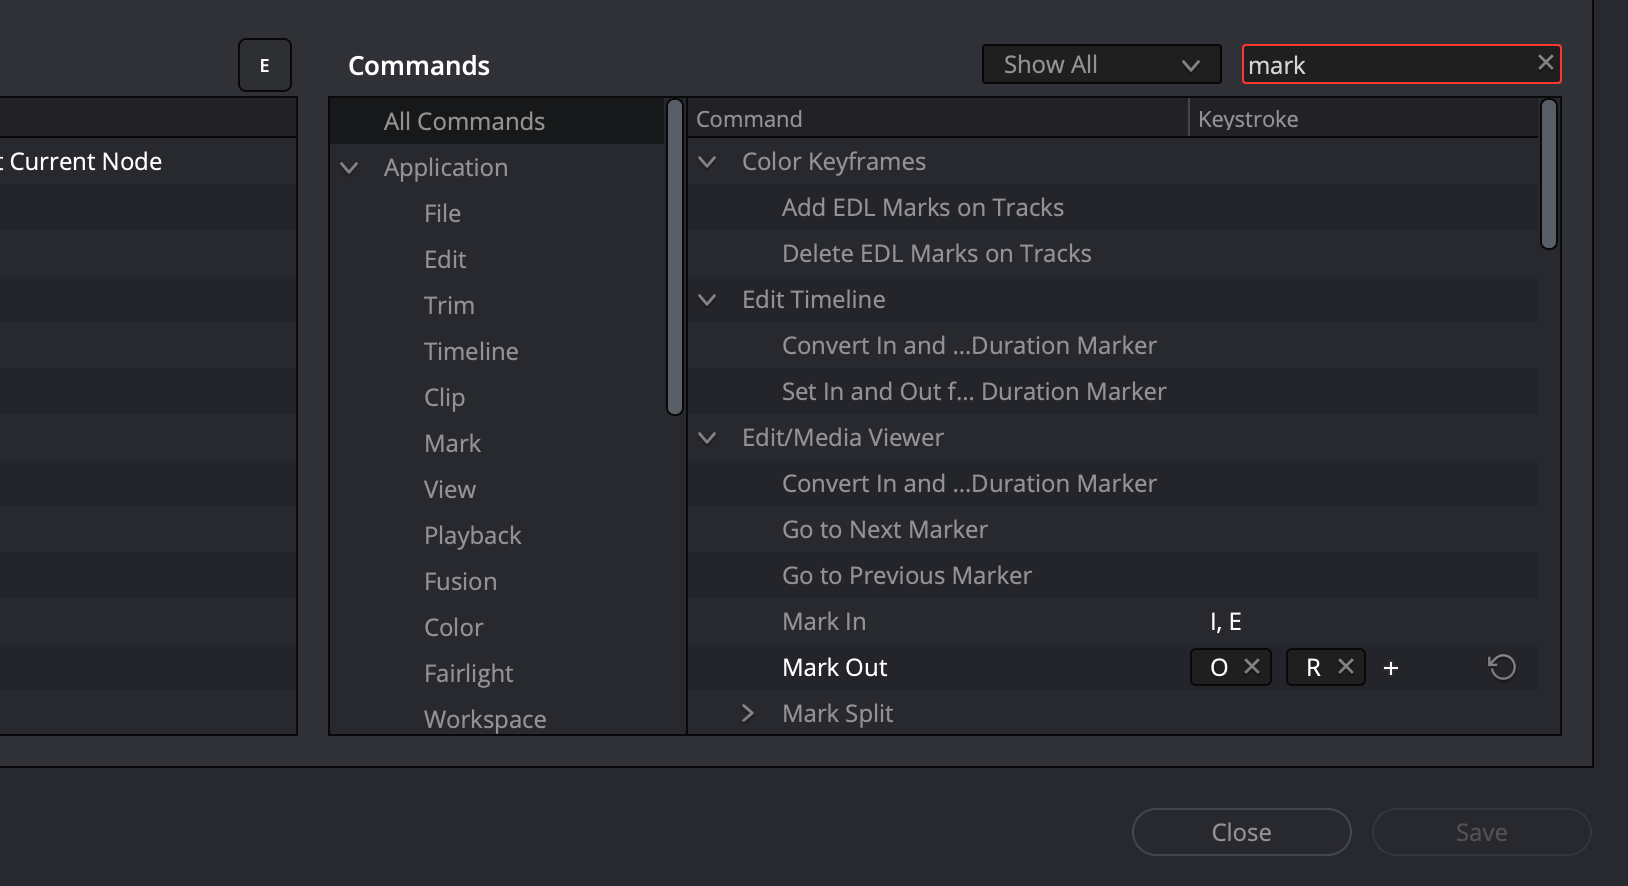
Select All Commands in the Commands column. Type “mark” in the right hand search box.
Locate Mark In and Mark Out.
The keyboard palette will display any current mappings or shortcuts that are setup in Resolve. You can remove these by clicking on the “x” by the shortcut, and you can add your own by clicking the plus sign.
Click the “+”
Type in the keyboard command you’d like to use
Click Save.
Enter a custom name to save your keyboard mappings.
Replace Existing Keyboard Mappings
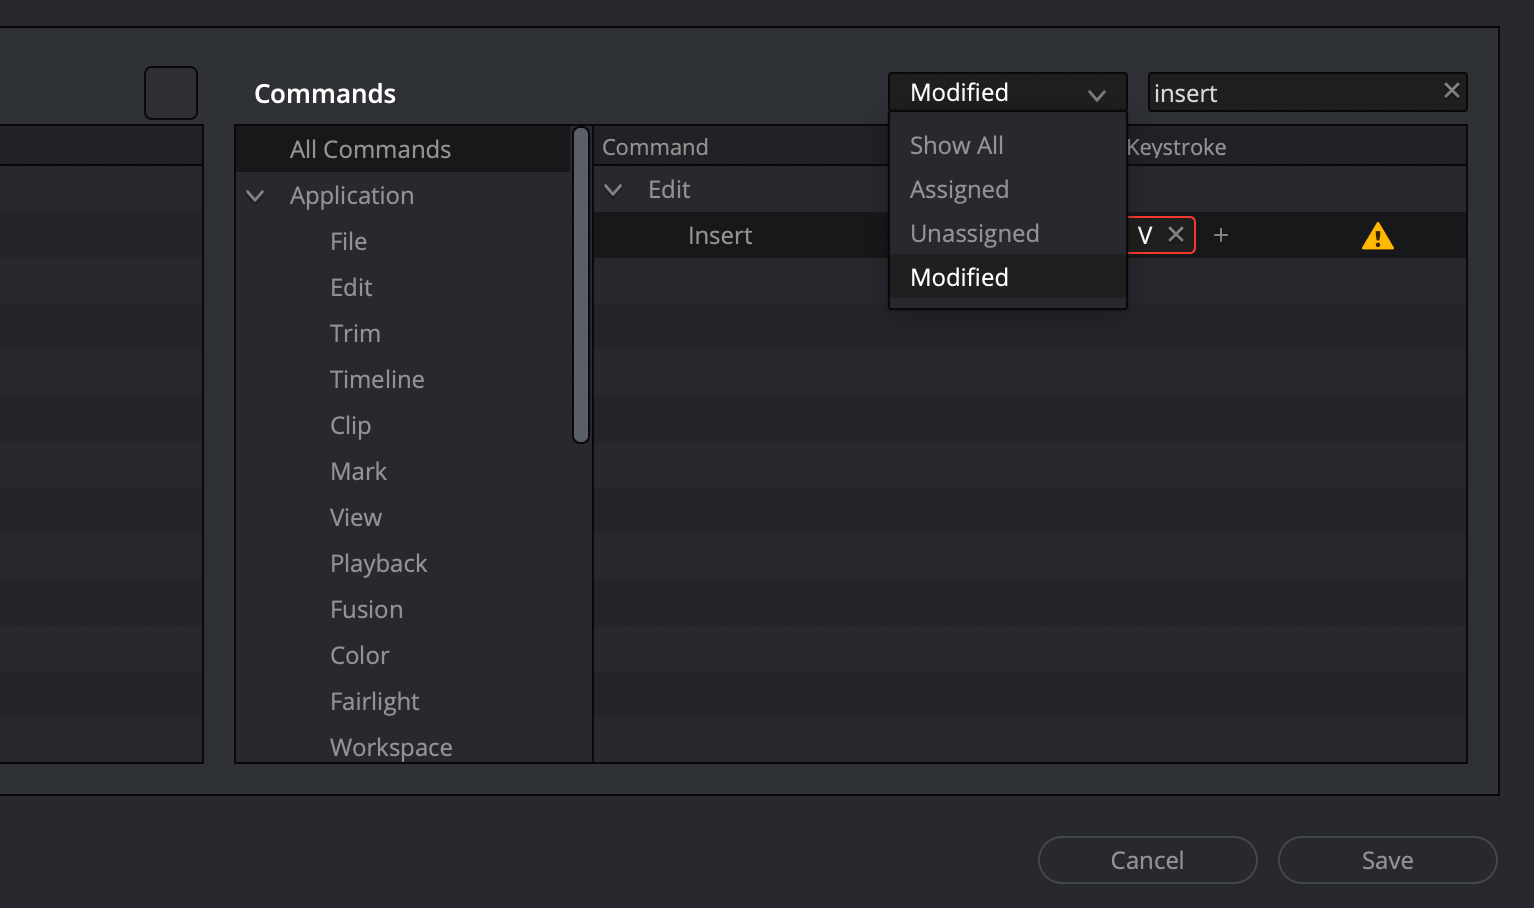
If you try to assign a keyboard shortcut or mapping to a key that is already mapped to another task for the same area of the Resolve application, you’ll receiving a warning.
DaVinci Resolve will allow you to save the mapping, but it will not work. You must manually remove the one you don’t need. This is done by looking up the conflicting mapping and clicking the “x” to remove it.
View Current Mappings
To see active mappings for any specific key or key combination, simply click the key (or keys) on the keyboard palette which will highlight them in red. DaVinci Resolve will then display the current tasks assigned. To remove a mapping, click on it under the Active Key column, and then on the right either change or remove the assignment.
Multiple tasks can be assigned to the same key for different areas of the DaVinci Resolve application such as the Edit Page vs Fairlight, etc.
View Modified Keyboard Mappings
If you’re in the process of mapping your keyboard, you can view the current mappings by selecting modified from the drop-down menu in the Commands column area. This will display all of the mappings you’ve changed but haven’t saved yet.
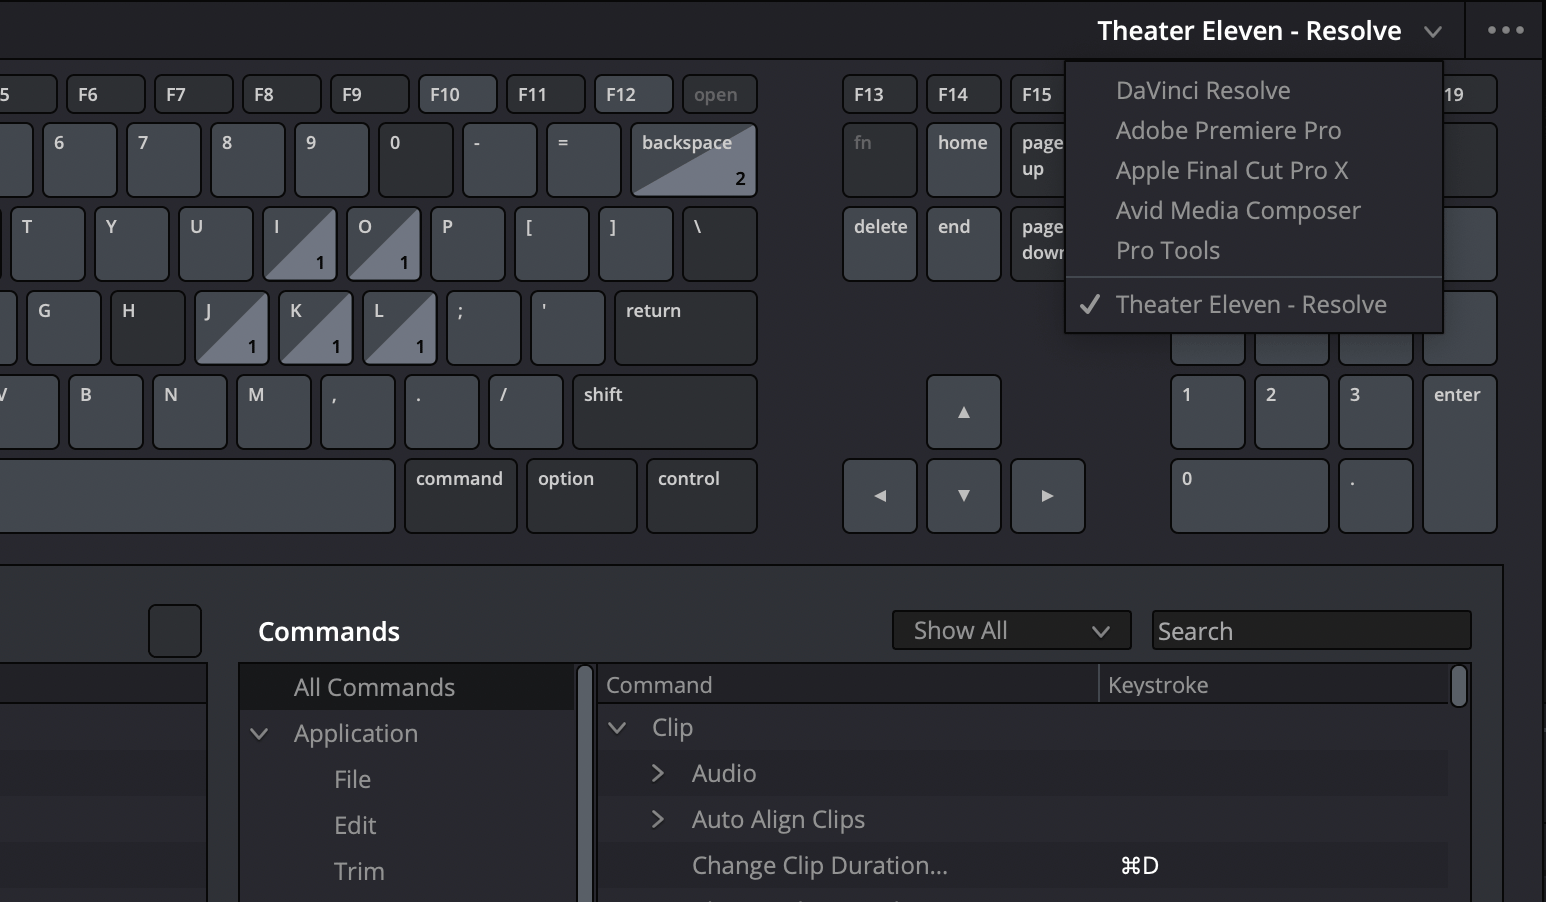
Import, Export and Common Presets
When you open the keyboard palette, the top right displays the keyboard preset in use. The default is of course DaVinci Resolve. When you make changes and click save, Resolve will prompt you to name the mappings as a custom preset. This will then be the active preset even if you close and re-open Resolve, or change projects.
You can also also start by choosing custom default mappings from other non linear editing systems like Avid Media Composer, Final Cut Pro or Adobe Premiere. And finally, you can click the three dots to import or export a keyboard preset.
The keyboard command palette in Resolve allows you to create an ideal editing workspace that is portable to any DaVinci Resolve editing workstation!
If you’re like me, you’ve spent a lot of time working in various non linear editing systems. They each have their own way of doing things. The first thing I do on a new NLE is familiarize myself with how to do the common tasks required to edit quickly.
In Resolve, a fast way to place a clip in the timeline is to visit the Cut Page and drag the clip from a bin to the timeline. However this is impractical most of the time. I prefer the Edit Page over the Cut Page for 99.99% of my narrative film editing work.
Let’s look at some of the most common methods you’ll use from the Edit Page:
How to Smart Insert Footage
When you have a working timeline full of existing clips, sound FX and other items, you can’t just drag clips in as that will overwrite exiting clips. A common way to get a new clip into the timeline is to insert it. DaVinci Resolve calls this a ‘smart insert’ as it will push everything down the timeline.
Using smart insert will keep everything in sync on your timeline as all clips on all tracks will be pushed down to make room for the new clip.
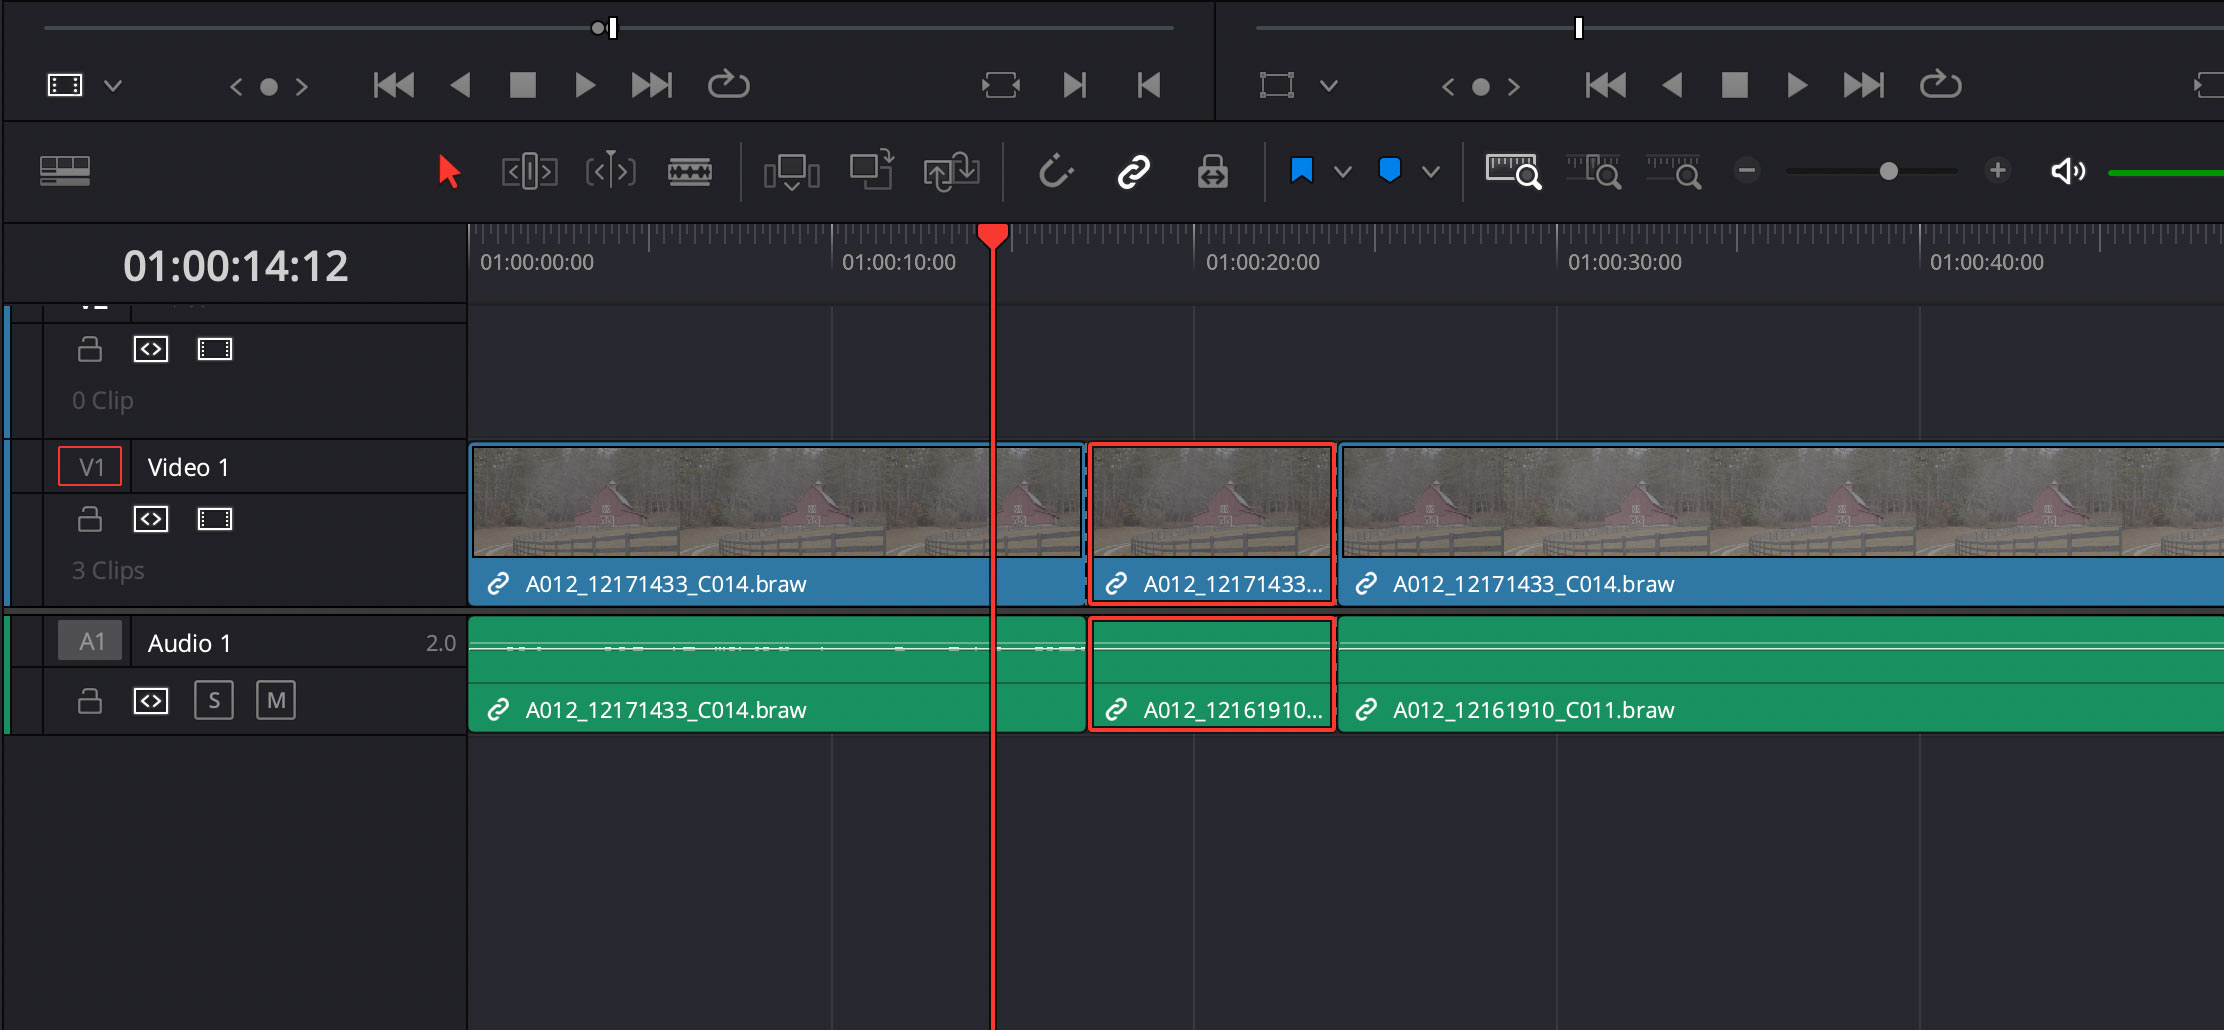
First, make sure the right video and audio tracks on your timeline are active (red boxes on the left). Next mark an “in” and an “out” in the source clip (keyboard I and O). Then position your playhead where you want the clip inserted and hit F9.
And btw, as much as I appreciate Resolve’s default mappings, I prefer my own. You can fully customize the Resolve keyboard mappings.
How to Overwrite Footage
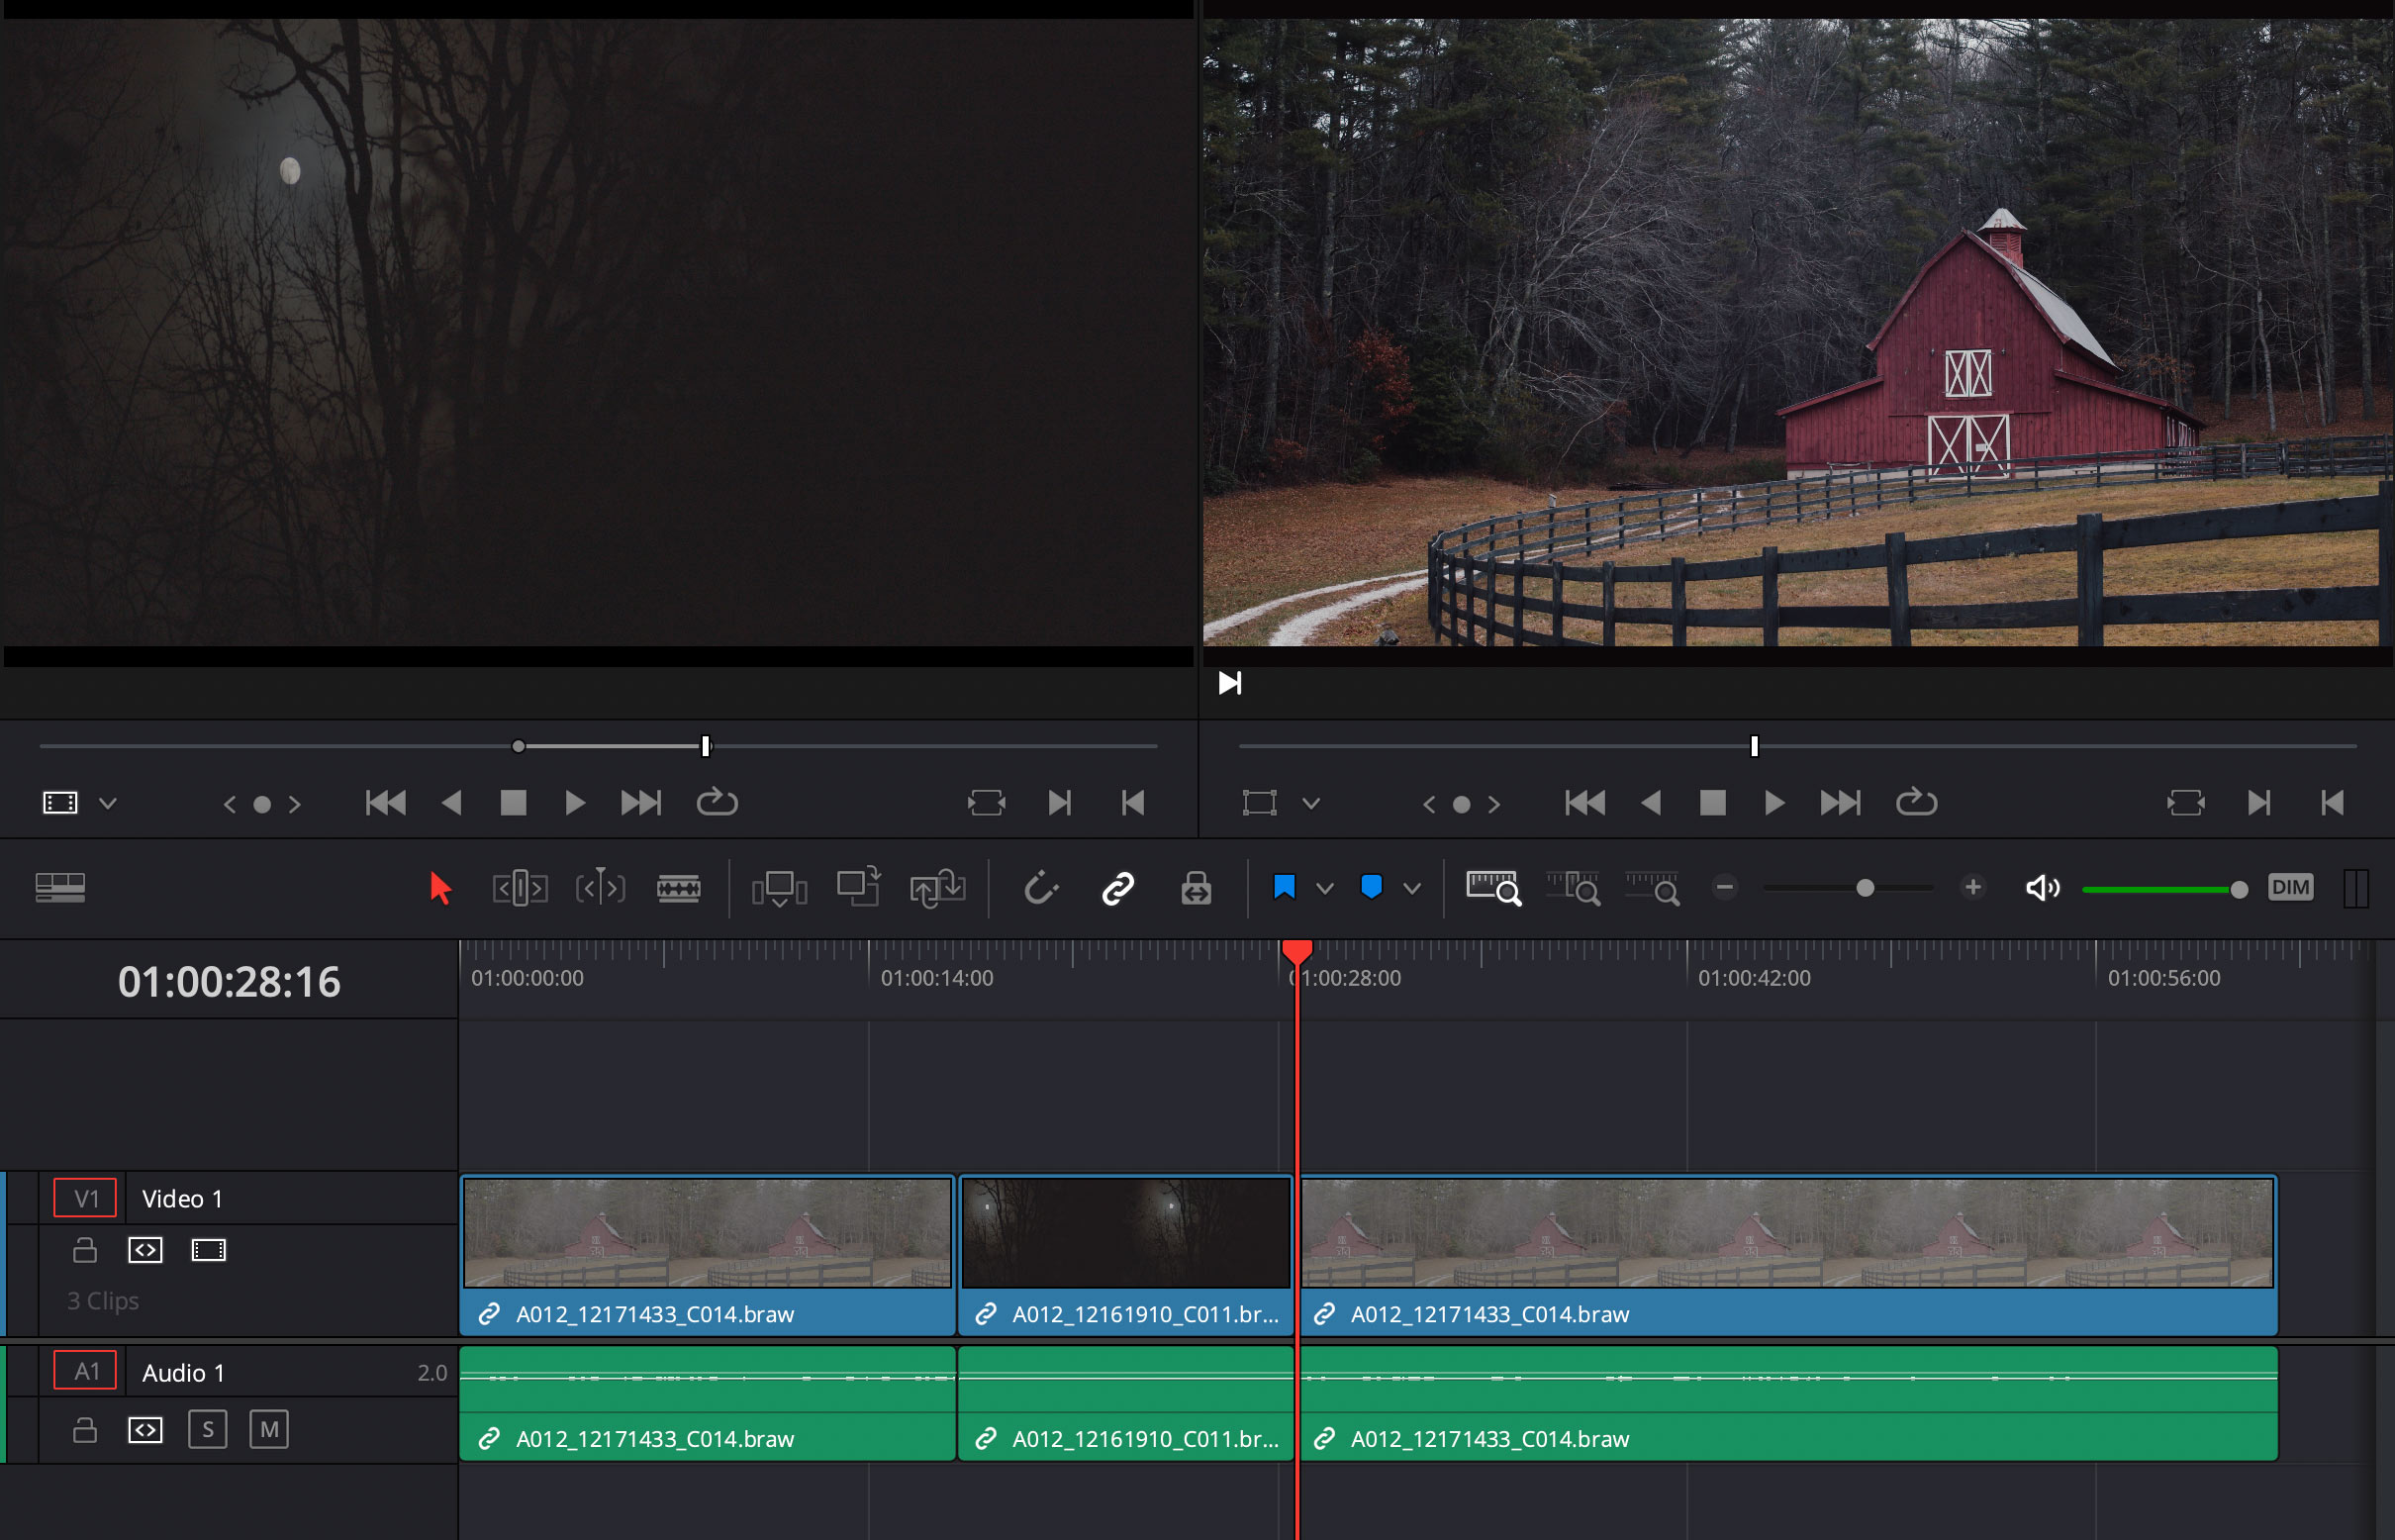
Instead of inserting footage, you can overwrite existing footage from your source clip. With the same in and out marks selected, hit F10 to overwrite existing material in the timeline. Instead of moving everything down to make room for the new clip, it will simply overwrite whatever is on the tracks.
How to Replace Footage
The replace footage feature is similar to overwrite, but used to replace only a certain area on the timeline. If you select an “in” on your source clip and then position the playhead over a section and hit F11, DaVinci Resolve will overwrite timeline footage either between two edit points on the timeline, or between a marked in and out.
Fit to Fill
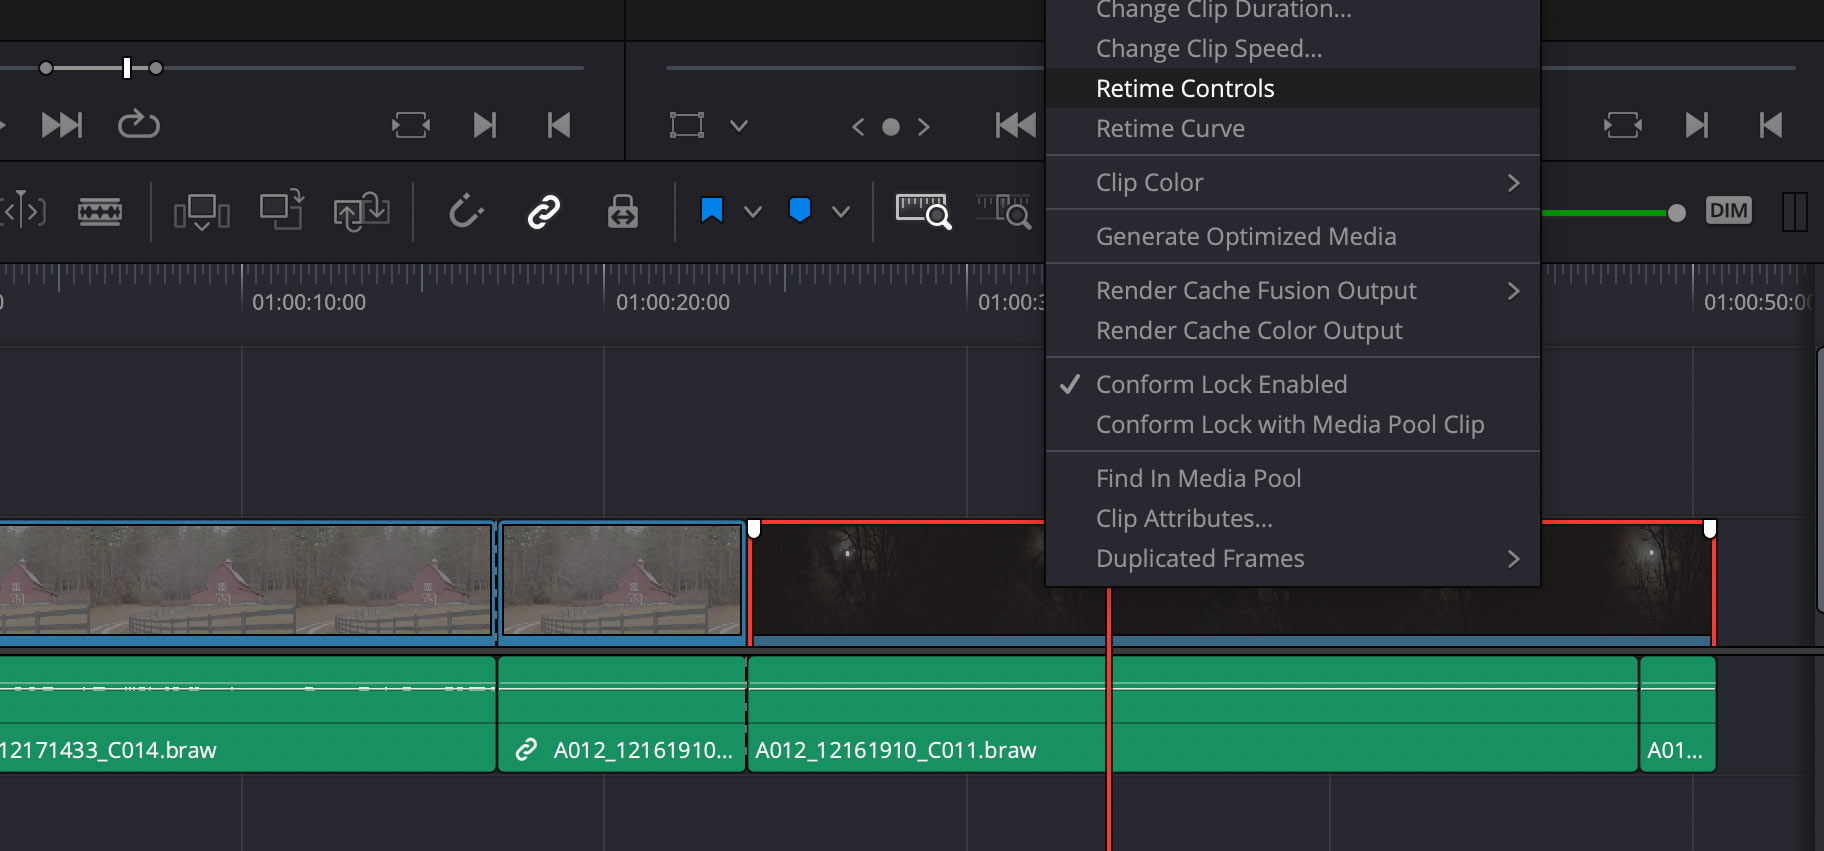
Another option similar to replace is Fit to Fill. If you have two edit marks and you’re inserting source material that is shorter than the desired section on the timeline, you can use Fit to Fill to fill the entire space by slowing down the source clip. Obviously this only works in certain situations. Use Shift + F11 to insert source material as Fit to Fill.
Once you’ve inserted the source material if you right-click on the section in the timeline and choose Retime Controls you can see detailed information on how much the clip was slowed down, etc.
Tip: To access all of these tools when dragging a clip into the timeline, simply drag the clip from your bin to the right, over the timeline monitor window. Various insert options will show up on the right.
How To Remove Clips From The Timeline
Now you have a few ways to add media to the timeline on the Edit Page. But what if you’re removing? There are two primary methods of deleting footage from a DaVinci Resolve timeline:
Delete Selected
If you select a clip in the timeline, or mark an in and out in the timeline and then hit the ‘delete’ key on your keyboard, DaVinci Resolve will lift the material from the timeline. This leaves a gap where the clips used to reside.
Ripple Delete
Conversely, ripple delete will remove the material from the timeline and also remove any remaining gaps. Every track in the timeline will be kept in sync with a ripple delete. So if you use the blade two and cut two points across all tracks on a timeline, ripple delete will remove the selection and close the gap. If you don’t cut through the material on all your tracks, ripple delete will take affect on the select clip and try and merge the rest.
Ripple Overwrite
The ripple overwrite tool is like combining normal overwrite with ripple delete. It overwrites existing content, but if the clip is longer or shorter, the timeline is either extended or the remaining gap is removed. Use Shift + F10 on the keyboard for Resolve’s ripple overwrite.
These are not the only ways to add and remove media to the timeline in DaVinci Resolve, but these are my favorites! And I love that you can map all of them to shortcut keys on the keyboard.
Coming from a decade of using Avid Media Composer, I’m shocked at the tools available in DaVinci Resolve at such an affordable price point. Resolve makes it possible for new filmmakers to tell their stories without the price tag of other solutions.
If you’re new to Write & Direct this is the online film school for aspiring directors. Discover more on our film school details page! You can also book a free call.
This tutorial is written for DaVinci Resolve Studio 19. Adding audio fades are extremely easy and highly flexible in DaVinci Fairlight and Resolve, but not 100% intuitive. So allow us to clear the flog! With an open project, click over to the DaVinci Fairlight page (the music notes icon on the bottom of Resolve).
1) Add Initial Fade in Fairlight
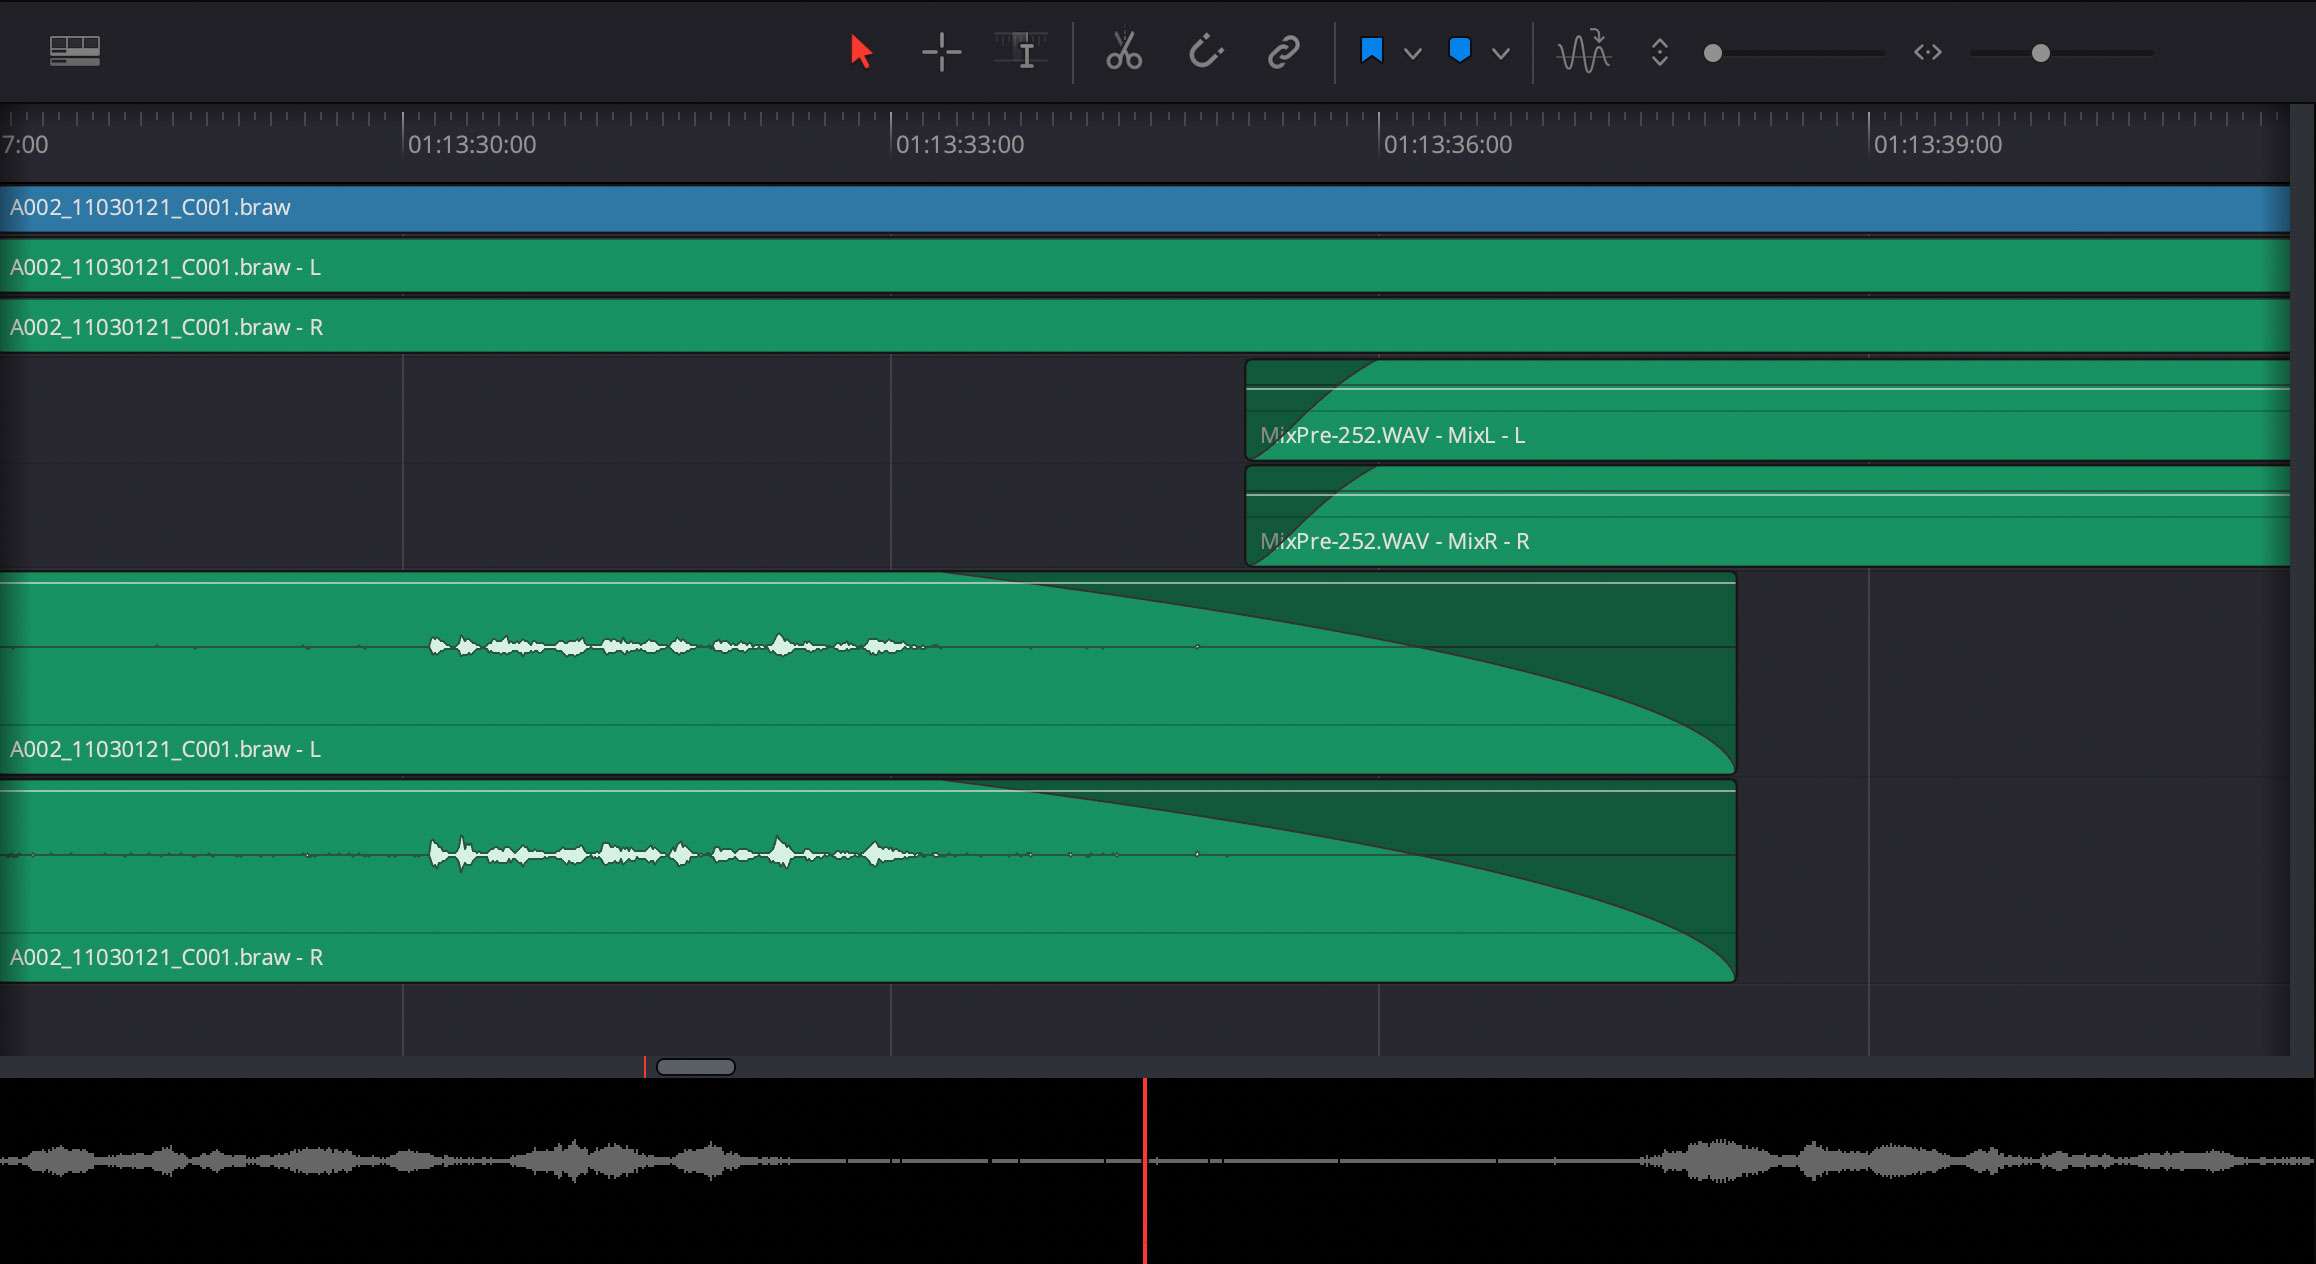
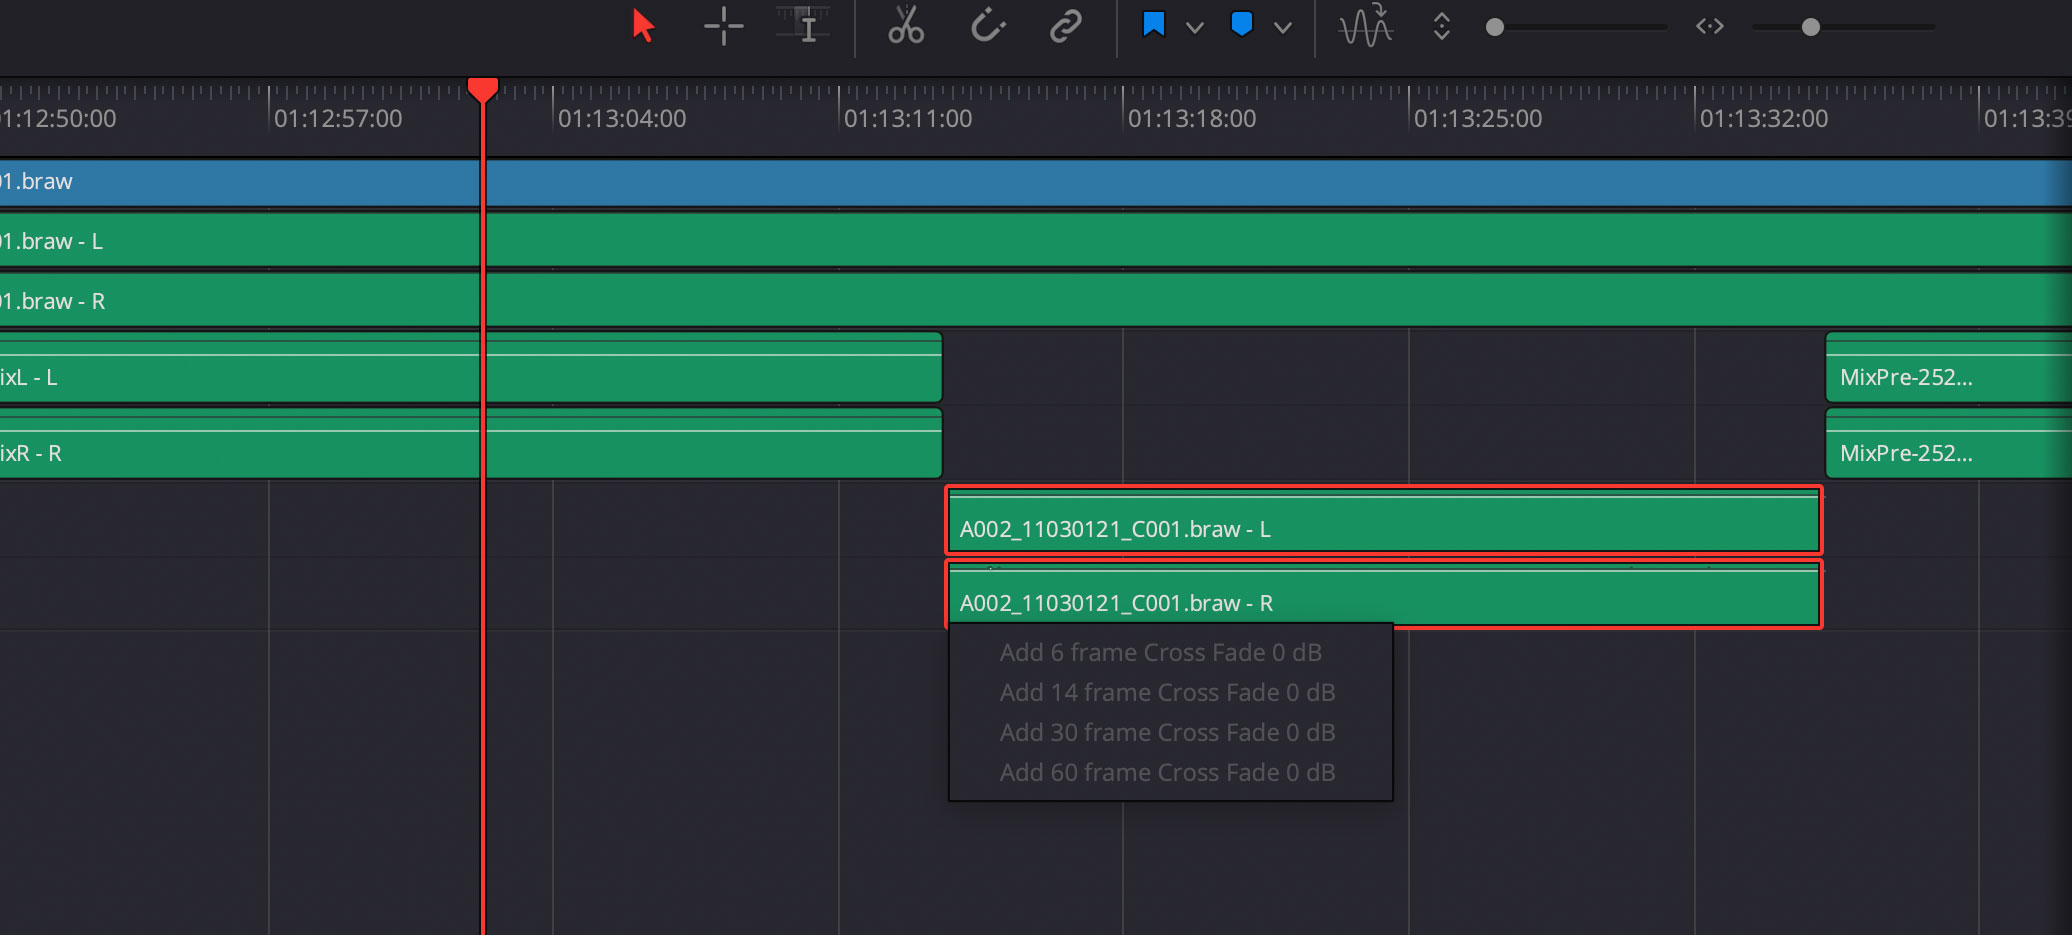
If you right-click any edit point on your audio track, you’ll be presented with various cross fade options. Just pick one as you can adjust the exact frame count easily after adding. If your edit point has an adjacent audio clip, it will default to a cross fade. If the audio clip is isolated on another track, it will add the fade to the beginning (or end) depending on where you right-clicked on the clip.
Alternatively (and even easier) you can simply click the white indicator on the top left or right of any audio clip and drag it over to introduce a fade. This works for both audio and video tracks.
2) Adjust Track Height for Fairlight Tools
To access additional tools in Fairlight you’ll need to adjust the height of your audio track. Each track has an information/settings box on the left of the track. Move your cursor to the bottom of this area for the audio track you’re working with. When your cursor turns into a double arrow, click and drag to change the height of the track.
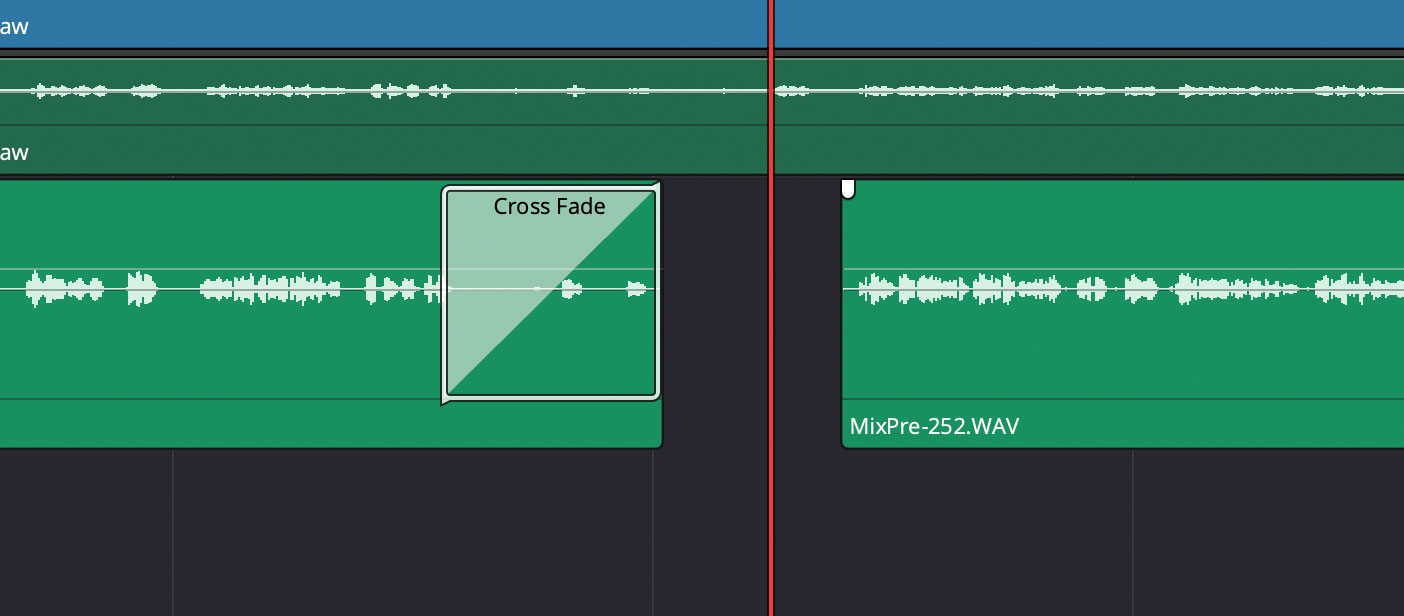
3) Adjust Fade Length
Now you can easily adjust the length and style of your audio fade using the white marker on the top of your track. Simply click and drag to shorten or extend the audio fade. You can also use the center dot on the fade to adjust the style of the audio fade.
4) Add Audio Fades Using DaVinci Resolve Edit Page
You can also work with fades on the edit page. Simply right-click or drag the white indicator as in Fairlight. You can also add them via the Effects palette, but this takes longer. First make sure the effects palette is open by clicking the Effects icon on the top right of DaVinci Resolve. Next, in the lower right effects palette, click on Toolbox. Here you can access various cross fades. Simply drag them onto your timeline in the desired spot.
The fades added via the Edit or Fairlight pages are accessible in each area. Personally, I like to keep all of my audio editing in Fairlight so everything is consistent. You also cannot control the type of fade on the edit page as you can within Fairlight.
“Rubber Banding” With Audio Key Frames
Another powerful method of manipulating audio is via audio key frames. You might hear people call it “rubber banding.” If you hear that term, they’re talking about adding key frames to a clip of audio in the timeline. To add an audio key frame in DaVinci Resolve or Fairlight with option + click (alt + click in Windows) on the gain line of your audio clip. Be careful to click on the actual gain (volume) line otherwise it will not give you the key frame.
You can also use the Inspector to add a key frame from the DaVinci Resolve edit page, but the keyboard method is much faster. And there you have it! Again, crazy simple but with Resolve Studio 19 freshly installed and everything at defaults, not always intuitive.
In case you’re new to external media and/or random array of independent disks (RAID) let’s real quick cover some key reasons why, as a filmmaker, you need to invest in RAID:
A RAID Array is FAST
An array of disks has an advantage over a single hard drive. When you copy your camera and audio data to the drives, the files are “striped” across all the disk drives in the array. The advantage of this is when accessed for playback, the video and audio files are read from all the disks simultaneously vs an individual disk drive. The speed increase is monumental.
RAID Can Provide A Safe Guard
RAID can give an extra layer of protection if we choose to setup our drive array as RAID 5 (there are various RAID options). In a RAID 5 array files are striped across all the drives along with parity information. If you have a drive fail mechanically, the parity information on the remaining drives is used to completely rebuild the lost drive when you replace the failed drive. It’s amazing.
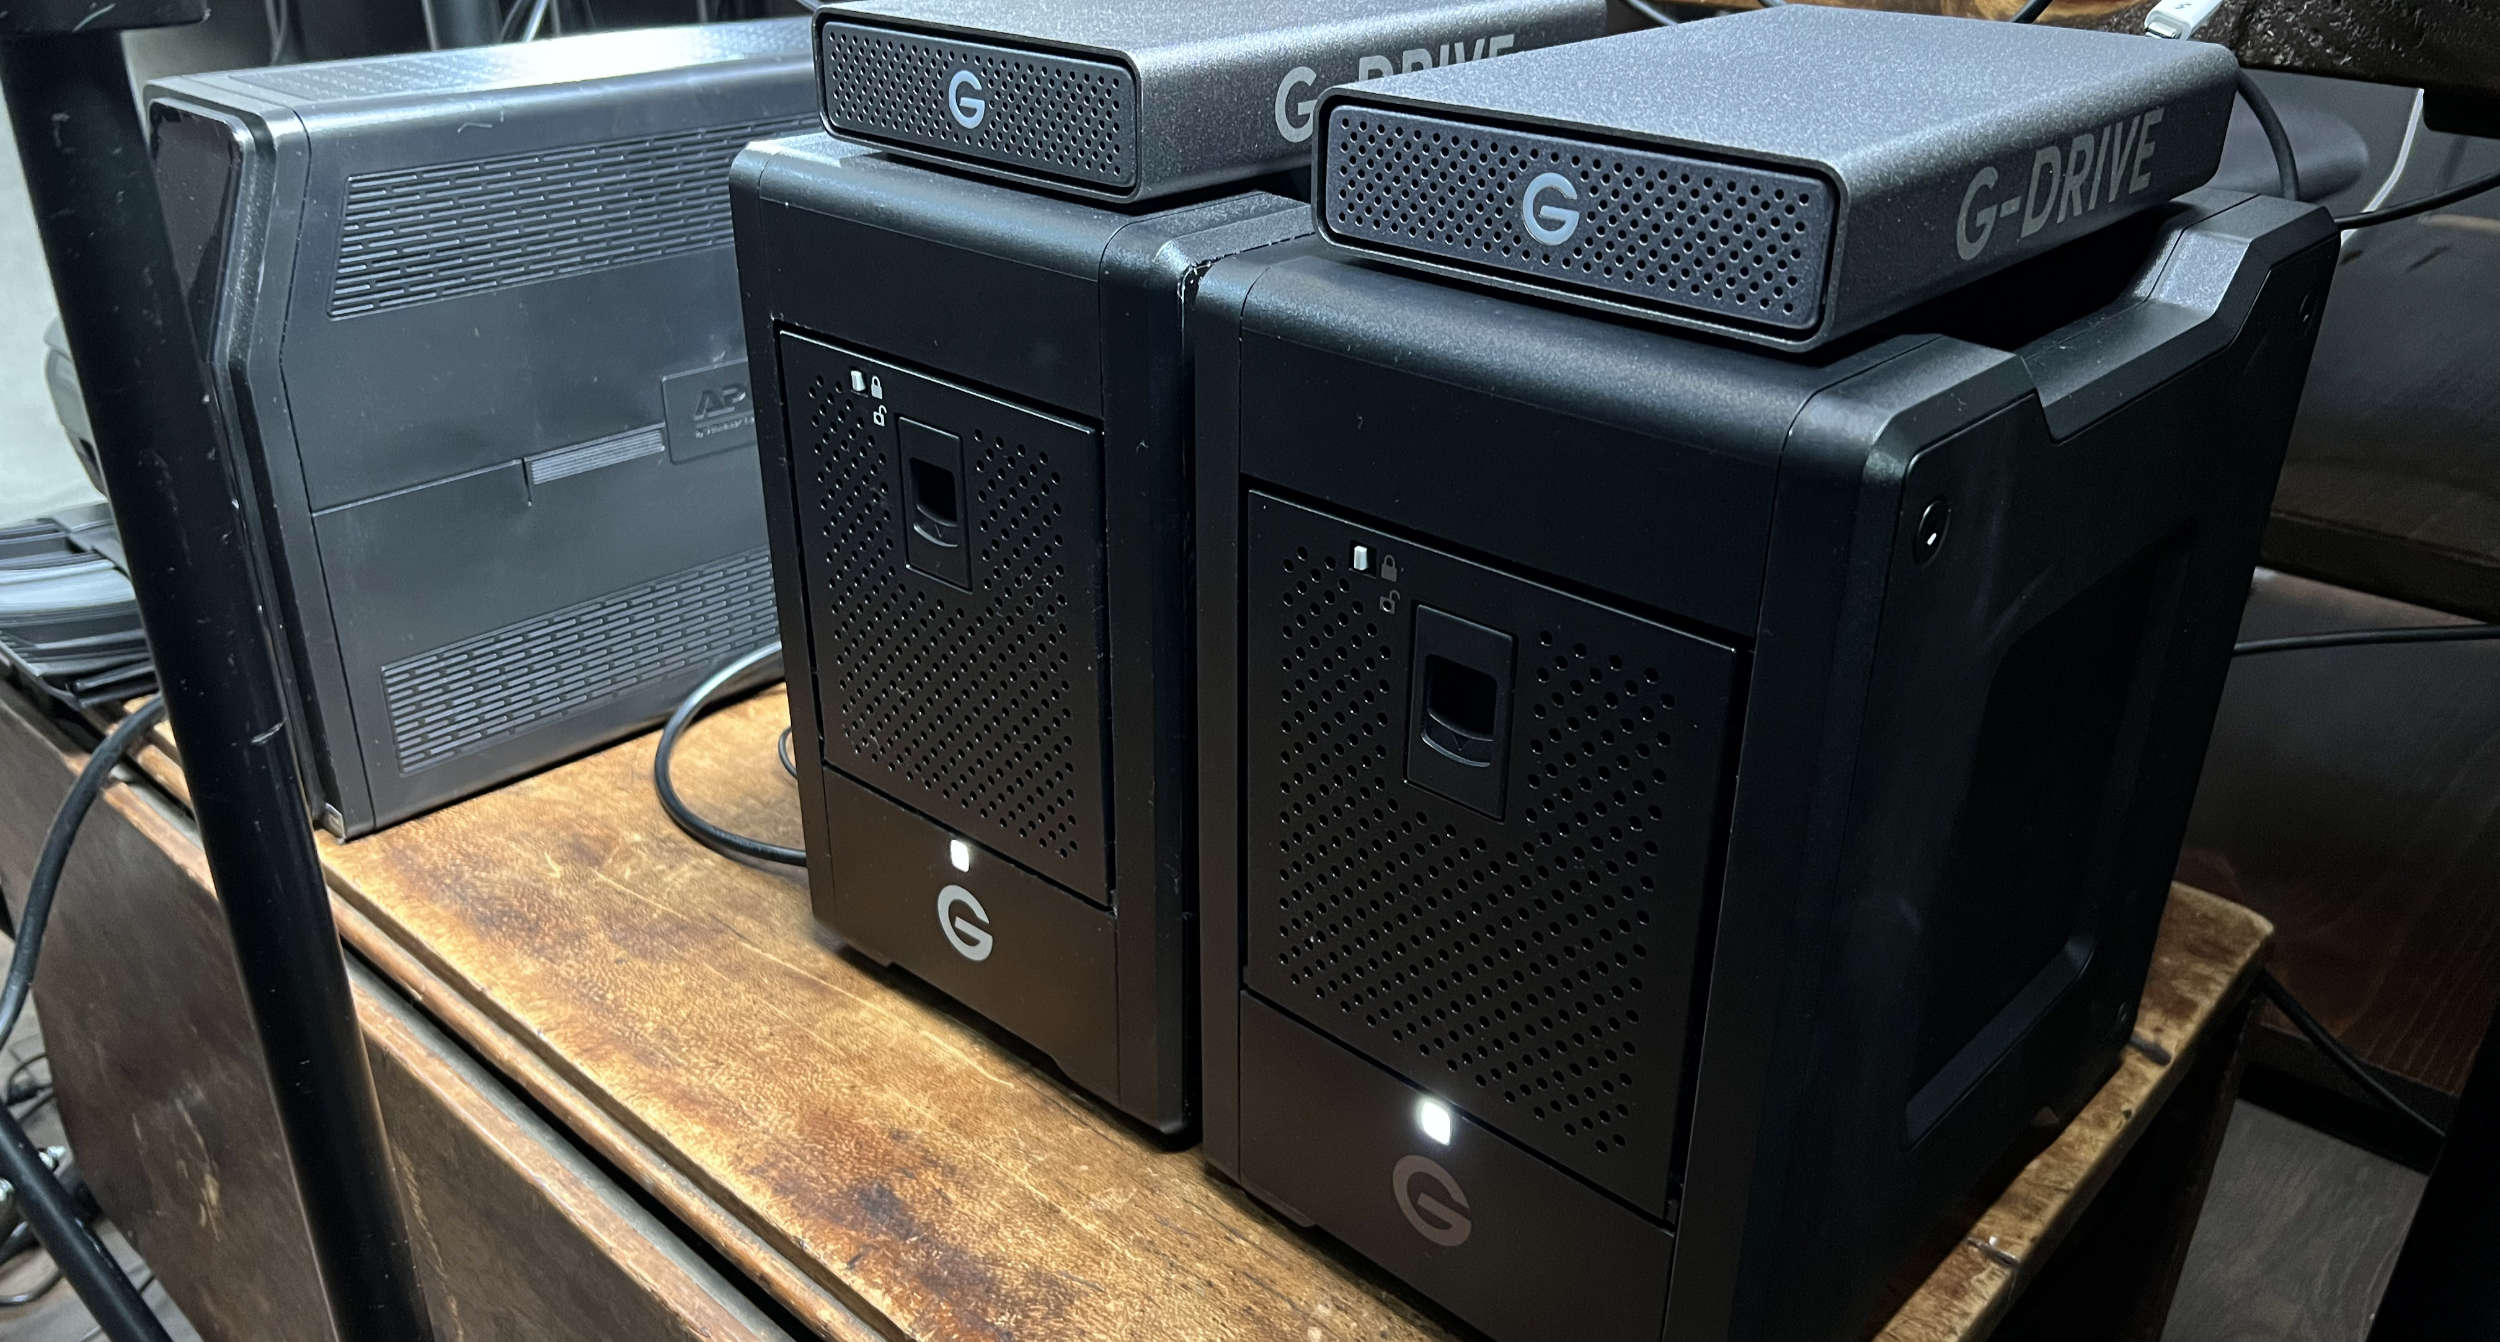
SanDisk Professional G-RAID
My favorite brand of external drives is G-Technology. When I first started as a filmmaker, I witnessed drives from various manufacturers crash and burn. People lost valuable data. My G-Drives were rock solid and have served me well.
Now G-Technology is owned by Western Digital and resides under the SanDisk Professional product line. A popular option for filmmakers is the G-RAID Shuttle which can have 4-8 spinning disks configured in various RAID arrays. And it connects via Thunderbolt 3.
G-RAID Stripe & Sector Size Configuration
Now to the purpose of this article: Stripe size and sector size! When you hookup a new G-RAID to your computer and open the G-RAID Software Utility you can setup a new disk array and then a new logical drive on the array. You can also use the wizard to this for you.
WARNING: If you use the first two wizard options, you’ll lose out on a major performance option.
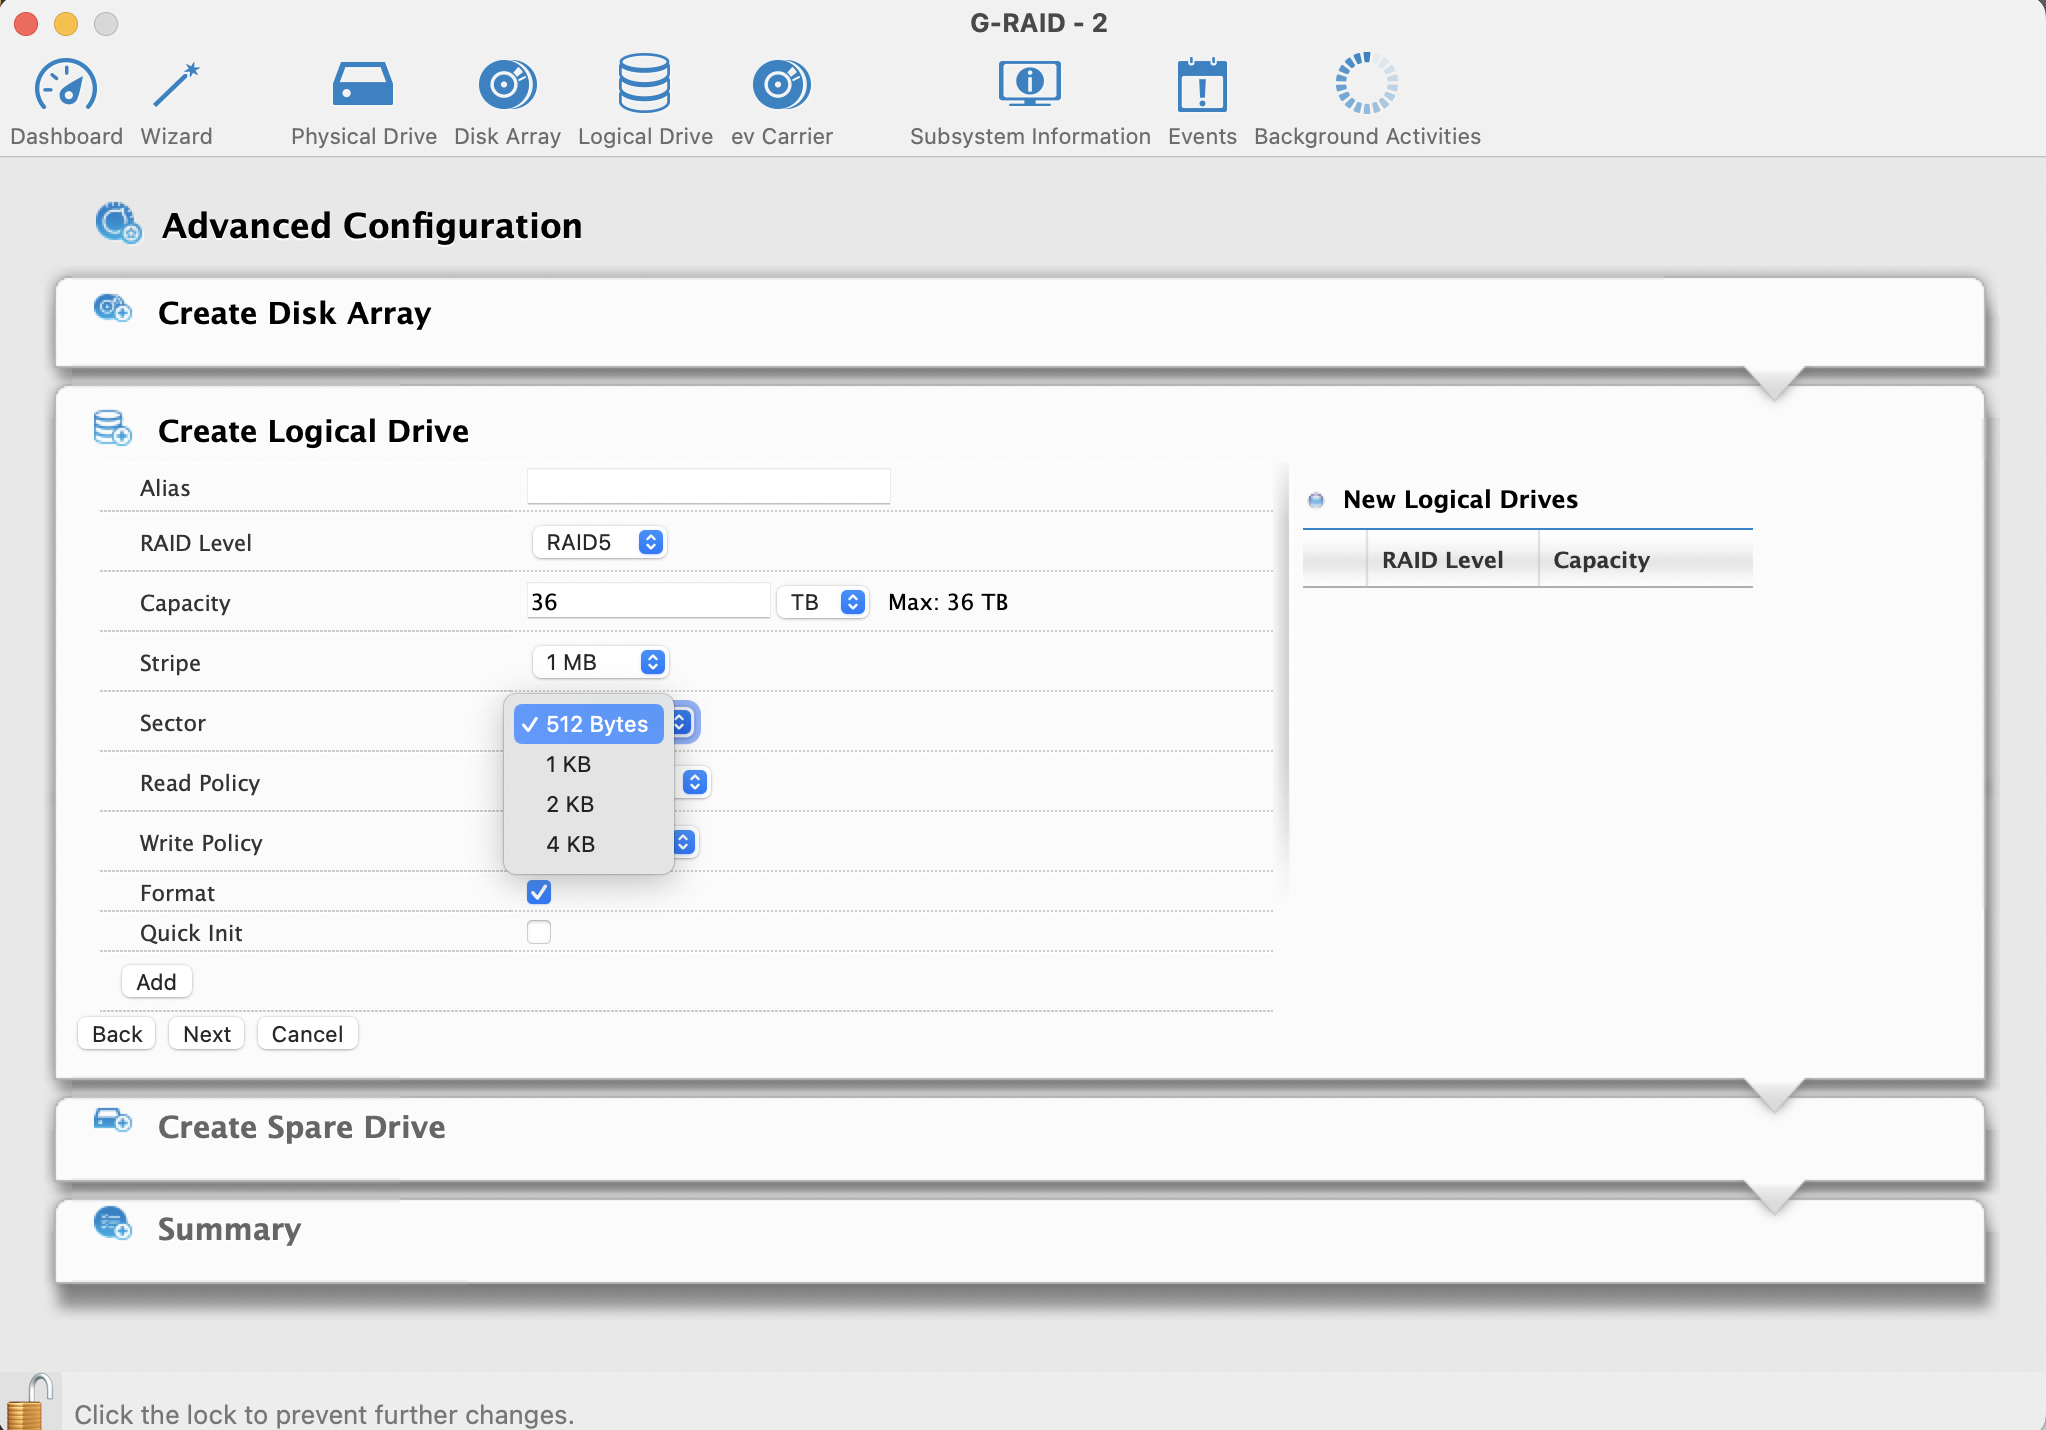
Use the 3rd option in the wizard which allows you to configure specific details of your array and logical drive, or manually create the array and then add the logical drive. Regardless of the method you choose, you’ll be presented with two choices that are key to performance:
Stripe Size and Sector Size as shown below.
Stripe Size
Stripe Size is the size of each block of data written as your video and audio is striped across your array of disks. For large files like camera and audio data, you want the largest stripe size you can configure so the data can be read and written with the least amount of work from the hard drives. A small stripe size means the disk arm have to perform more read operations to serve up the files.
Sector Size | 512 byte or 4K?
This is the one that isn’t documented very well. A sector is the smallest data area on a hard drive. All your files are split up into tiny sectors. Sectors make up the stripes of data.
Should you choose 512 or 4K for your logical drive on a SanDisk G-RAID?
You’ll notice the default sector size for G-RAID is 512 bytes. This was the most common size years ago for hard drives. However, the drives in your G-RAID support the newer 4K sector size. And just like the stripe size, a larger sector size means less work from the drive when you’re writing and reading data.
In my quest to determine the ideal configuration for G-RAID I contacted SanDisk Professional Support (i.e. Western Digital). They told me to use the 512 byte sector size as this would be better for efficiency and performance of the array.
But…I decided to do my own test.
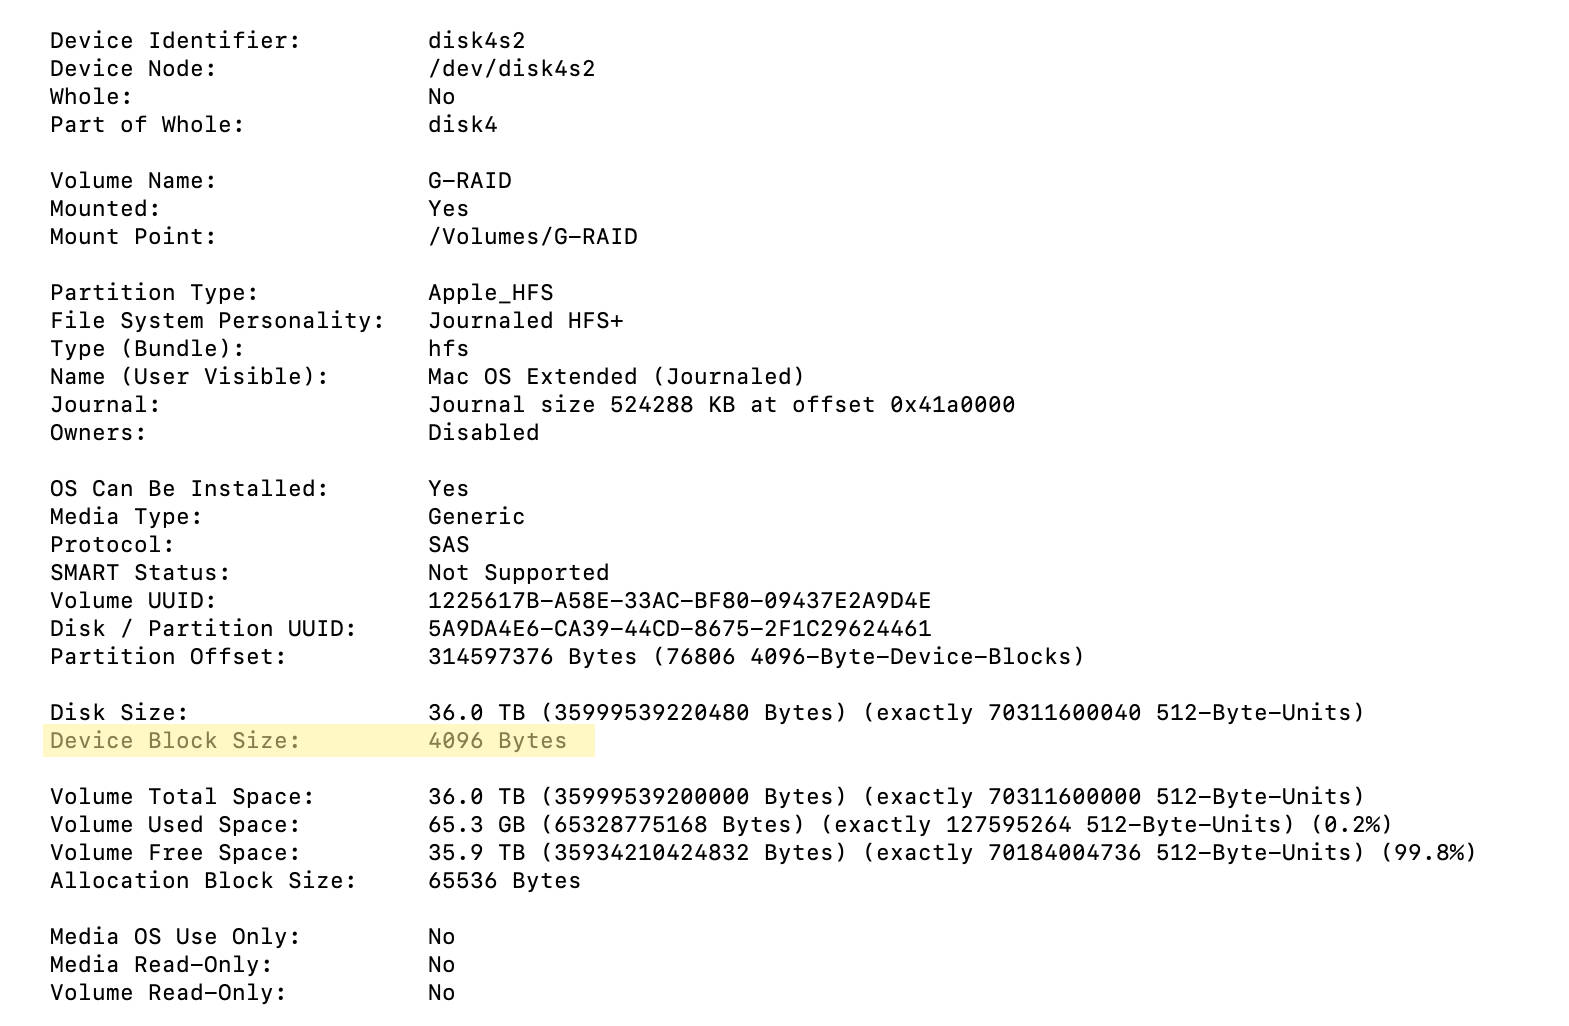
I setup an array and logical drive using 1MB stripes and 512 sectors. Copied a file from an SSD drive to the array, and then back again. Since SSD is faster, this ensured an accurate test. I then toasted the array and set it back up using 1MB stripes and 4K sectors. Did the same write and read with the same file. No cable changes.
The file size was 60.41 GB. You can verify the setup from terminal (macOS) or with the G-RAID Software Utility by viewing info on the logical drive. From terminal, type:
diskutil info -all
Find your external drive to see the configuration details:
512 Byte Sector Size Results
The 512 byte sector test had a write time of 7 minutes and 57 seconds. Read time was 1 minute 35 seconds.
4K Sector Size Results
The 4K sector test write time was 1 minute 21 seconds. The read time was 1 minute 32 seconds.
I was blown away at the write time difference! It went from almost 8 minutes down to a minute and a half. That’s insane. And read time was also slightly better.
Even though the wizard (even if you select the video server option) and Western Digital support will push you towards 512 byte sectors for your logical drive on the array, my advice is to never do that. A 4K sector size will deliver the performance you need when cutting your movie!
New to Write & Direct? This is an online film school for aspiring directors. It teaches the craft from development through post production. You can learn more on our film school details page!
What is exposure? It deals with controlling the light entering your camera to capture details in a scene. Let in too much light and you lose details in the brights. Not enough light? You lose details in the darks. The exposure layers available to us are: ISO, Shutter Speed, Aperture and Light.
You’ll hear of other models like the “exposure triangle” which might be fine for photography. But exposure layers is much more suitable to filmmakers. Each layer deals with light in some way. But some layers have specific tasks in the world of film, making them unavailable to us for getting exposure.
Before we dive into how to use the exposure layers, there are two things to wrap your head around:
1) ANSEL ADAMS ZONE SYSTEM
Ansel Adams, a famous black and white photographer born in 1902, developed an eleven zone-system that defined pure white to pure black with nine shades of gray in between. The exact halfway point of the zone system is called “middle gray” and it reflects 18% of light back. For now, that’s all you need to know about middle gray.
2) DYNAMIC RANGE
The ratio between the brightest brights and the darkest darks in an image is called dynamic range. Dynamic range is measured in stops of light. The human eye can see 21 stops of dynamic range while cinema cameras don’t come close. For example, the Black Magic Pocket Cinema Camera captures around 13.1 stops of dynamic range while an Arri Alexa captures 14 stops. And there’s a $30K price difference between these cameras!
So with that, imagine your scene has the sun setting over a small town. A white billboard catches the sun rays while the lower streets are encompassed in the early shadows of night. There is a large ratio of dynamic range in this scene. You have intense brights (billboard sign) and dark shadows. And there are more stops of light than your camera can capture. Sometimes, part of proper exposure is deciding where to compromise.
Let’s take a look at the exposure layers and how they can or cannot be used by us as filmmakers. We’ll start with the foundation layer:
ISO (International Standards Organization)
ISO is the foundation layer and at times the most complicated layer to initially understand. But you’ve gotta wrap your head around it so everything else makes sense.
Back in the days of film, ISO dealt with a film stock’s sensitivity to light. Also called the “speed” of the film. A production would decide on a certain film speed based on their needs for the scene. A film negative with an ISO rating of 300 is less sensitive to light than film with a speed of 800.
Digital cameras also have an ISO setting that can begin at 50 and go up into the thousands, depending on the camera. And similar to film, the ISO setting on a digital camera deals with the camera’s sensitivity to light.
Well, sort of.
ISO – WHAT YOU NEED TO KNOW
You can nerd out on ISO like crazy and run down the rabbit hole of analog and digital gain, etc. But for us aspiring directors, it’s overkill. Here’s what you need to know:
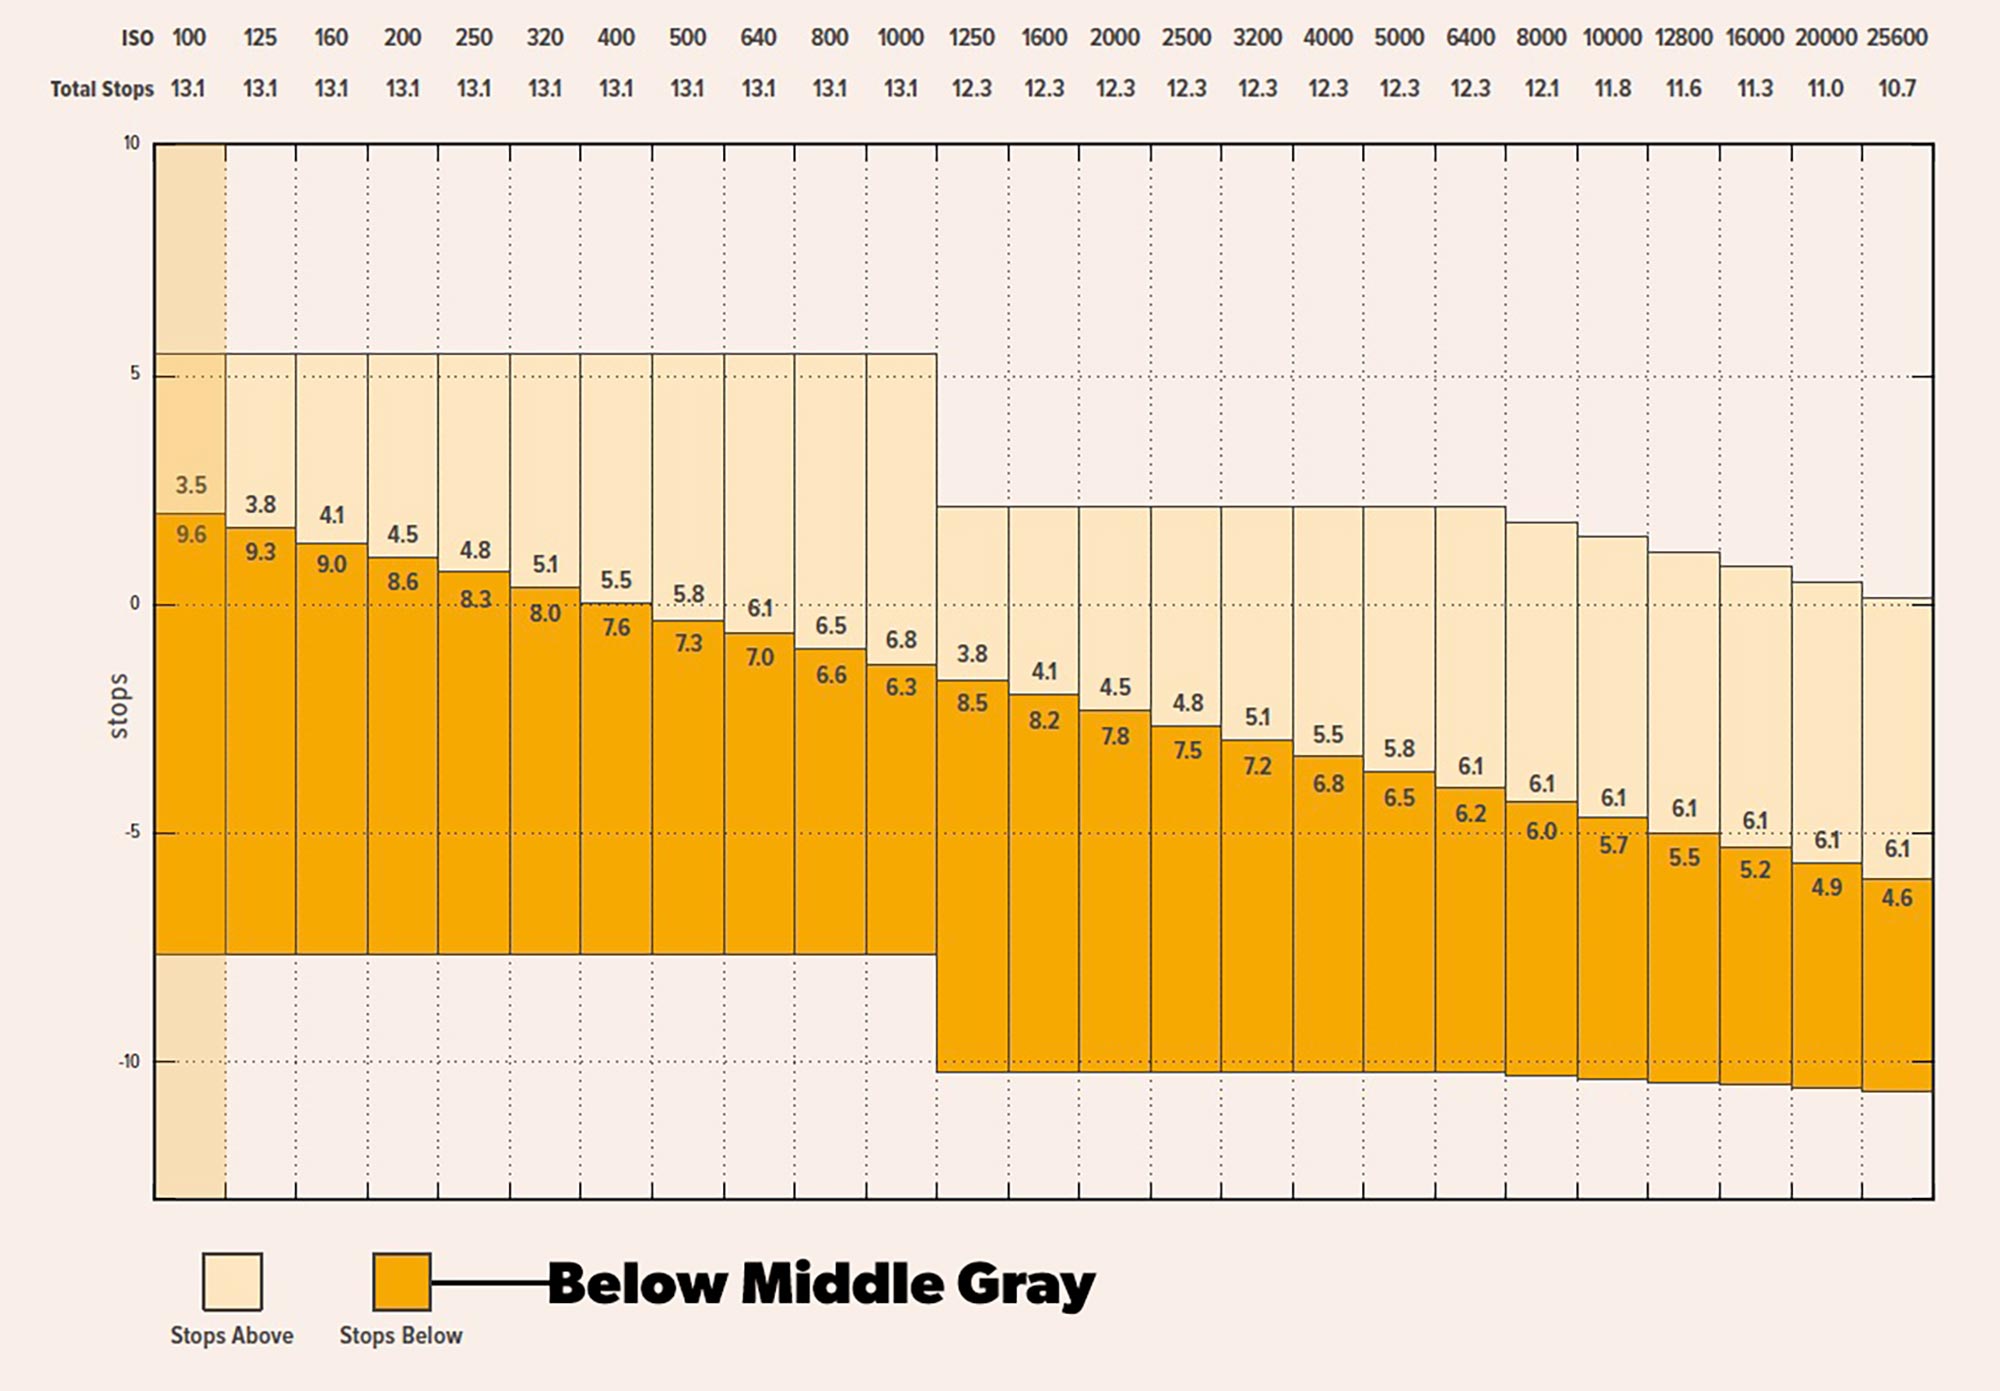
Let’s jump back to the concept of middle gray, but instead of the eleven zone-system we’ll reference the full dynamic range of a camera. If my camera has 13.1 stops of dynamic range, I have a certain amount of stops above and below middle gray. ISO controls this.
See the graph below from Blackmagic Design. Based on the ISO setting for their Pocket Cinema Camera you’re moving the camera’s dynamic range of exposure above or below middle gray.
Are you tracking with me?
Cinema cameras have what they call a “native” ISO which is the camera manufacturer’s recommended ISO setting for the best range above and below middle gray (given proper exposure). The native ISO on a Blackmagic Design Cinema Camera 6K is ISO 400. This gives a theoretical 5.5 stops above middle gray and 7.6 stops below middle gray of image detail.
What do you think more stops below middle gray does? Captures more details in the shadows.
So great right? You have a dim scene on a film noir movie and you want details in the shadows. So just drop the ISO and you’re done!
Not exactly. Dropping my ISO down to 100 doesn’t work any miracles. I still have to expose to this setting — just like the film days. Dropping down to ISO 100 will give me more details in the shadows, but only if I exposure correctly.
So with that, let’s move up to the next exposure layer — shutter speed.
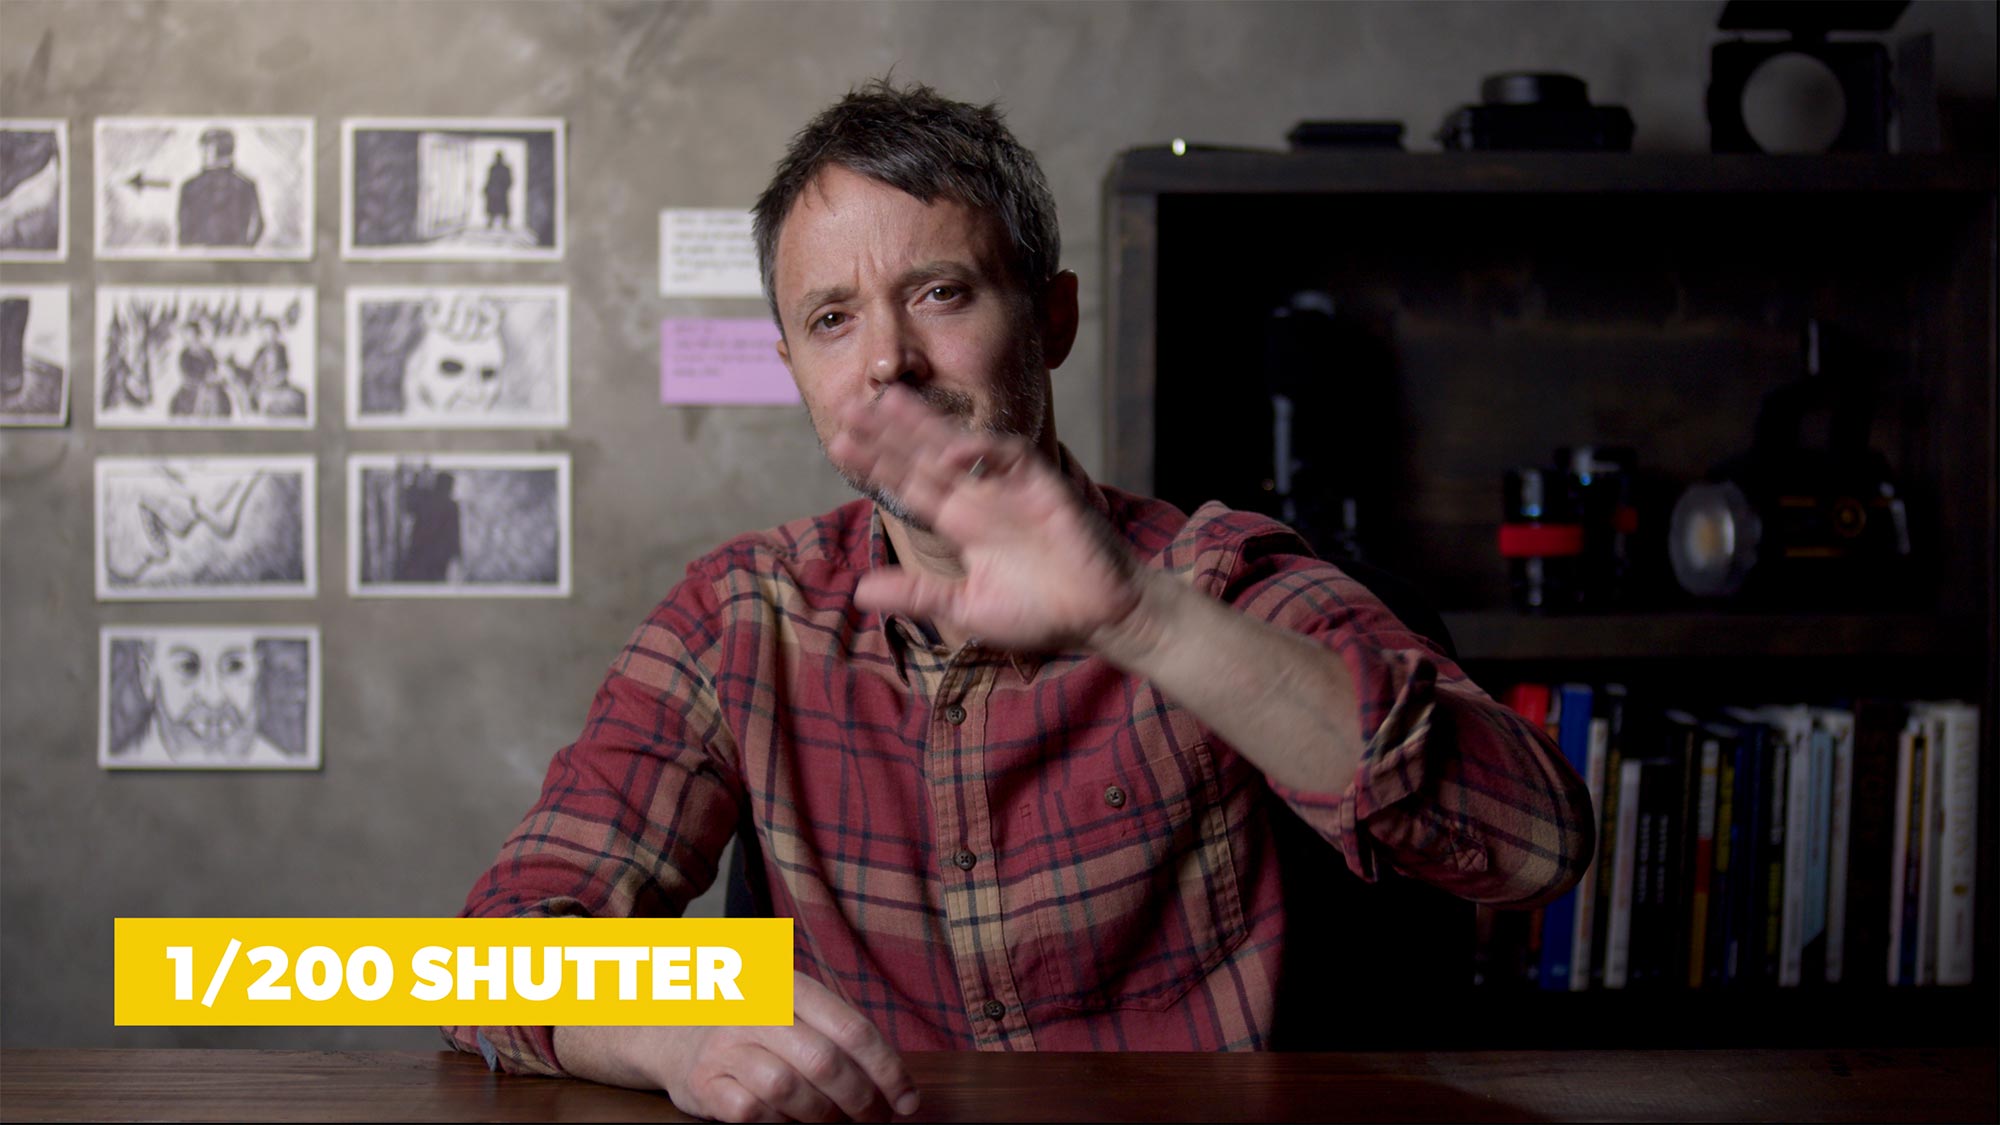
SHUTTER SPEED
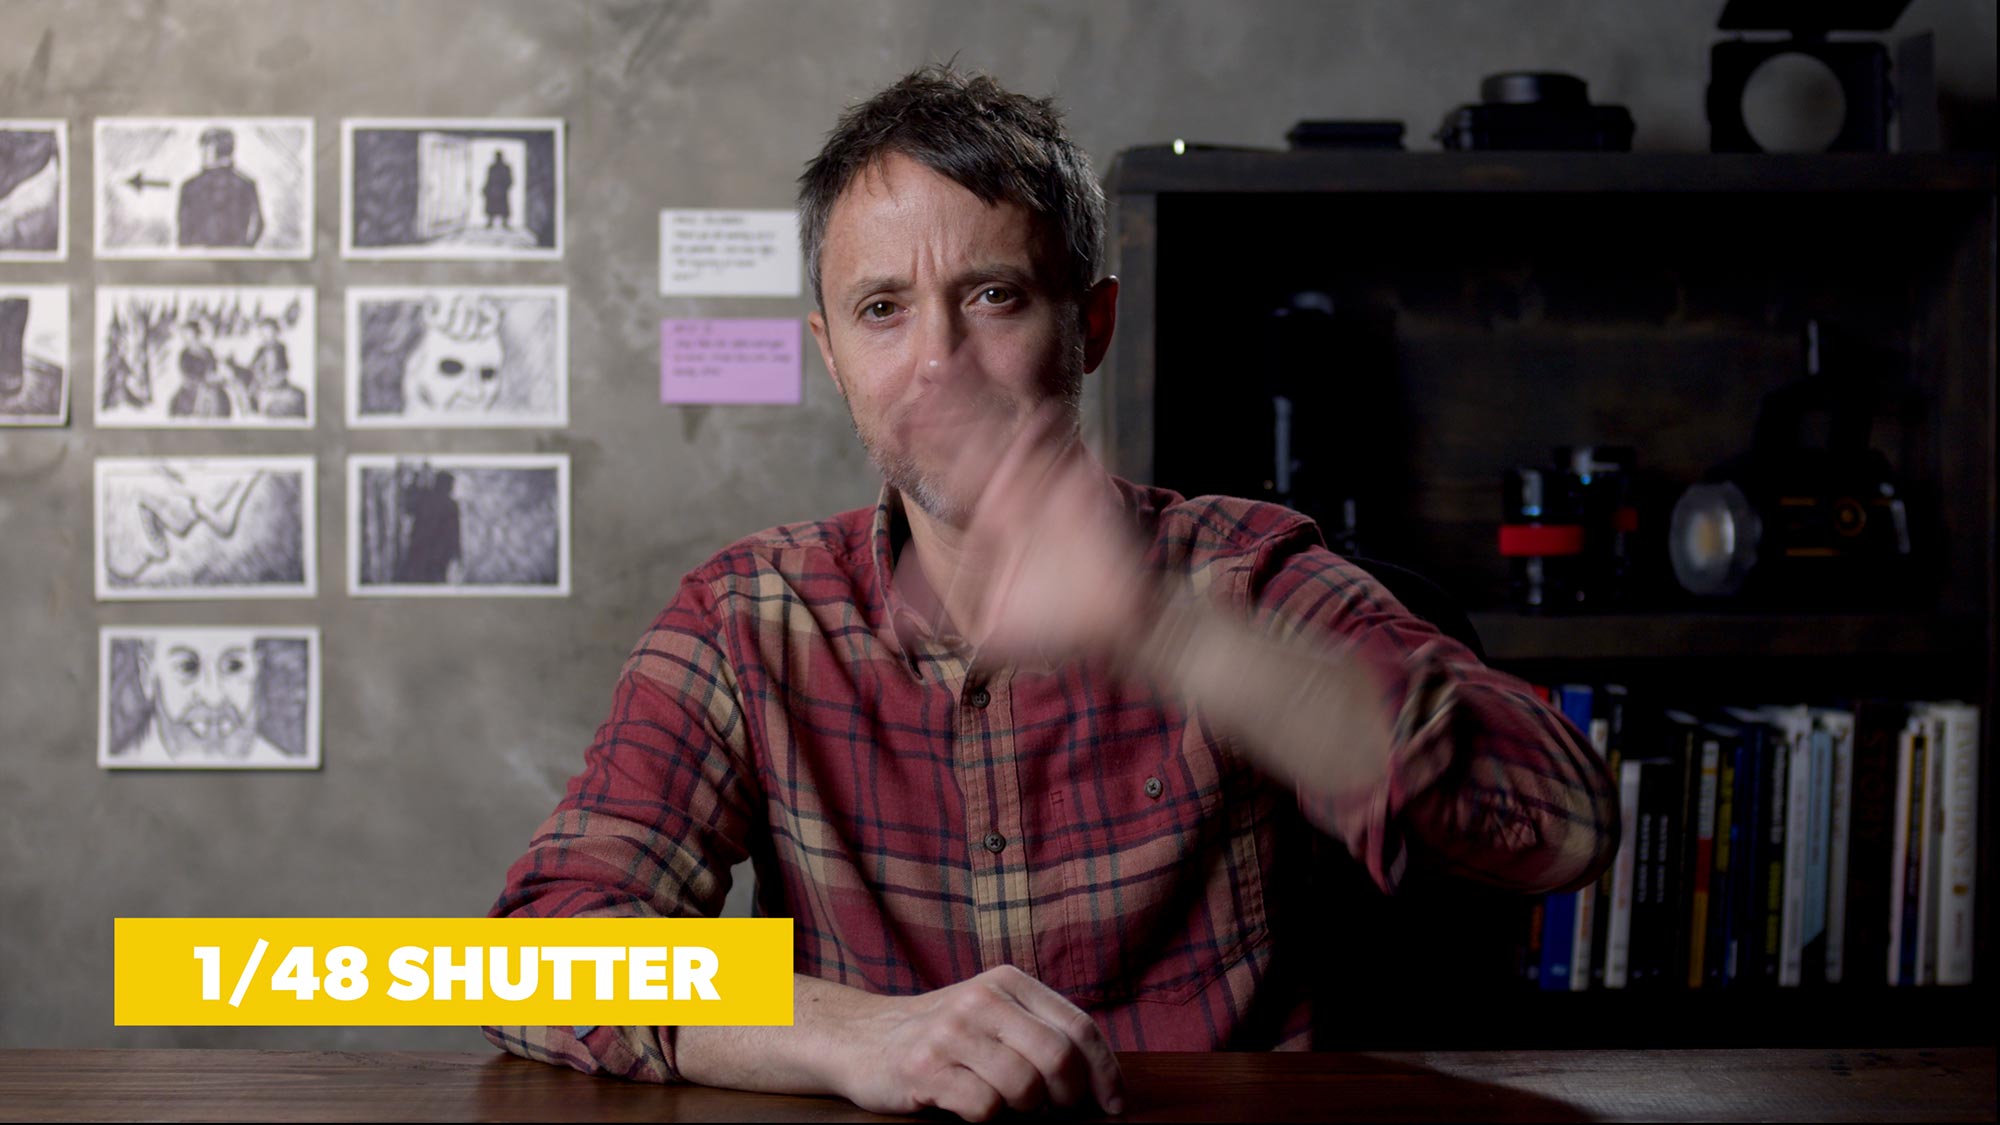
The camera’s shutter controls how long the sensor is exposed to light. Shutter speed is measured in parts of a second. A 1/200 shutter is open for one two hundredth of a second and would be considered a “fast” shutter. A fast shutter cuts down on motion blur and produces a crisper image. A slow shutter introduces motion blur. See the examples below:
Although the shutter controls how long a sensor is exposed to light, it’s not an exposure layer we can use to actually control exposure. Why not?
Cinematic motion blur.
We often shoot narrative film at 24 frames a second for a cinematic look and feel. But it’s not just about 24 frames. There’s another part — an associated cinematic motion blur defined by the 180 degree rule. Film cameras used to have rotating shutters that exposed each frame of film to light based on a degree of the shutter’s opening. And the shutter angle was set to 180 degrees.
Audiences now associate the look and feel of 24 frames and the resulting blur from a 180 degree shutter with movies. To achieve the same motion blur with digital cameras you multiply your frame rate by 2.
24 x 2 = 48
If we’re shooting 24 frames our shutter should be set to 1/48th of a second. Shooting 24 frames with a faster shutter would not deliver the cinematic feel that we’re after.
Some cameras (like Blackmagic Design cameras) allow you to set the shutter by parts of a second or by angle. This doesn’t change the mechanics of the camera, but simply allows you to do it either way. The advantage of angle is that you’re guaranteed the right motion blur regardless of frame rate.
But here’s the thing: Even though shutter speed technically does affect light hitting your camera’s sensor which affects exposure, it can’t be used as an exposure tool due to the 180 degree rule.
Make sense? Okay, so what’s next?
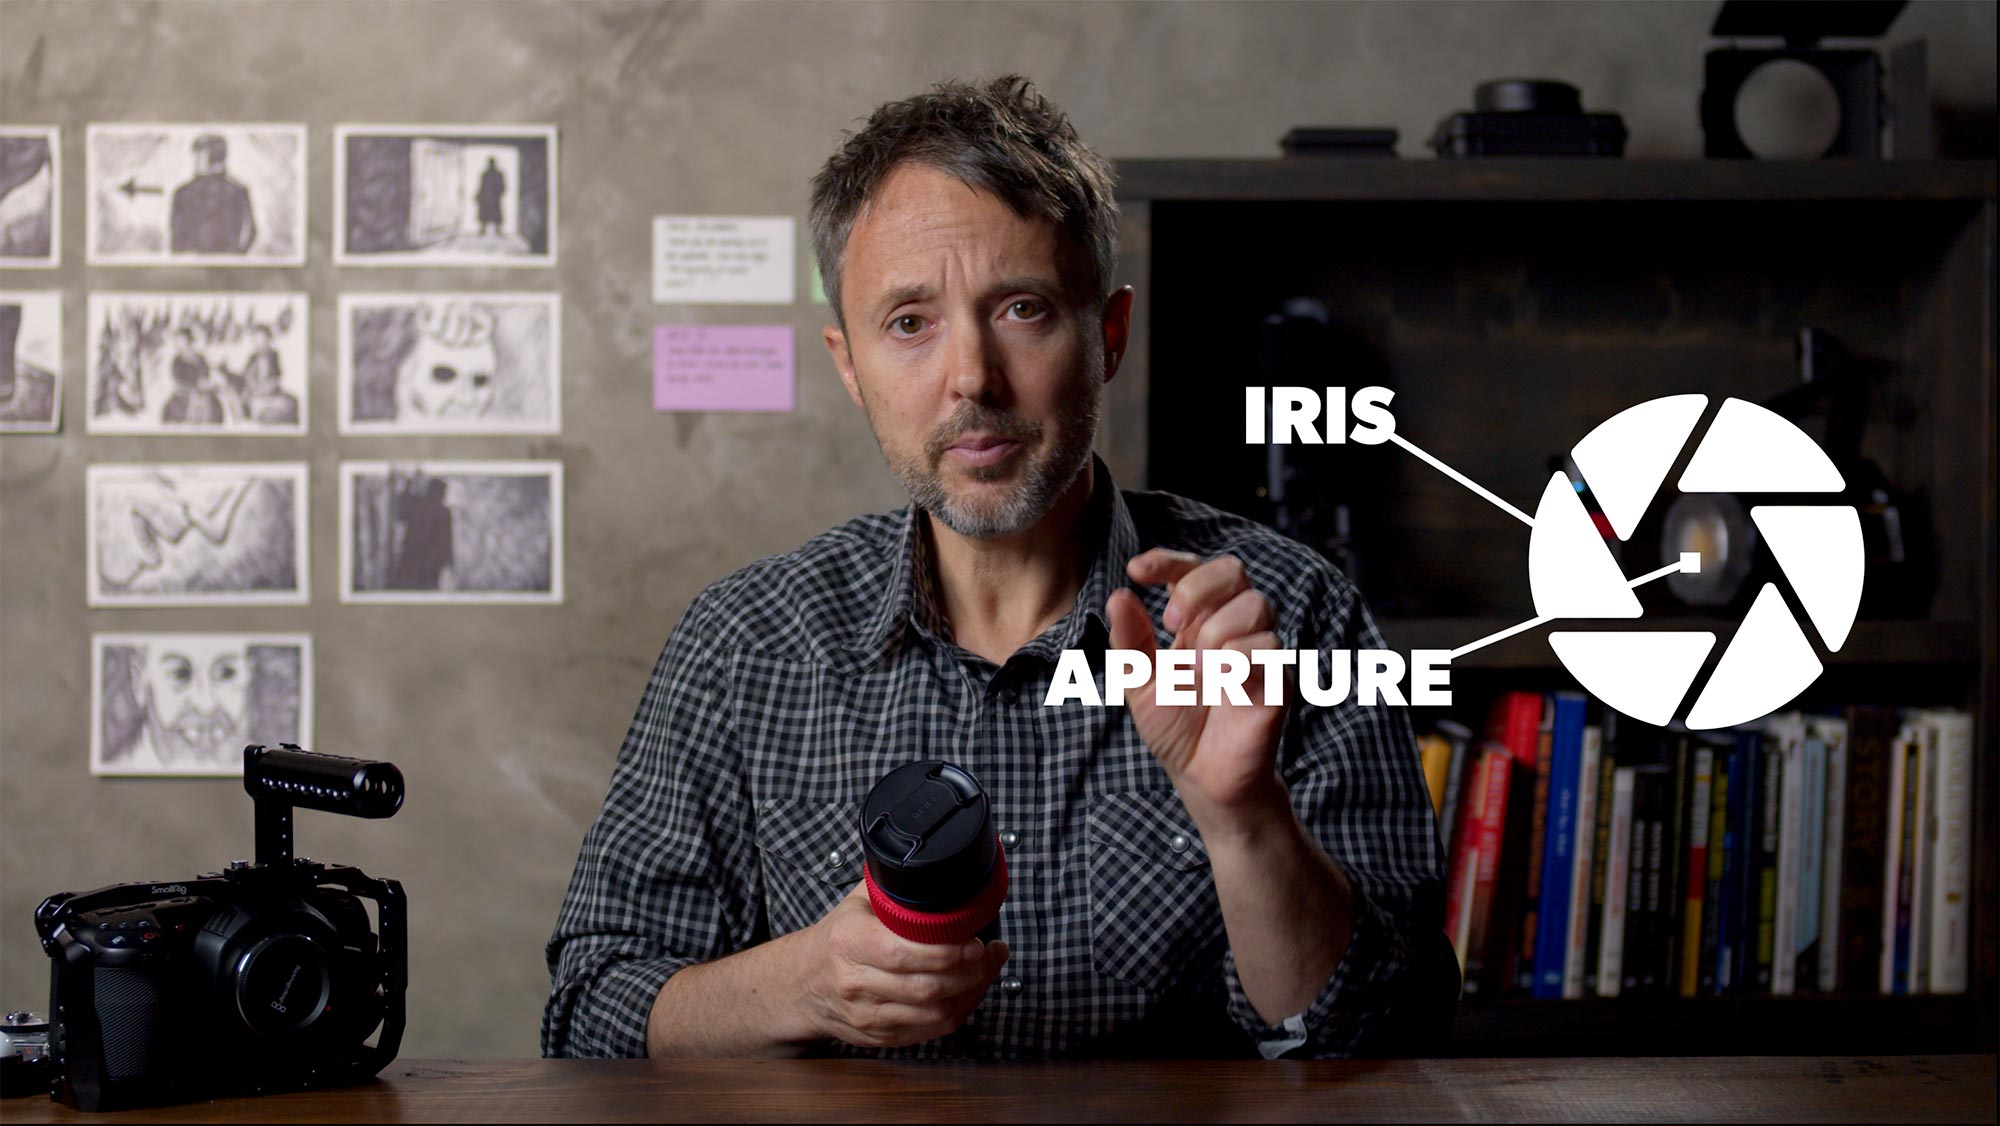
APERTURE
For aperture we leave the camera and move into the lens itself. A lens has an entrance pupil similar to the human eye. The entrance pupil opens to allow light in and closes to cut light out. The mechanics that open and close is called the iris, and the actual opening itself is aperture.
Aperture is measured in stops of light referred to as focal stops or F-STOPS on the lens. The lower the F-STOP the wider the aperture. If you ever hear someone say “I’m shooting wide open” it means they’re at the lowest F-STOP value for that particular lens. This means they’re letting in as much light as possible.
Nice! We finally have an exposure layer that helps control exposure. Actually, not so fast.
What else does aperture affect? Depth of field.
Opening and closing the IRIS on a camera mimics a distance change to your subject which affects your depth of field. The lower your F-STOP the shallower your depth of field. If you’re shooting a scene with a couple actors in it, your minimum F-STOP is gonna be 5.6 or greater. Otherwise you’ll have them falling out of focus way too easy. So what does this mean?
It means another exposure layer is sometimes not available to us for getting exposure! Crazy right? So what’s next?
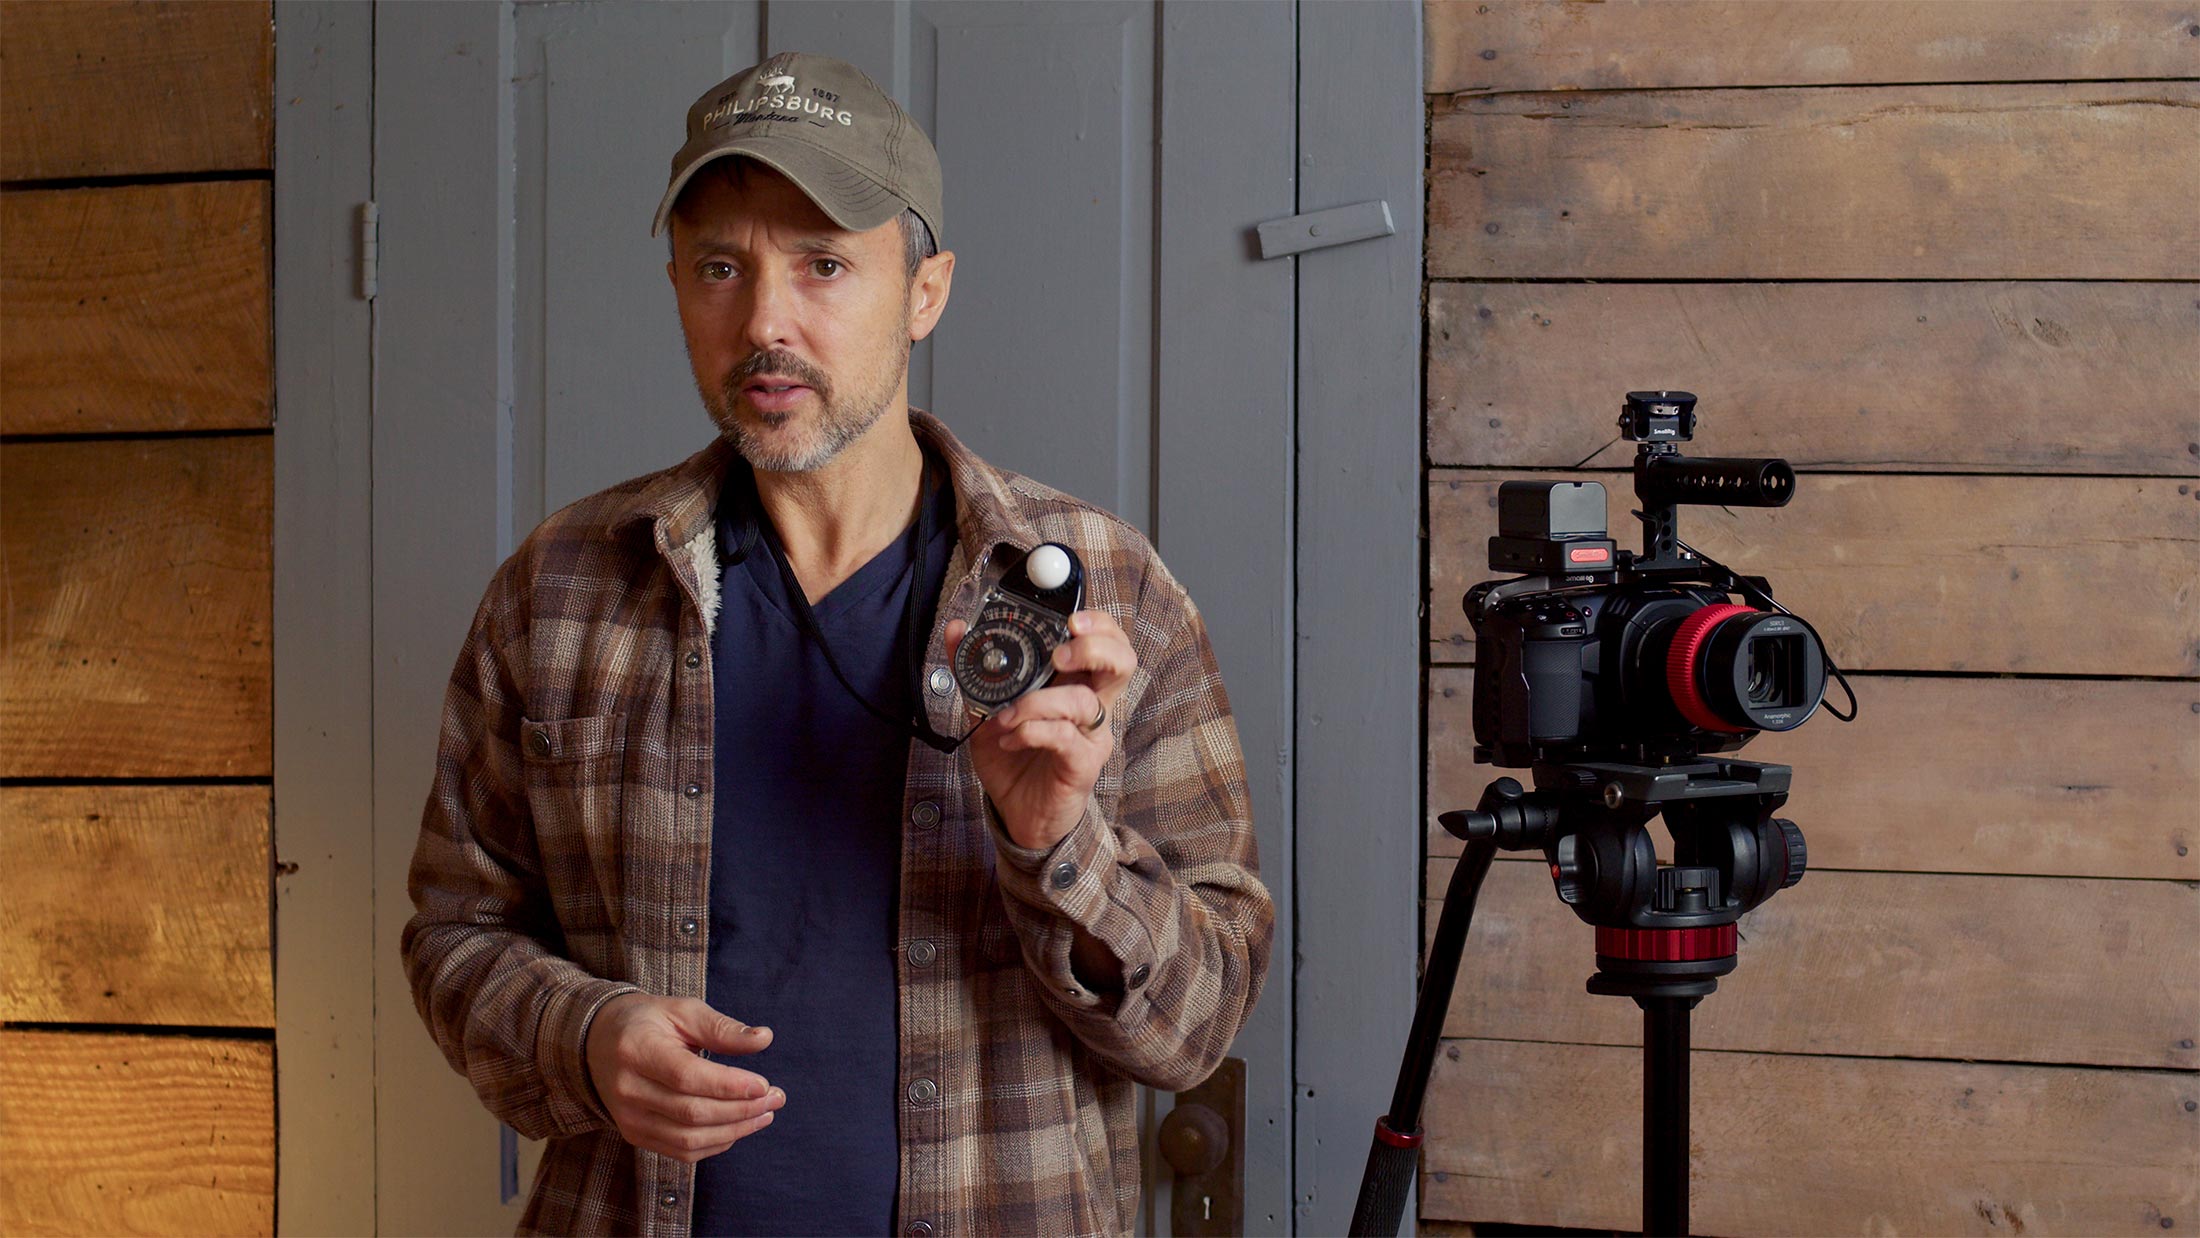
LUMINANCE (LIGHT)
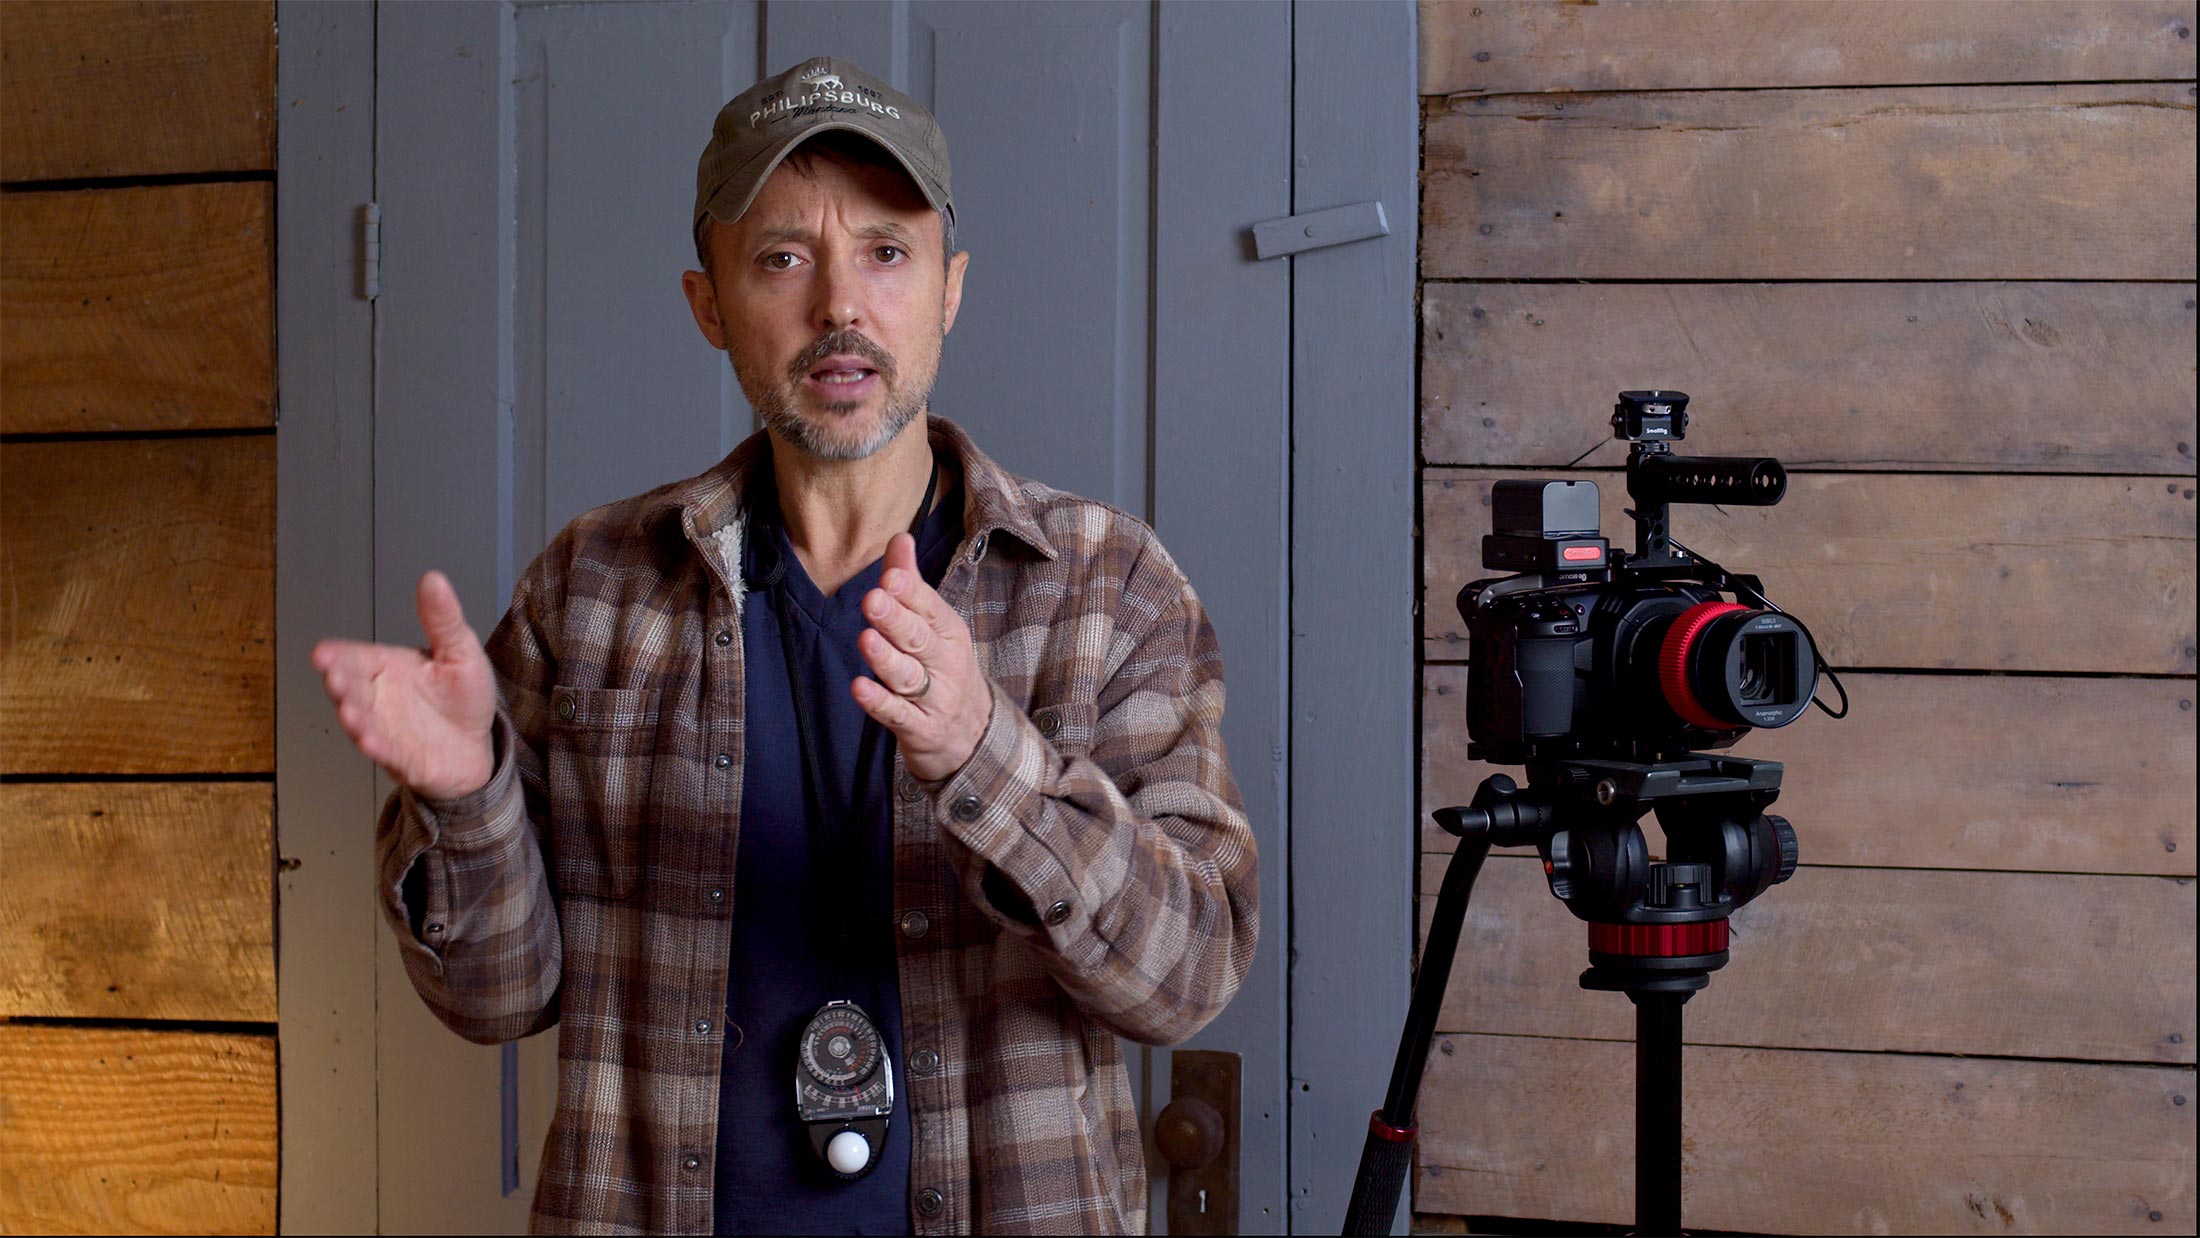
Our final exposure layer is light, and light is often the only layer available to us as filmmakers that directly affects exposure. This is paramount to understand. To drive these points home, let’s say the image below is our set. After we find our motivated light and setup our key, fill and background lights (at a minimum) to dial in the mood and add depth we’re ready to work through our exposure layers. To do that we grab a light meter and begin with the foundation:
ISO
For ISO we’ll go with the native ISO of 400 for the Blackmagic Pocket camera. This will give us a good balance of dynamic range above and below middle gray. If we can get exposure at the native ISO, unless we have a specific reason otherwise.
SHUTTER SPEED
We’re shooting 24 frames a second so our shutter is set to 1/48 or 180 degrees.
APERTURE
I’ll grab an incident light meter and take a reading. It tells me the current lighting is 40 foot candles.
I’m shooting 24 frames so this has me at an F-STOP of 2.8 for proper exposure (according to the light meter). So if I set my lens to 2.8 that’s it. I’m done! I’ll have proper exposure.
Easy right?
So even though layers 1 and 2 weren’t used for exposure specifically, layer 3 allowed us to dial it in.
But what if this scene had 2 or 3 actors? As mentioned we need to be at an F-STOP of at least 5.6 or higher for a proper depth of field. If I move the light meter to the desired 5.6 F-STOP it will indicate my foot candles rating needs to hit 160. Quite a bit brighter!
The only way to get proper exposure in this scenario would be to modify our final layer: Lighting on set. We’d need to go to our key light and increase it until we get a light reading of 160. And we’d also have to adjust fill and background lights to keep the balanced look that we have.
Then and only then would I have proper exposure at an aperture of 5.6.
Make sense? Let’s take another example:
OUTSIDE: Too Much Light
Let’s assume we’re outside on a cloudy day. We’re again shooting on the Blackmagic Pocket Cinema Camera using a SIRUI anamorphic lens with an F-STOP range of 2.2 to 16.
We’ll stick with the native ISO on the camera and set the shutter to 1/48. Next we’ll take a light reading. Let’s say it says it tells us we need to be at an F-STOP of 16 to get proper exposure. We close down to 16 and we’re good!
But that’s also a very deep depth of field. What if we didn’t want that?
We need to operate at our fourth layer…but we can’t control the sun.
What to do?
A large silk could be used to remove stops of light. Or an easier method would be to use an ND filter. “Sun glasses” for your camera. ND filters can be added to a lens (the 6K Pro has internal ND) and such a filter removes stops of light allowing us to open up.
Let’s look at a final example:
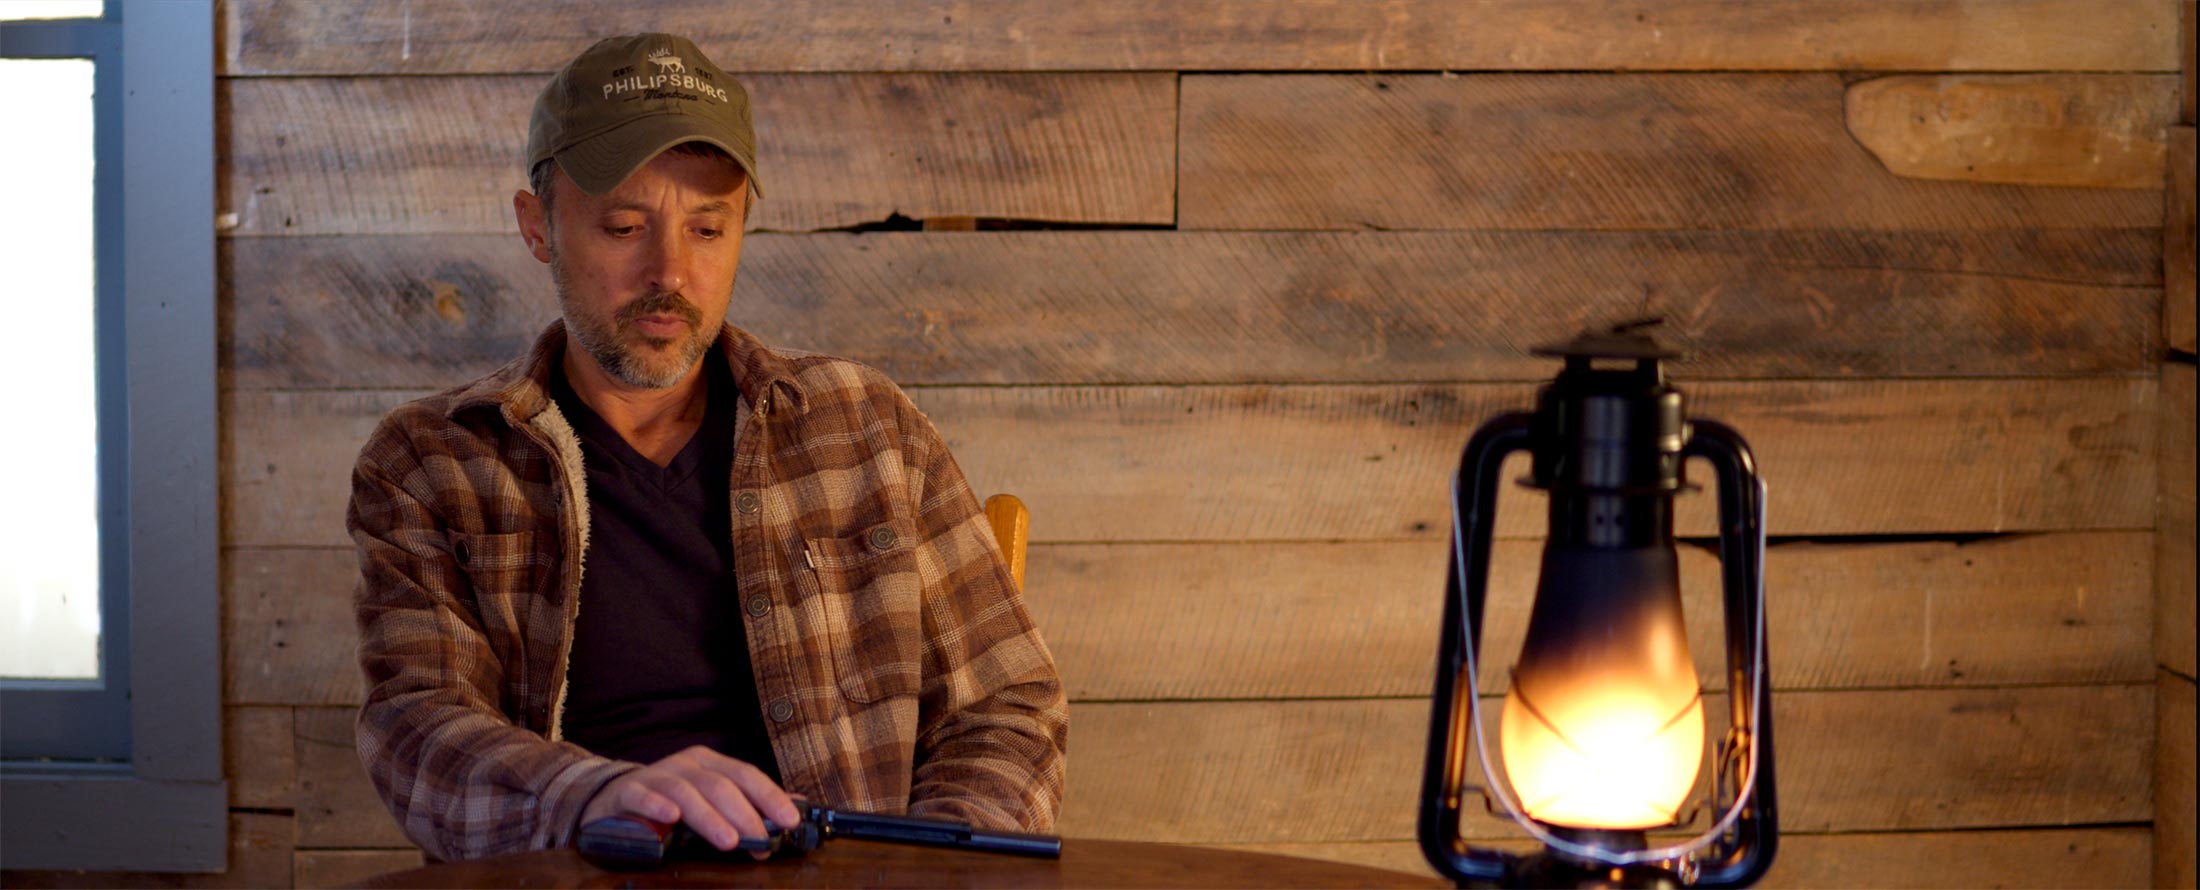
CONTROLLED SET: Low Light Details
Let’s say you’re shooting a scene for a thriller that takes place in an old house at night. You want to capture a lot of details in the shadows. This means we want to move our camera’s dynamic range further below middle gray.
The obvious thought is to drop our ISO down to 100 (see the chart from Black Magic Design below). An ISO of 100 delivers the most stops of exposure detail below middle gray for the Pocket 4K. But here’s the thing: As stated above, setting your camera to ISO 100 isn’t a miracle worker.
For this example let’s say I need a decent depth of field so my actor doesn’t fall out of focus. So we’ll set our F-STOP to 5.6. Now if I set my lighter meter to an ISO of 100 and an aperture of 5.6, the light meter tells me I need to be at…wait for it:
640 foot candles.
Whoa! That’s an insane amount of light. Once again we’re relying on the fourth exposure layer to get proper exposure based on the foundation we are exposing to, which is ISO 100. Telling the camera to be at ISO 100 is only a dynamic range positioning tool, not an exposure tool.
So what’s our main takeaway as filmmakers?
1) There are four main exposure layers: ISO, Shutter Speed, Aperture and Light.
2) ISO is typically not an exposure tool. It’s more of a dynamic range selector.
3) Our Shutter must be at a multiple of 2 of our frame rate.
4) Aperture can be used for exposure, but may be limited by depth of field requirements.
5) Often our final layer, the light layer, is how we obtain proper exposure. And the tools at this layer are of course lights, ND filters, silks, scrims, etc.
Once you truly understand exposure and have a quality light meter, dialing it in is no longer a gamble.