Maybe you’ve always wanted to make movies. Maybe you’re just now realizing it’s the thing you want to do. This page is for you. First off, this is both a bad and good time take the plunge into filmmaking. Anyone can do this, but you’ve gotta “pull up your boot straps” and get ready for what’s required.
A COUPLE IMPORTANT ITEMS
I was already an adult working for an IBM Business Partner when I decided to pursue film. Going to the theater was my life. I watched THE MATRIX 18 times—couldn’t get enough. Favorite talking topic was films. Then one day while eating lunch in my office, the thought literally fell out of the sky: “I should go to film school.”
It took a couple years, but soon I was all packed up in my 1992 Honda Accord and moving to LA. It was literally the coolest moment in my life—I was going to be a movie director! But I didn’t know what was coming. Looking back, there’s a couple things I stress to those who want to take the leap:
1. FILM SCHOOL WILL NOT GET YOU A DIRECTING JOB
I’ll never forget a moment early on in film school. The dean asked my class, “Who wants to direct?” Hands went up all over the room. Everybody want to direct movies! But the crazy thing? Hollywood doesn’t give a rip about your film school education. They don’t care about that thesis film your teachers raved about. It all means NOTHING.
Call The Studios
If you’re thinking, “Yeah, right man. Whatever.” I totally get the sentiment. My only challenge? Put this to the test. Call as many studios as you want, and pretend (momentarily) that you’ve already graduated from your film school of choice. See if this gets you anywhere beyond the receptionist.
Nothing Awaits After Graduation
It’s sobering to graduate from school, hit the streets of LA and realize there’s nothing waiting for you. I’ll never forget going to a sushi restaurant in Malibu a few years after film school only to see a directing major working at the restaurant. This guy was one of the best students in my school! And years after graduation he was serving sushi.
So what the heck? What does it freaking take to become a movie director?
The Tough Pill To Swallow
Why is the red and blue pill scene so great in The Matrix? Because it’s freaking real life. It’s real life for those of us about to gamble the rest of our lives on a dream.
To be a director after graduation you have to literally start making your own movies and YOU have to fund them—that’s the red pill you’ve gotta swallow. Nobody is going to hire you until you master the craft and prove yourself. If you nuke your savings on film school you’re toast. It will cost you years and you’ll be serving sushi instead of directing. So what’s the answer to learning the craft?
We’ll get to that in just a second. There’s something else:
2. DO NOT RELY ON TECHNICAL PEOPLE
Another huge concept for those who want to direct movies is this: The days of “just being a director” are long gone—if they ever truly existed to begin with. To stand even a chance of moving your career forward as a film director you must know how to do everything.
Why? Because film crew need to eat and pay rent just like you do. They can’t afford to work for free. Yes, you can pull favors. But when your gaffer lands a paid gig and you can’t afford their day rate, they have to bail. And if you don’t know how to light a set, you’re stuck.
Trust me, this is NOT the way forward. Gaffing is just one of tasks. You’ve got sound, production design, camera operation, editing, sound design…the list is long. The only way forward is to know how to do this stuff yourself. Not a master of each area, but you’ve gotta know enough to keep your production operational.
On my last film, there were many times I was doing EVERYTHING on set. Down to being the grip. But guess what? The movie got done with a very small budget.
HOW DO YOU LEARN FILMMAKING?
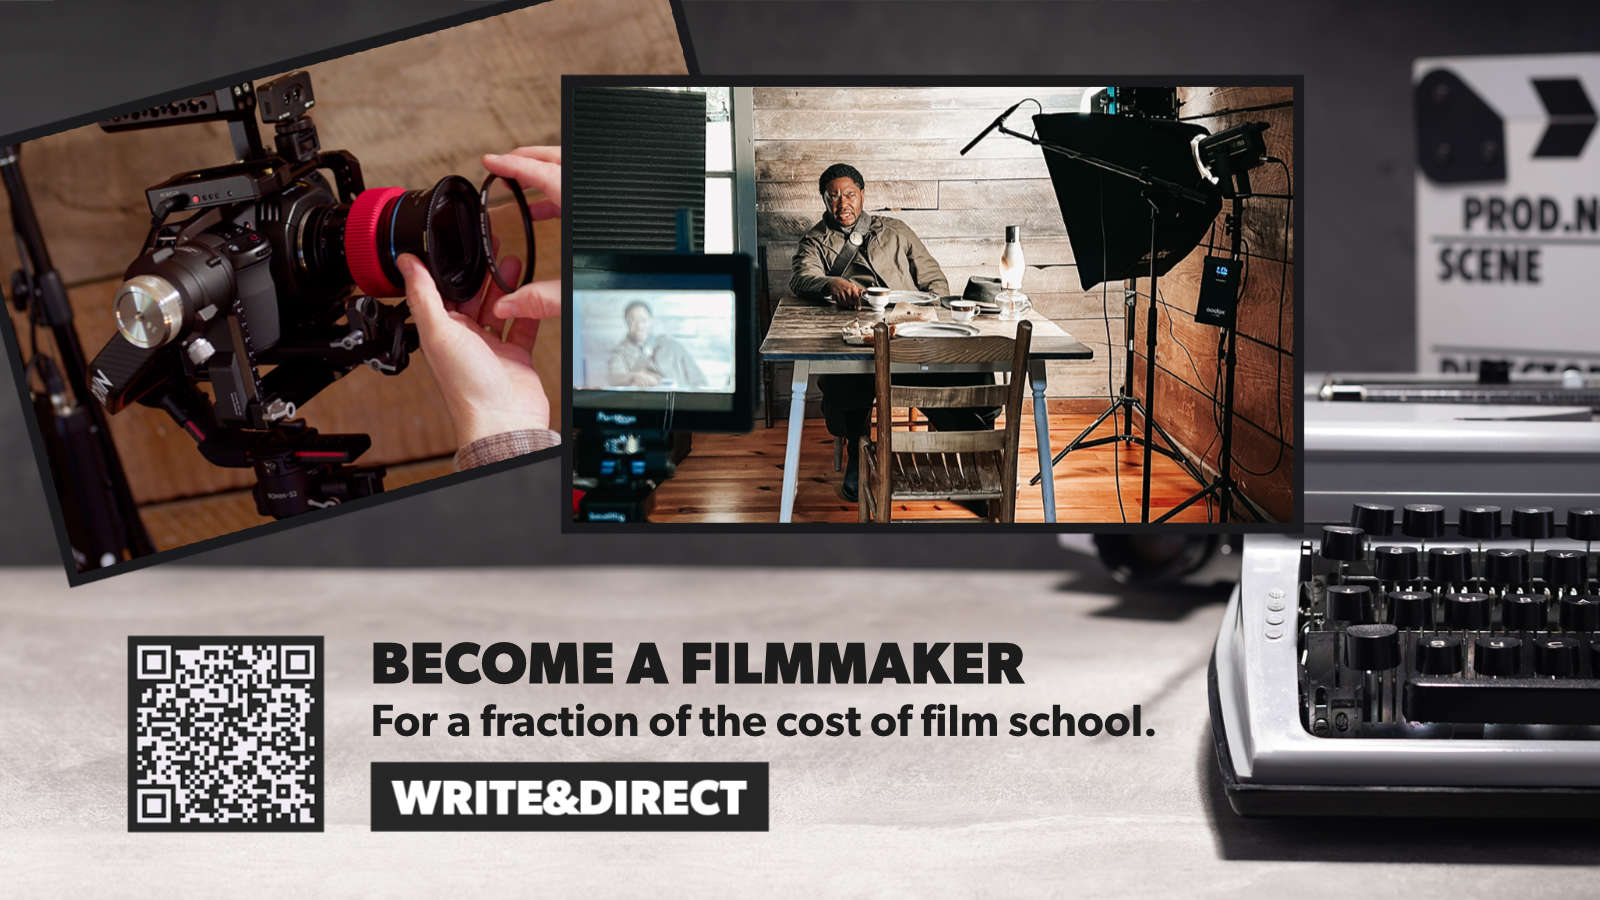
One of the best ways forward for aspiring movie directors is Write & Direct. Our school is designed to address the entire problem. The training is designed specifically for directors and it teaches what you need to know about making movies from development through post production.
During the training you will write your own script (development) and step it through pre-production, production and post. The school is self-paced, detailed and supported by a private online community. You will learn the craft and be prepared to continue making movies!
Find out more here. You can also contact us with any and all questions!
Whatever you do, don’t let go of your dreams to become a filmmaker.
Color grading means changing the color of your film to match your creative choices. Sometimes you are actually correcting an image. But most of the time? You’re creating a look. The term grading is a throwback to the film lab days.
In this article we are gonna cover fundamentals that you must understand about color—things that will benefit you as a director, even if you never grade footage. We will post other articles soon that get into more technical tasks like grading room requirements, display calibration, fun stuff like that. Without further adieu, let’s get started!
RGB, Luminance and Color Dimension
Every color we see is a combination of red, green and blue known as RGB. We see colors because of light. Another word for light is luminance. Color is a three-dimensional thing. We have hue, the actual color itself. Saturation, the intensity of the color and luminance, the brightness of the color.
If I had a CU shot of a red apple in my movie and I took that to the color page and didn’t touch hue—the actual color—but changed saturation or brightness, it would affect how the apple looks to the audience. So there are many ways to work with your footage to dial in the look you want for your film.
The CIE Chromaticity Diagram
Color spaces can be pretty confusing at first. Before we dive in: If you know anything about cinema cameras, they have a dynamic range. Dynamic range is what the camera can see from the darkest darks to the brighest brights. It’s the range the camera can capture.
The human eye has a larger dynamic range than cameras do. As beautiful as a mountain range might be in a movie, if you were there in real life, you would see more details in the brights and shadows than you did in the movie. Make sense?
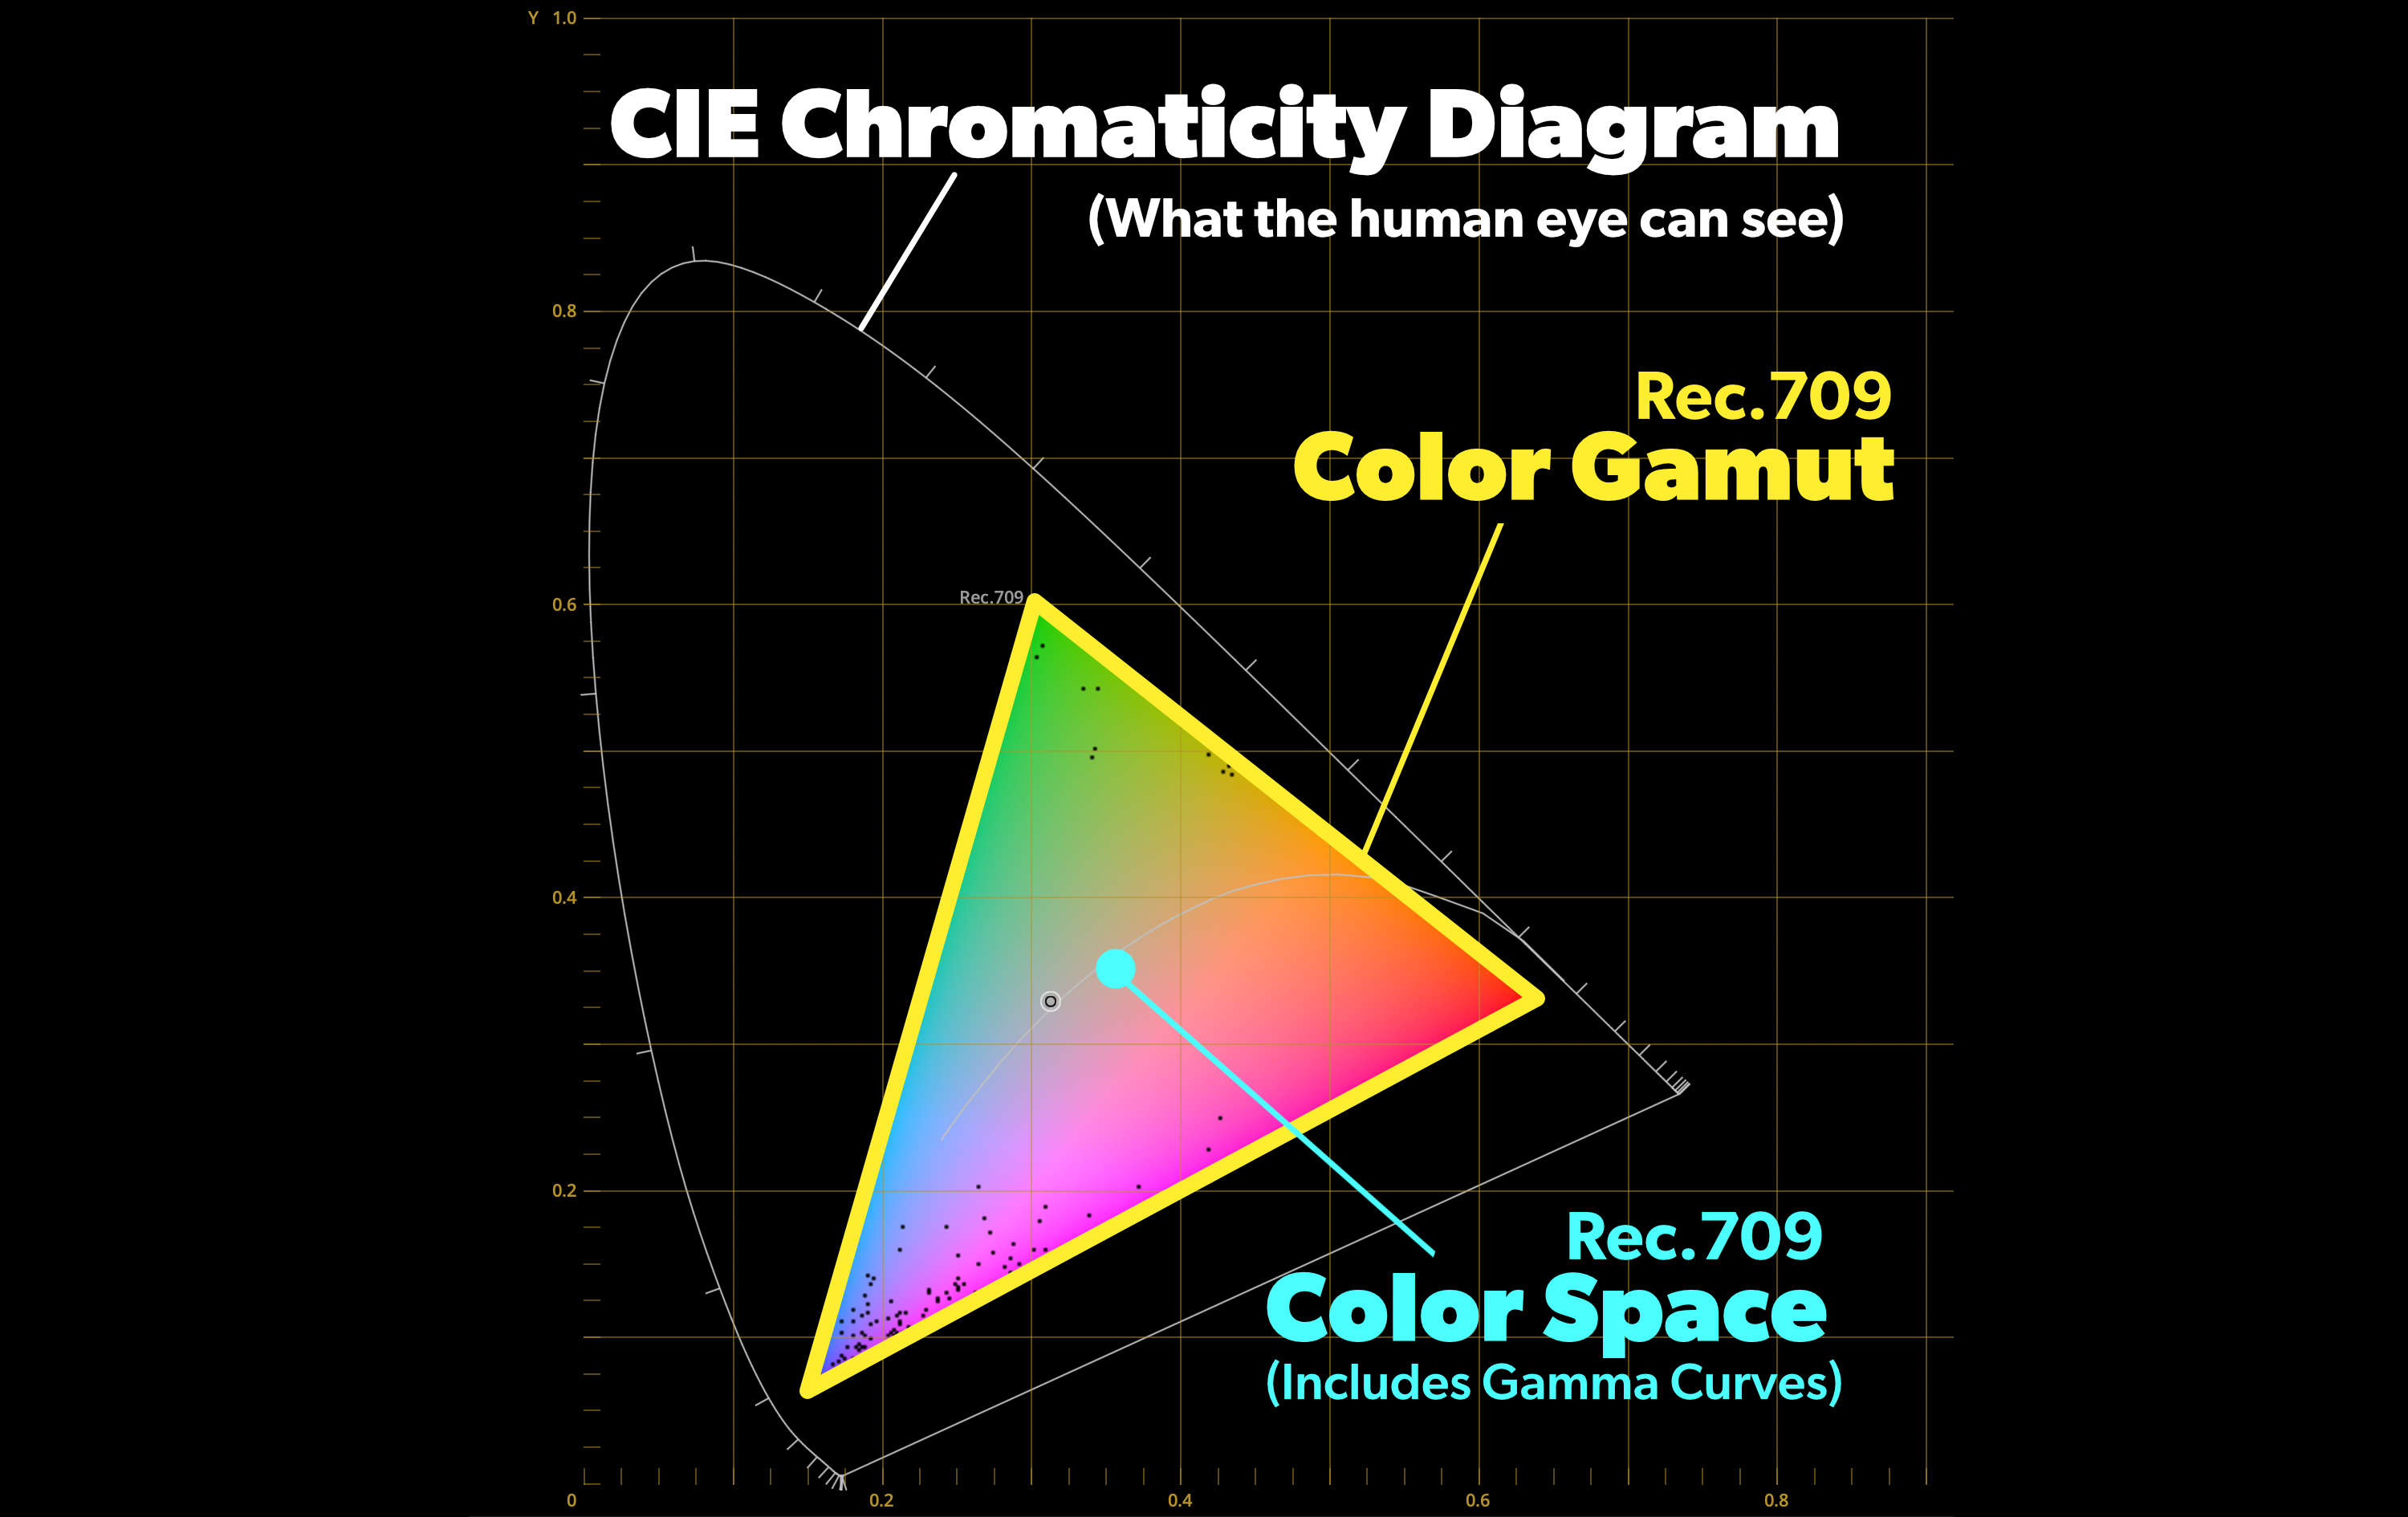
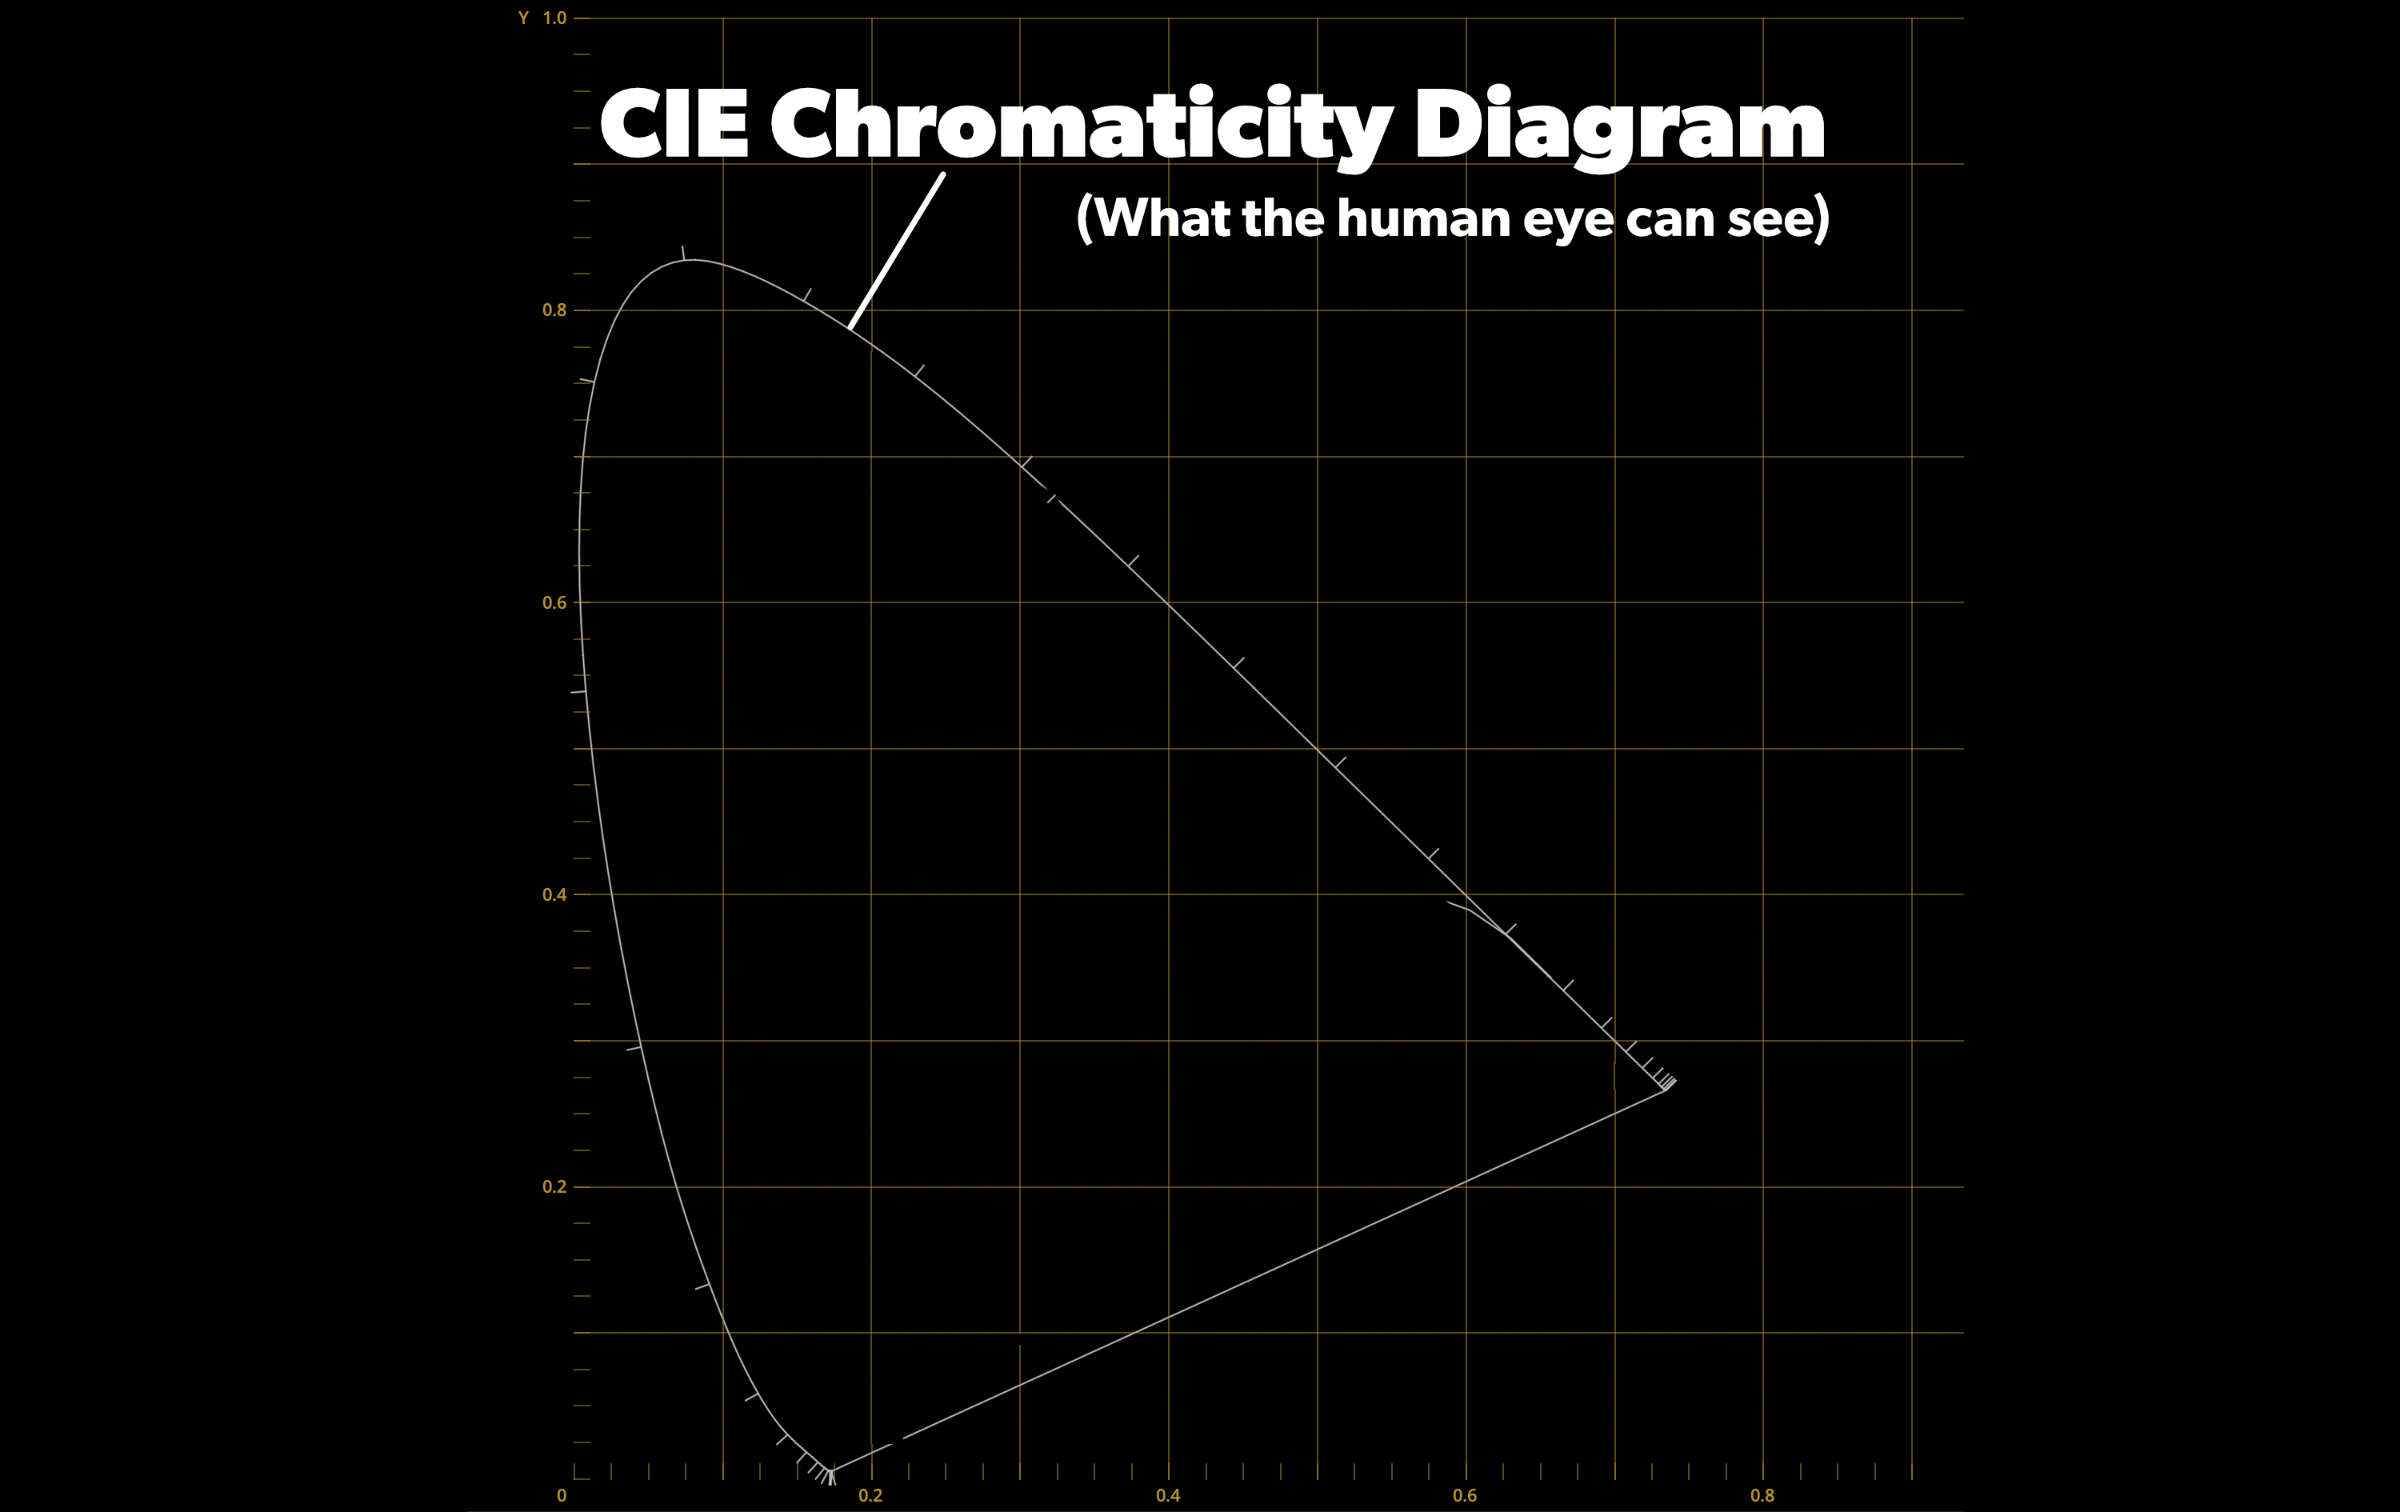
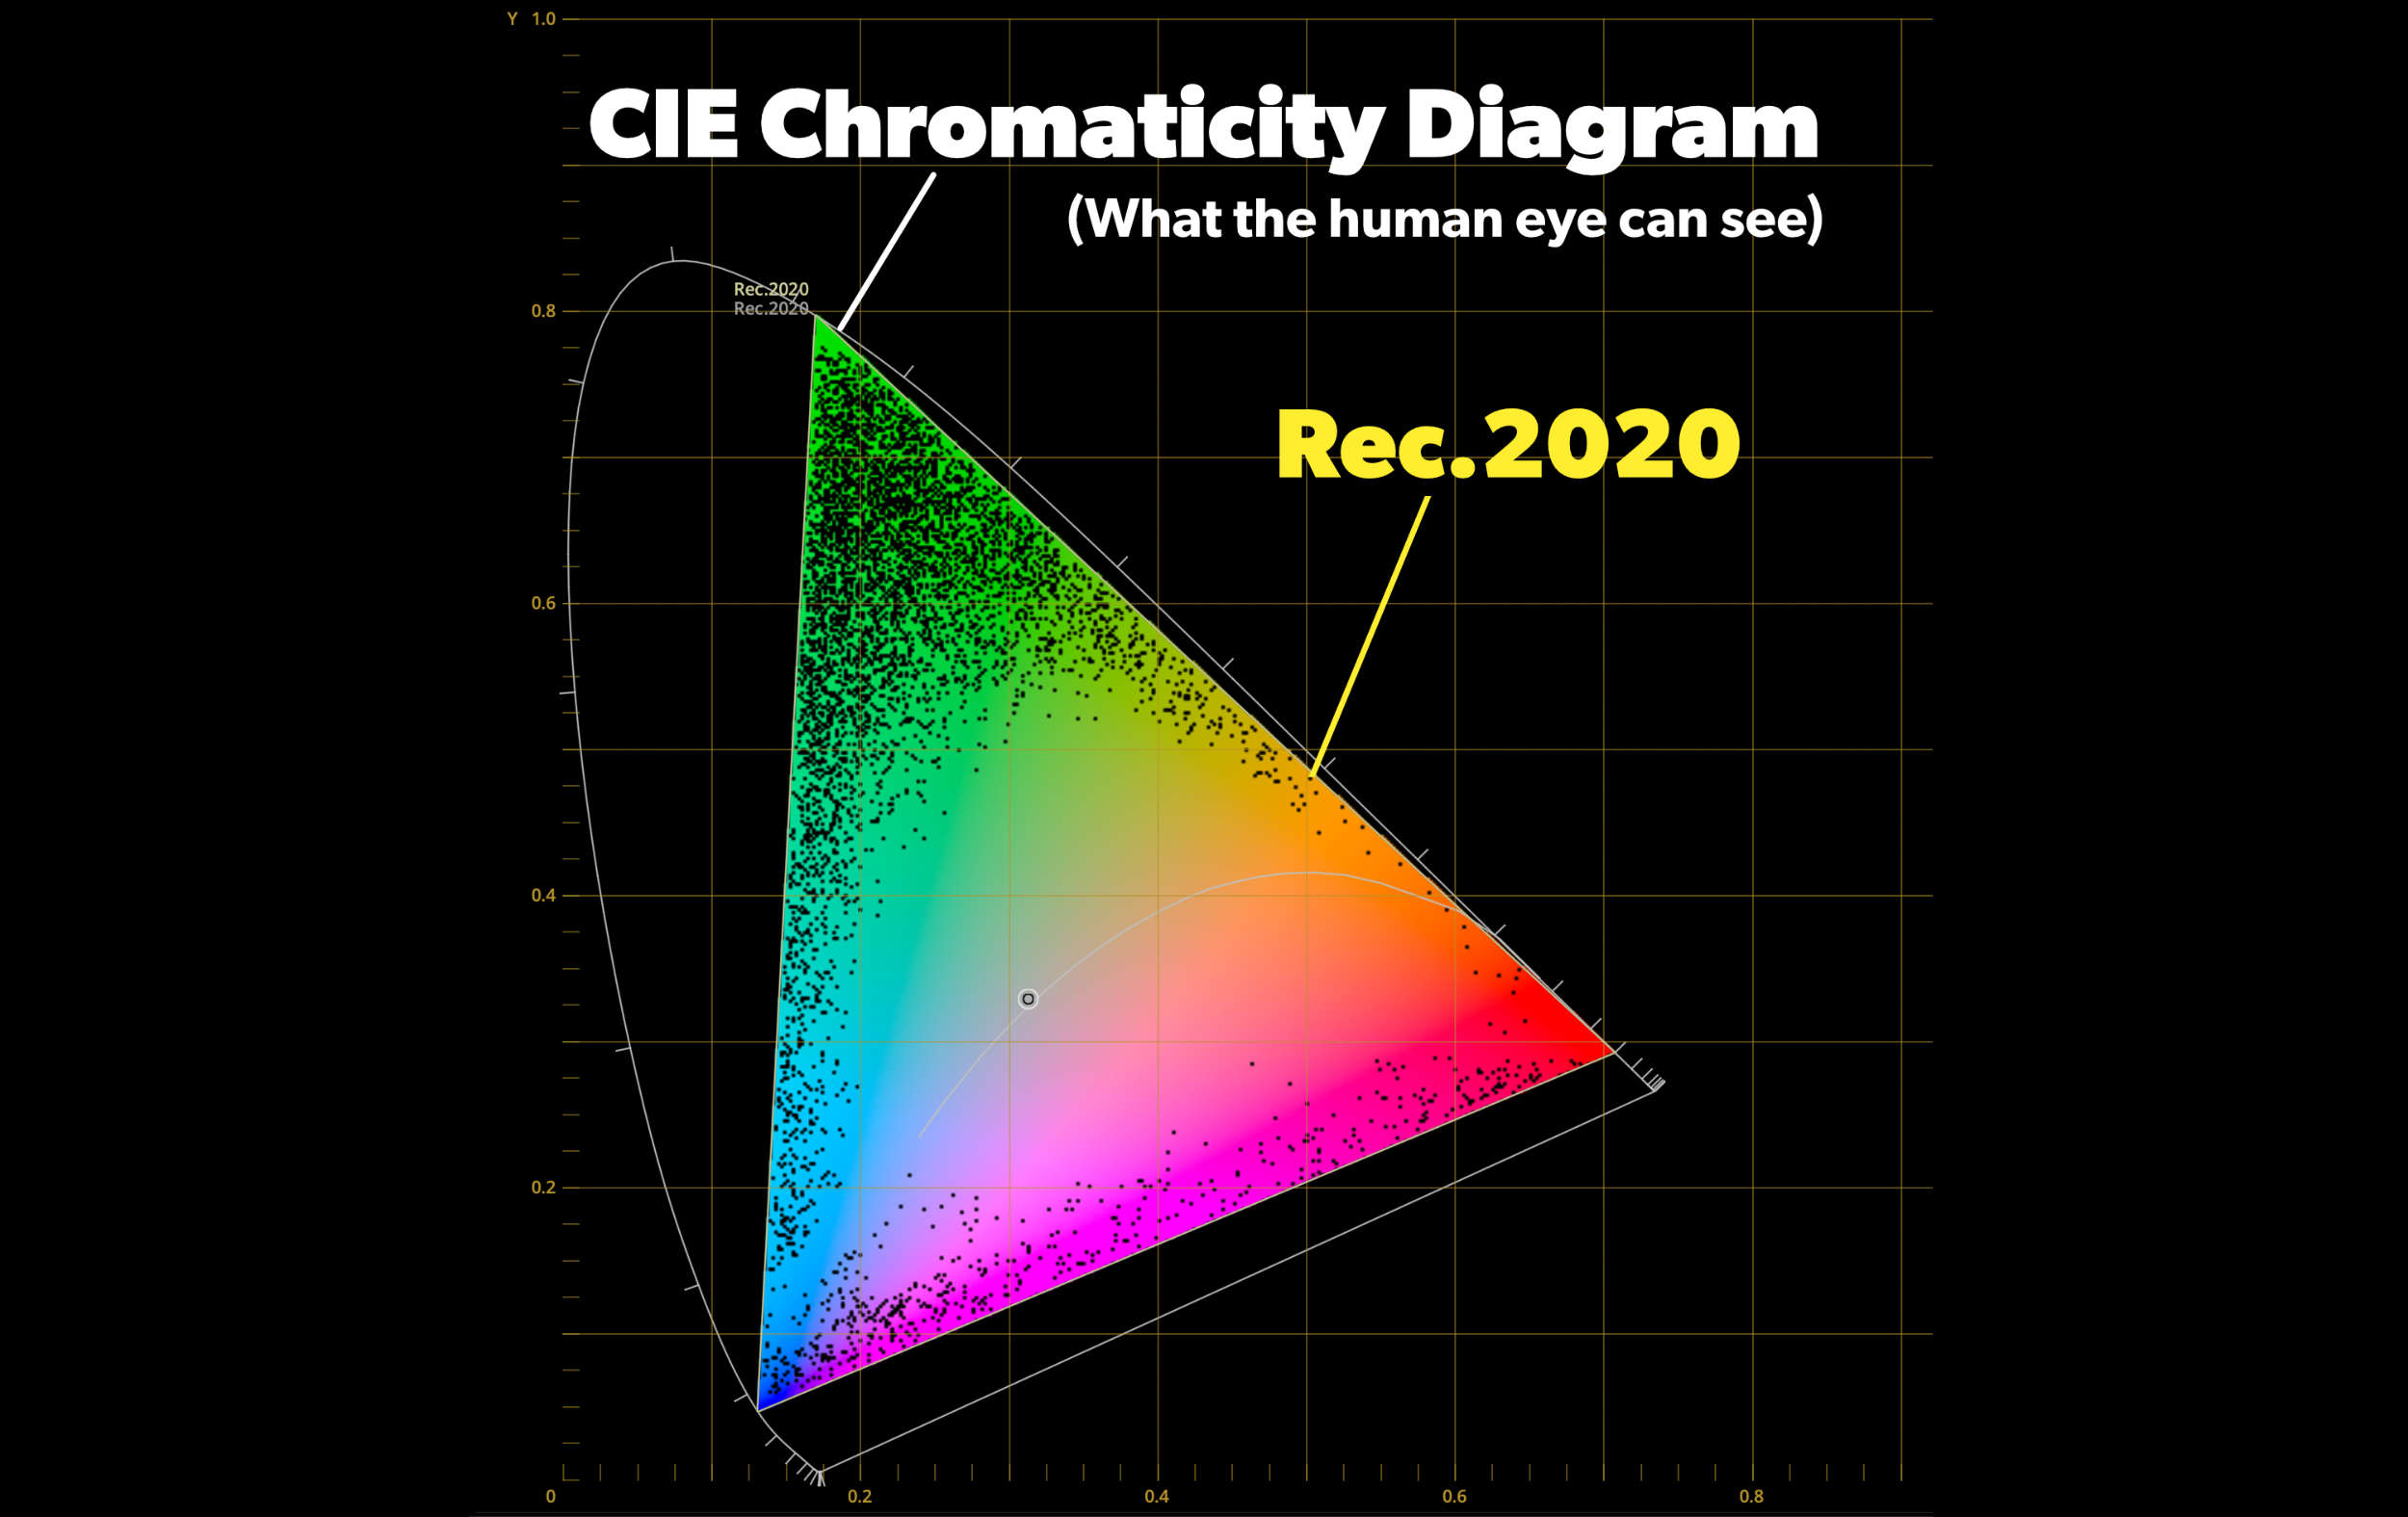
Colors are similar. The human eye can see a very large area of color—back in the 1920s, scientists did a bunch of experiments to plot out the colors the human eye can see. In 1931 they released what’s called the CIE Chromaticity Diagram (shown above). This diagram is still used today.
What Is A Color Space?
Back to the dynamic range example above, a color space is a similar concept. A color space is the “range” of colors that technology can capture or display. A certain camera can capture colors that make up a certain color space. Other cameras are able to capture more. Same goes for TVs.
Color spaces have specific chromaticity coordinates on a CIE chromaticity diagram. For example, the video version of this article (linked above) is in the Rec. 709 color space. Rec. 709 on the CIE chromaticity diagram is here:
Rec. 709 is only about 35% of what the human eye can see. And wanna hear something crazy? All of those gorgeous HD Blu-ray discs we jumped to as we tossed our DVDs? Those HD Blu-ray movies are in the Rec.709 color gamut.
Are Color Space and Color Gamut The Same?
Quick answer: No, they are not. If you plot out a color space mathematically, it’s a three-dimensional object. The chromaticity points we see on the CIE chromaticity diagram only account for part of the color space. And they are referred to as the color gamut of the color space. Refer to the image above. The yellow border defines the gamut.
Color spaces also have a gamma curve which deals with luminance values. For example, referring to the video version of this article, the color space is Rec. 709 gamma 2.4. While another video you see online could be gamma 2.2.
In summary we have a color space with plotted RGB values called the color gamut. And this also has a defined gamma curve. Just know that Color Space and Color Gamut are not technically interchangeable. A color space has a color gamut. And the color gamut is the 2D reference of where the color space exists. Sometimes however, they’re used interchangeably.
Color Gamut and Equipment
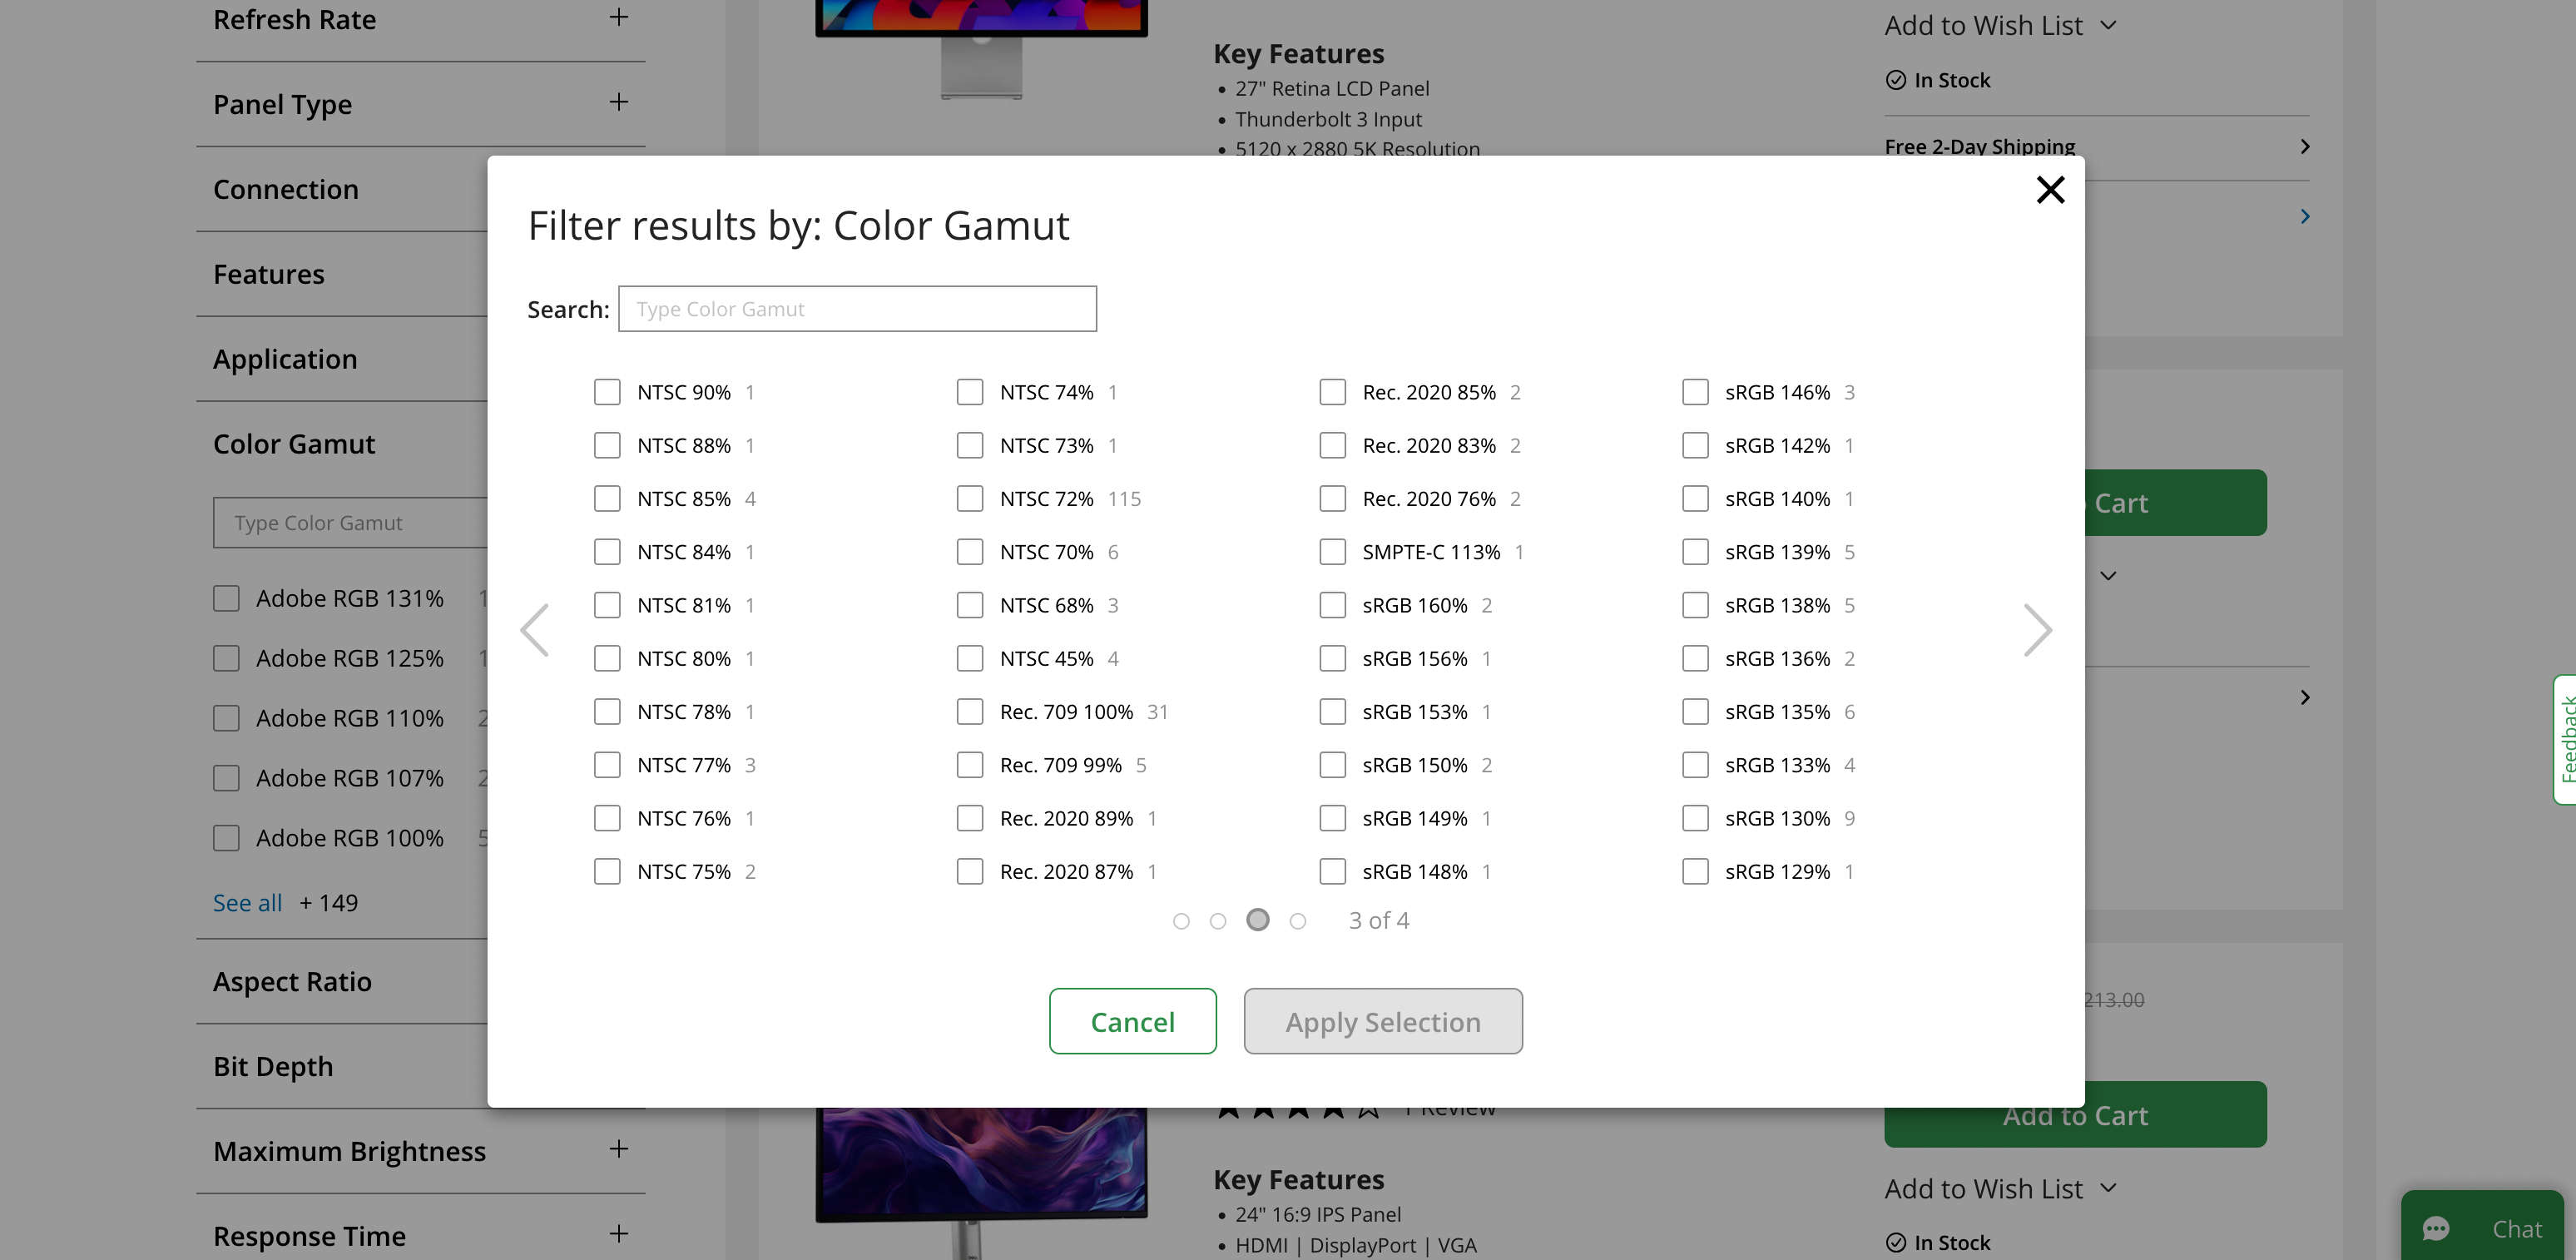
A practical way you’ll see color gamut used is to define what equipment can do. For example, if you go to B&H Photo and search for displays, you can filter based on what color gamuts they support. You’ll see things like, “Hey, this display has 100% Rec. 709 support and this one has 99%.”
What does this mean? It means the display with 99% support has a smaller working color gamut on the CIE Chromaticity Diagram than a true Rec. 709 display. When we’re grading, we want displays with 100% support for the color space we’re grading in. This brings up another question:
What Color Space Should You Grade In?
How many color spaces are there, and how do you know what to grade in? Great questions. It’s actually easier than it sounds, but before we go there, we need to discuss SDR and HDR: Standard Dynamic Range and High Dynamic Range.
Standard Dynamic Range (SDR)
Standard Dynamic Range can be viewed as a “container” for color spaces. Not an actual container, but a conceptual way to group color spaces. A label of sorts. Rec. 709 is an SDR color space. So is sRGB.
Rec. 709 is the color space used with HDTV and 1080p Blu-ray players. The Rec.709 color space is SDR. But what you must understand: Pixel count and color spaces are 100% independent of each other. There are countless numbers of 4K TV and films in Rec.709—It’s not about resolution.
What confuses this is the fact that SDR came about alongside HDTV. And HDTV displays cannot support HDR.
High Dynamic Range (HDR)
Rec. 709 is an SDR color space. Rec. 2020 is an HDR color space. HDR tech was released alongside 4K and 8K TVs. Again, not because of resolution. Because of simultaneous advancements in tech. We know where Rec.709 sits on the diagram. What about Rec. 2020?
HDR color spaces cover A LOT more than SDR right? When people go to a Best Buy and watch content on 4K and 8K TVs it looks “so amazing.” But it’s only partially due to resolution. It’s because these new displays also support HDR. And the content Best Buy is playing is HDR content. You know, bright green lizards on pink flowers that really push the color landscape.
So again, you’re not being wowed by 8K as much as you’re being wowed by HDR. There are different HDR color spaces out there: Rec. 2100, Rec. 2020, P3, etc. And just like Rec. 709 various equipment has different levels of support for these color spaces.
DaVinci Wide Gamut
Back to our question: What color space should you color correct in? The answer is DaVinci Wide Gamut (DWG) if you’re using DaVinci Resolve. DaVinci Wide Gamut is a very large color space that can house other HDR color spaces. Meaning it’s larger than Rec. 2020, etc.
HDR & SDR Grading and Delivery
So we shoot our movie and grade in DWG. Good. Done.
Well, not so fast.
To accurately grade in HDR, it takes a lot of money. You’re gonna have to purchase expensive hardware for your computer, along with an expensive display with full HDR support. Computer displays that have 100% support for HDR at a grading level cost A LOT of money. And if you’re not grading accurately in HDR, you might be doing more harm than good.
Rec. 709 Monitoring and Delivery
If your film is destined for online viewing, or at home viewing, monitoring and delivering in Rec. 709 is absolutely fine. There’s tons of content delivered with Rec. 709. You should grade in a DWG timeline so you have access to HDR tools in Resolve and can grade your film without restraints. Resolve will then graciously take that to SDR for monitoring (what you see on your display) and delivery. And then if you do upgrade to HDR hardware you can simply open the film back up, tweak your grade and deliver in HDR.
Color Intro Summary
So that was a lot of geek talk about color grading. What are main takeaways?
Color is three-dimensional: Hue, saturation and luminance.
The CIE Chromaticity Diagram plots out what the human eye can see.
A color space defines a range of hue, saturation and luminance that equipment can support.
Chromaticity coordinates within the CIA chromaticity diagram define hue and saturation limits of a color space and this is referred to as the color gamut.
High Dynamic Range (HDR) and Standard Dynamic Range (SDR) are independent of pixel count.
We color grade in an HDR color space without restraints.
We can monitor and deliver in an SDR color space from an HDR timeline if needed.
The most common SDR color space for film is Rec. 709 Gamma 2.4.
Hopefull this has been helpful. If you have a cinema camera like the Blackmagic Cinema Camera 6K then you are shooting with HDR support. You can then bring that into DaVinci Resolve in a color managed project using a DaVinci Wide Gamut (DWG) timeline. This allows you to grade your footage without restraints and with access to HDR tools in Resolve. You can monitor and deliver in Rec. 709 or if you have the hardware support, monitor in HDR and deliver your film as needed.
If you’re new to Write & Direct, we are an online film school designed for directors.
Watch The Grading Video
If you’d like, here’s a video version of this article:
We’re gonna nerd out a bit in this article, but crop factor is important and it can be a little confusing at first. Before we dive in, need to make sure we’re on the same page with terminology:
Field Of View
What is field of view? It’s what a specific camera and lens combination actually sees. More specifically, it’s what a lens and camera sensor see. Camera perspective is the distance or positioning of a camera. If I move closer to a subject, my camera perspective changes. The field of view remains the same. Yes, what we see in our viewfinder will look different based on a camera perspective change, but it’s still the same field of view. Make sense?
Focal Length
Lenses have what’s called a focal length rating. Light enters a lens in parallel and it’s bent and converges prior to hitting the camera’s sensor. Focal length is the measurement from roughly the convergence point to the sensor hit (in millimeters). Focal lengths do affect field of view. They also have characteristics that effect magnification and such. This is a conversation for another time. But just know that focal lengths are story telling tools.
Full Frame vs Super 35 Film
To understand crop factor we need to begin with film as that’s where it all came from. A strip of analog film has perforations on the sides called “perfs.” Sprockets in cameras and projectors use these perfs to move the film. The most common film for movies was 35mm—unless of course you’re Chris Nolan.
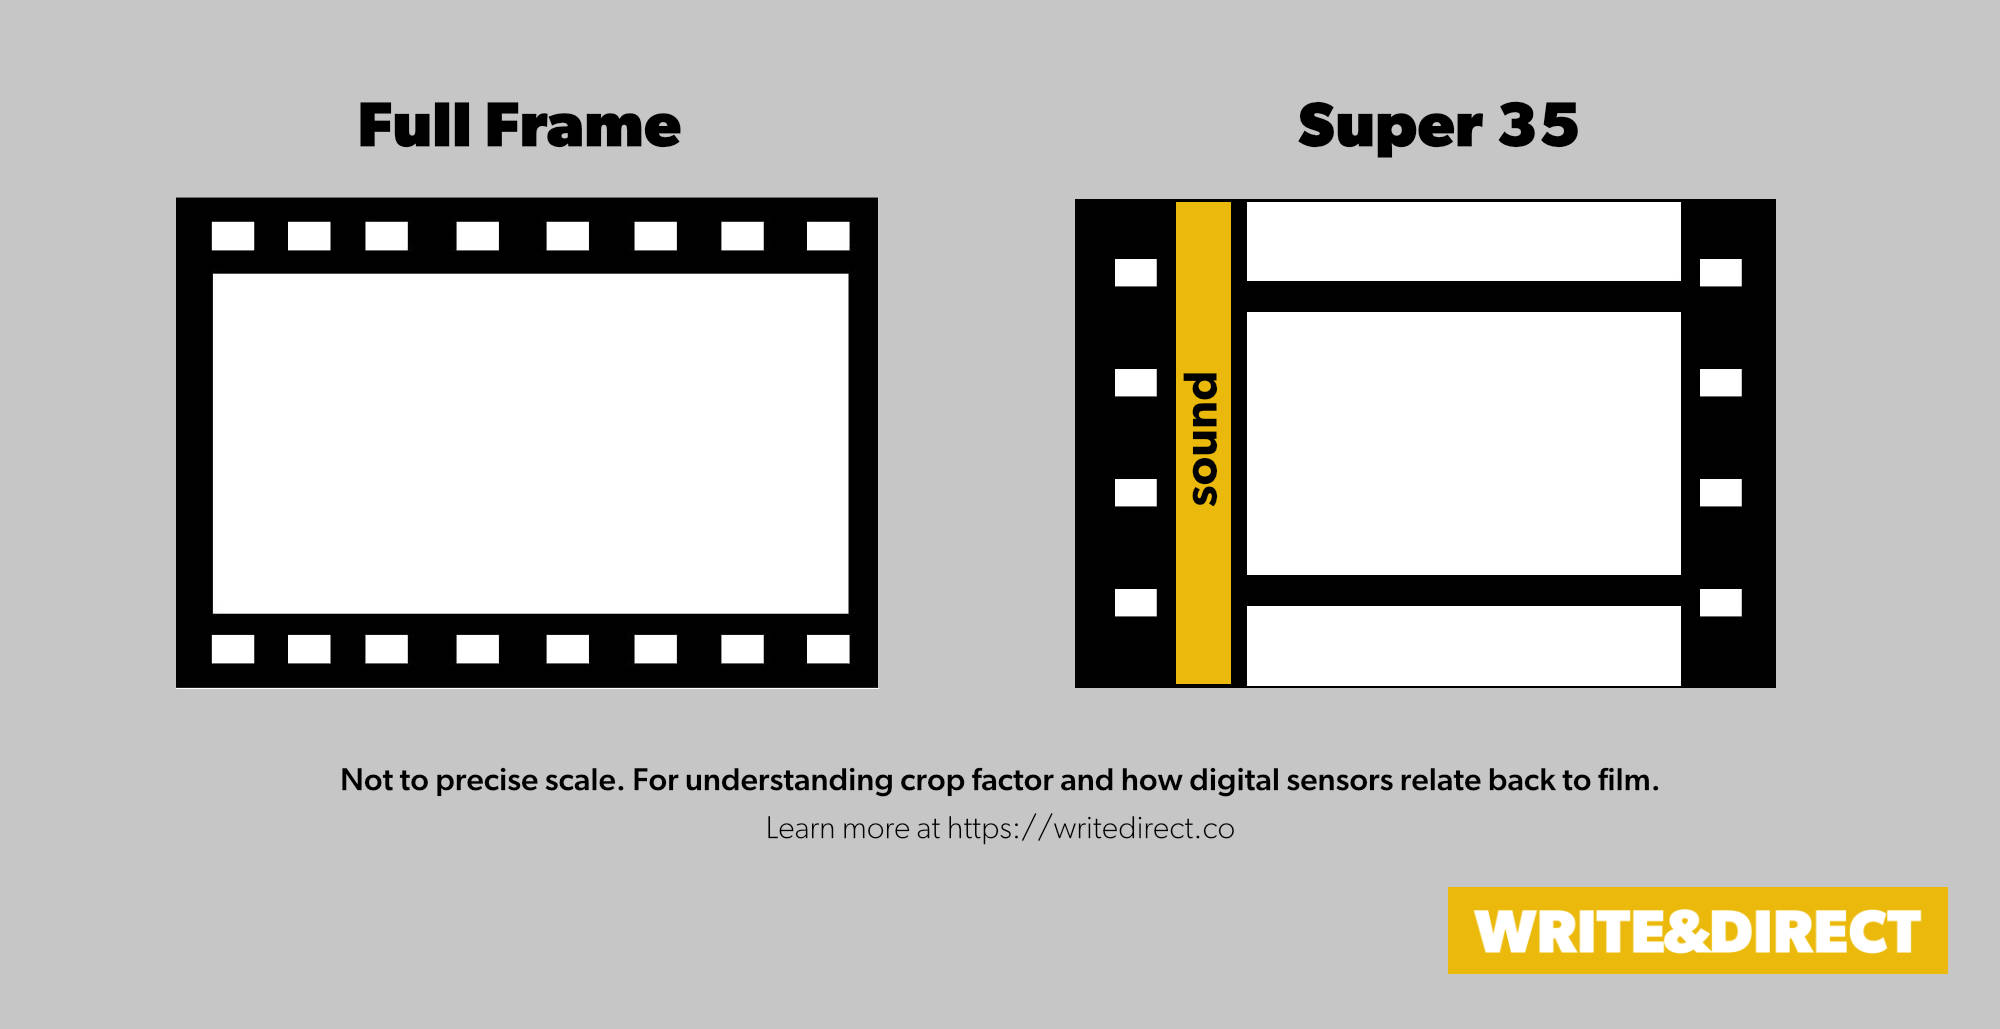
If you take an old school photography camera, the roll of 35 millimeter film feeds sideways and each shot uses a length of 8-perf. Whereas many cinema cameras feed film vertically. So instead of shooting on an 8-perf frame width, they shoot on a 3-perf height and this is called Super 35.
In the image above we see full 8-perf 35mm on the left (fed horizontally) and roughly 3-perf Super 35 on the right fed horizontally. You can also see sound information was stored alongside picture for the cinema film on the right.
Digital Sensor Crop Factor
So why do we need to know all of this? Because it directly relates to digital camera sensors. The size of a digital camera sensor is measured with a crop factor. And this crop factor is based off the size of 8-perf 35 millimeter film.Not Super 35.
Does this make sense?
If a manufacturer says their cinema camera has a full frame sensor this means the digital sensor is the same size as 8-perf 35mm. And this a crop factor of one because it’s the same size as 8-perf 35mm film. It’s a 1:1 size difference. Got it?
A cinema camera with a digital sensor the same size as Super 35 has a crop factor of around 1.6 (varies by camera manufacturer). But a crop factor of 1.6 means the sensor is 1.6 times smaller than a full frame sensor. Another common format you’ll hear about is Micro Four Thirds (MFT) sensor. These cameras have a crop factor of around 1.9—again this depends on the manufacturer.
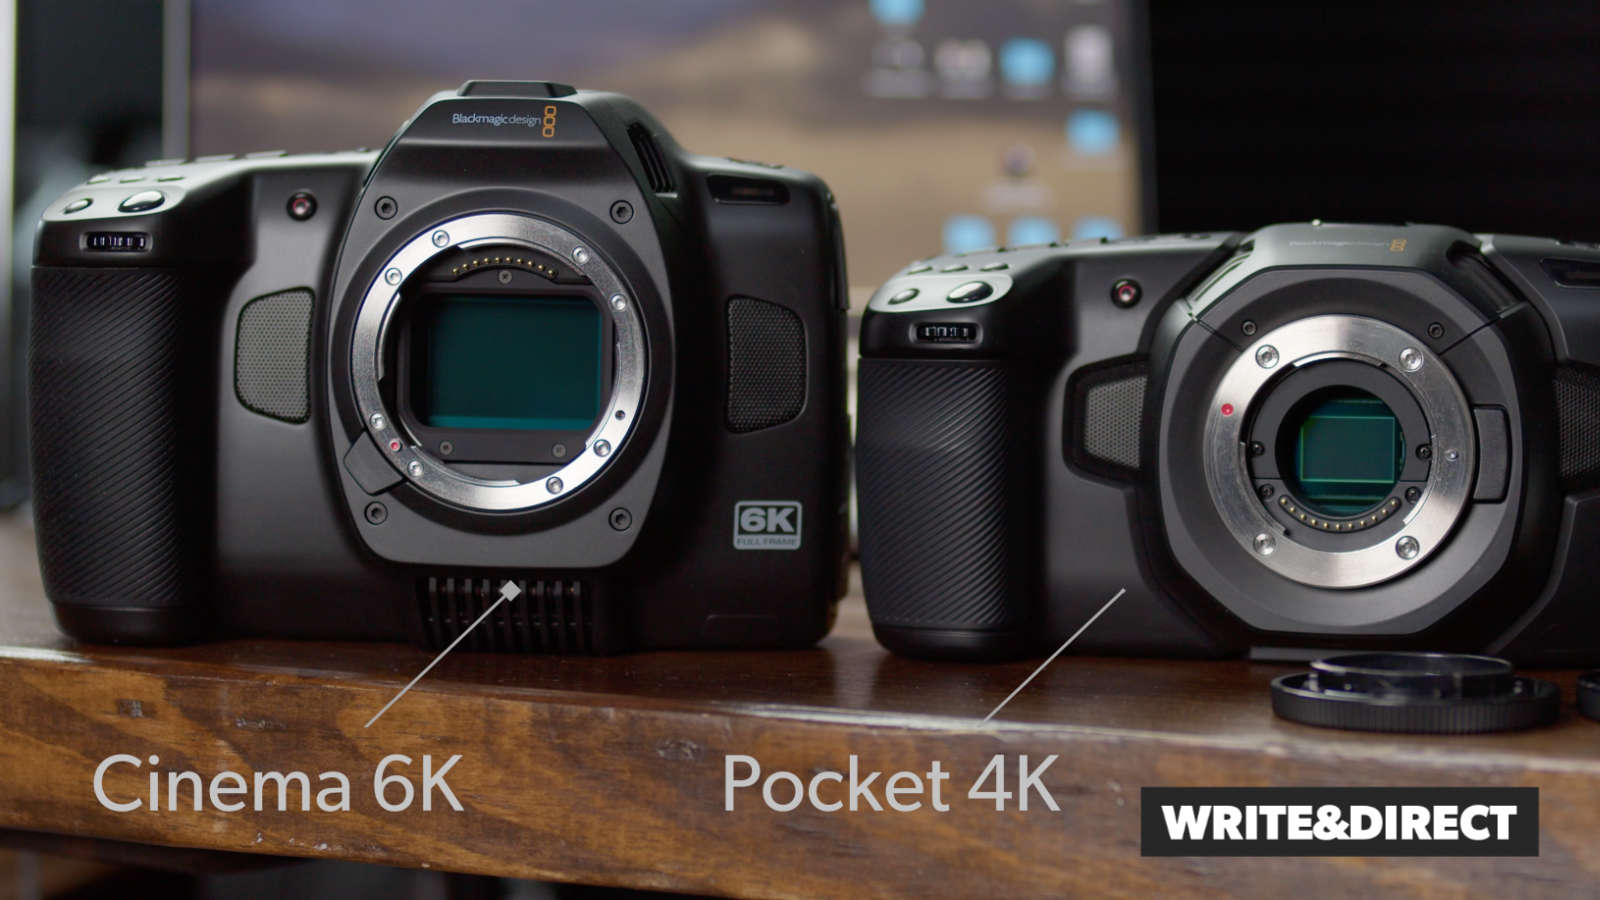
Above we see Blackmagic Design cameras compared beginning with the Pocket 4K (MFT) to the Cinema Camera 6K (full frame).
How Does Crop Factor Affect Filmmaking?
So this is the big question, right? What crop factor should you get for making your movies? I’ve shot films using an MFT and I’ve also used a full frame. Both work just fine. Both have advantages and disadvantages. I prefer full frame, but let’s talk about it.
Sensor Size Does Not Affect Resolution
Sensor size is not tied to pixel count. You can shoot 4K on an iPhone or you can shoot 4K on an ARRI Alexa. The phone rings in around $1K and the ARRI around $30K. Huge difference in price and quality. Referencing the Blackmagic Design camera chart above you can see that both the Pocket 6K and the Cinema Camera 6K shoot the same resolution.
So what does the full frame sensor do?
Image Quality
First, with all things being equal, a larger sensor shooting the same resolution as a smaller one can yield a better image. Larger photosites in theory can capture better images than tiny photosites. So even though you’re iPhone 16 is shooting 4K RAW, the sensor cannot do what a larger 4K sensor can do.
Now I can tell you with real world testing that a full frame sensor is not guaranteed to deliver a better image in every scenario. For example, the Pocket 6K does better in low light than the Cinema Camera 6K. So you have to know your cameras. But in general, the larger the sensor the better the image. This is definitely true comparing phone sensors to cinema camera sensors.
But the most important story telling difference with cropped sensors? Field of view.
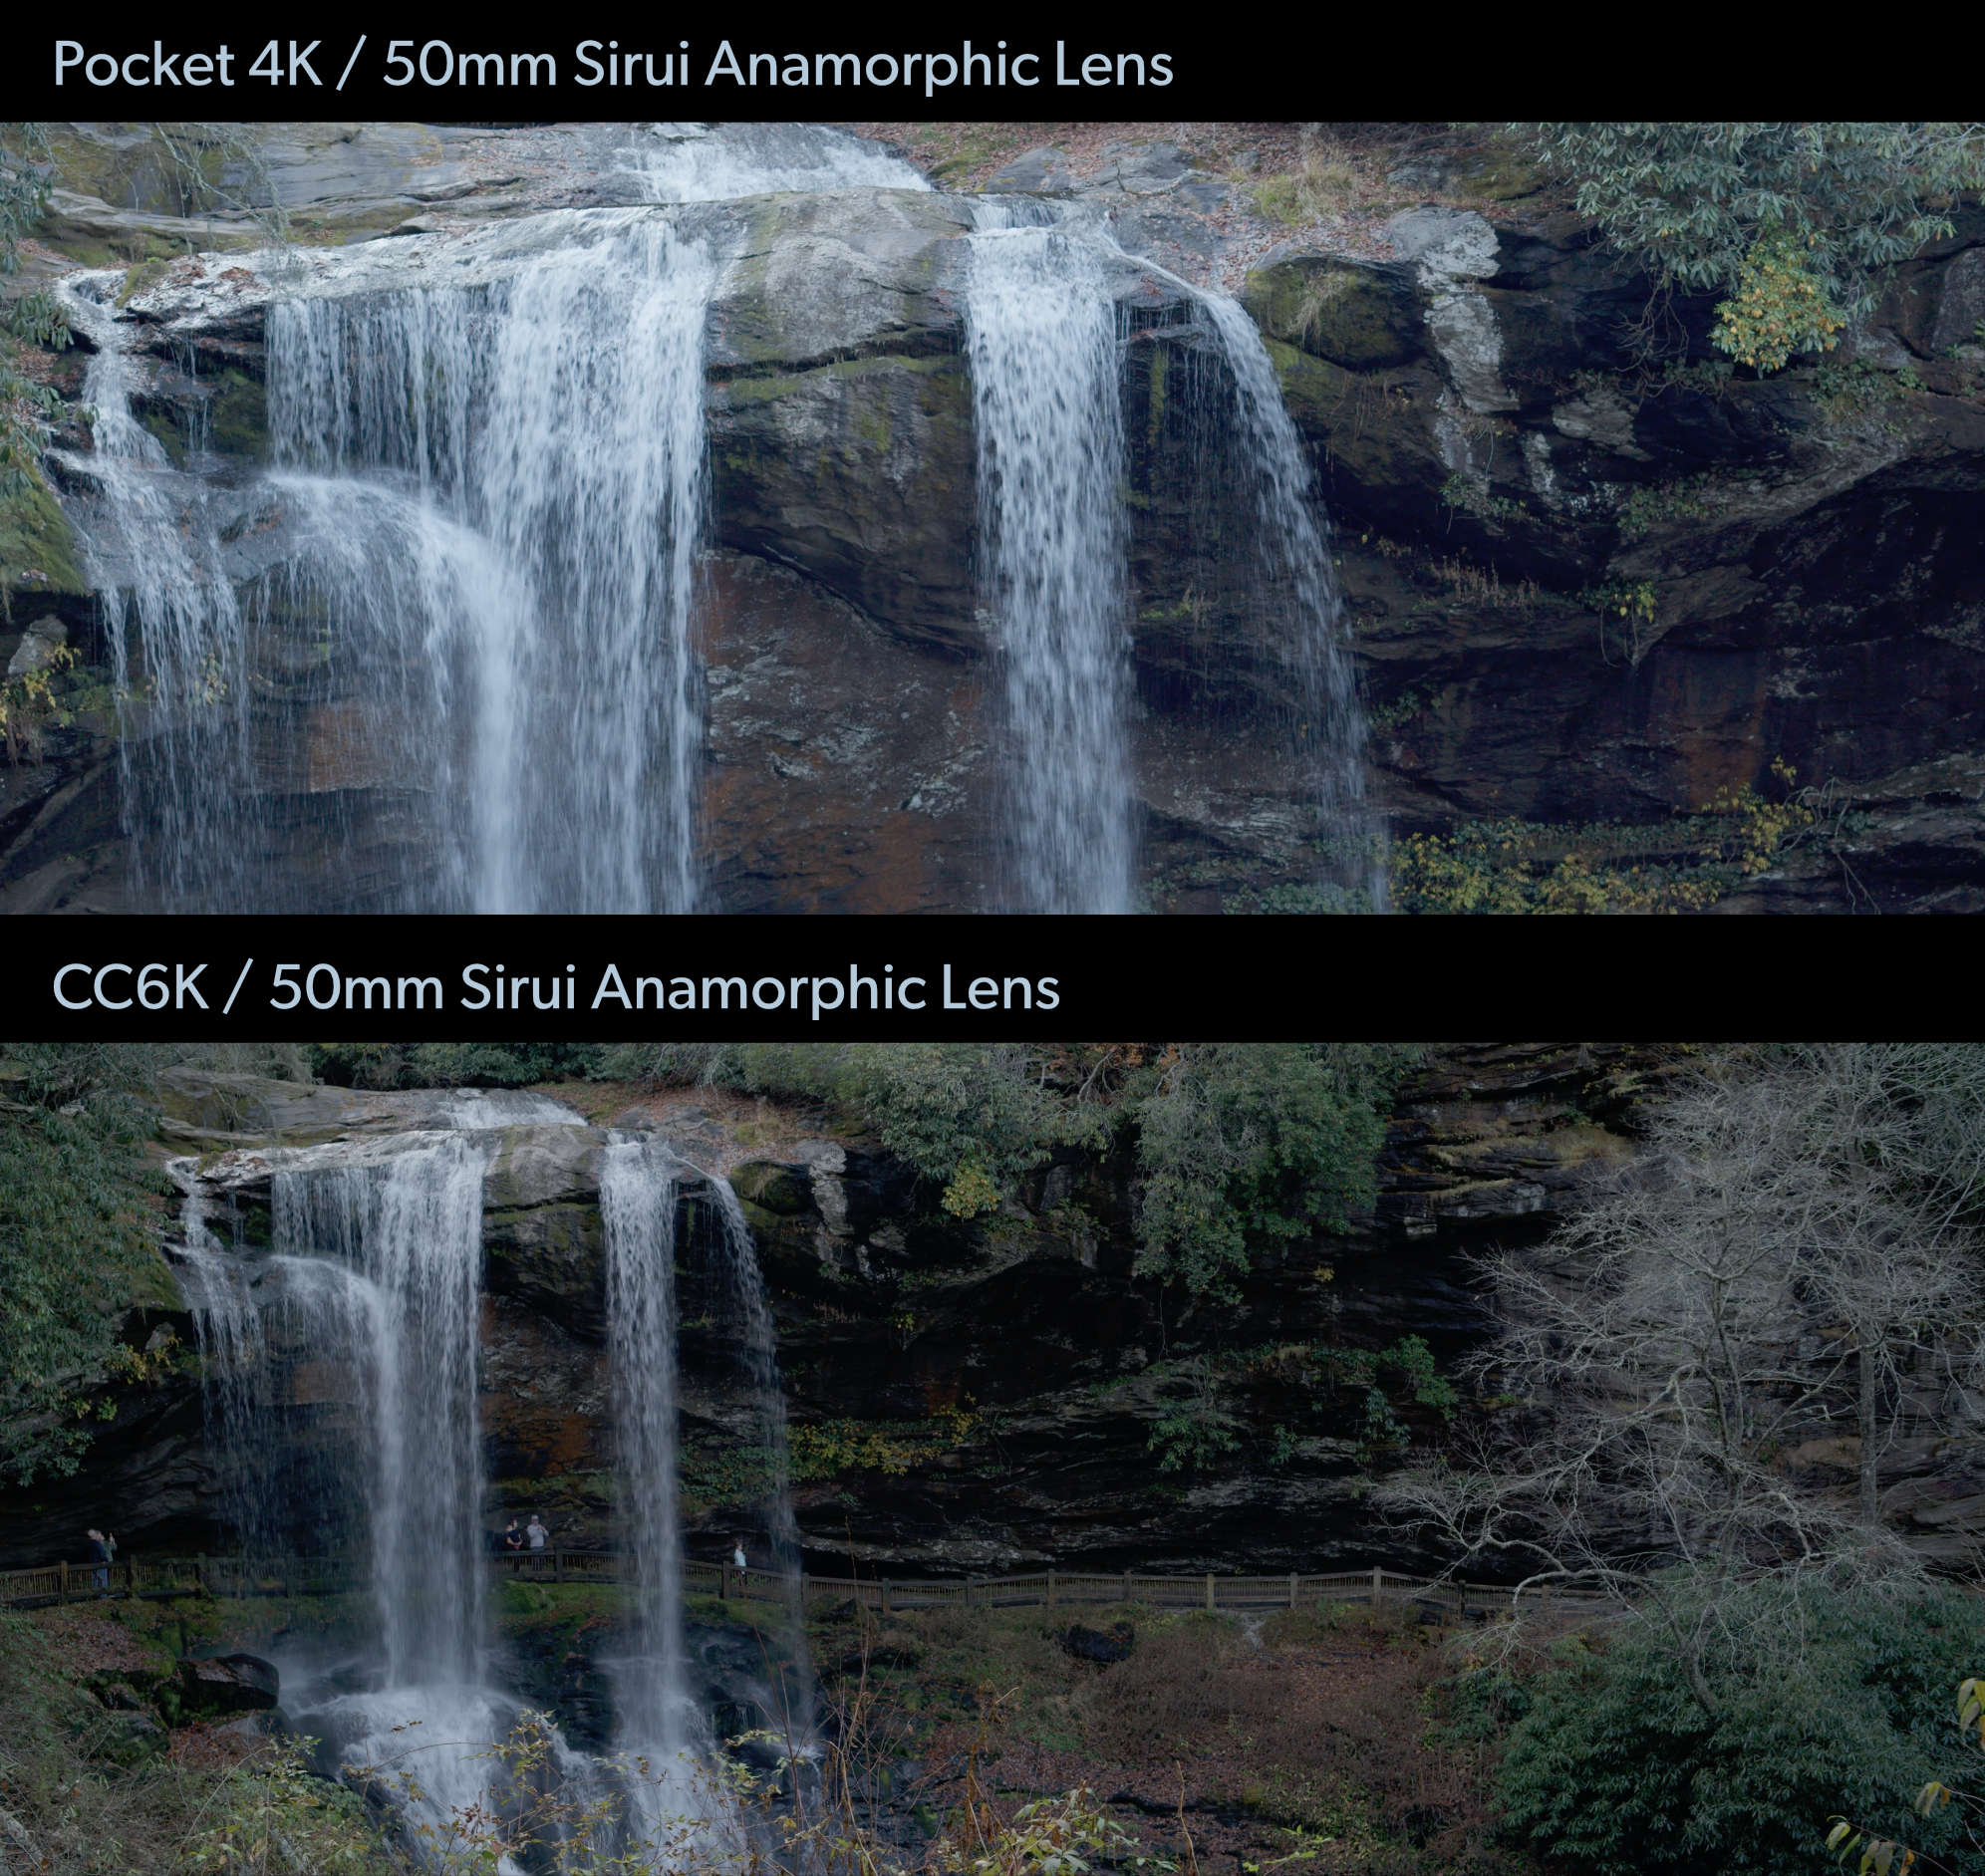
Field of View Changes With Crop Factor
A cropped sensor reduces our field of view. If I take two 50mm lenses and put them on a Pocket 4K and a Cinema Camera 6K and shoot from the same physical location, what the camera and lens combination see—field of view—will be radically different. You can see this in the image above. I had the cameras in the same spot with the same focal length. Massive difference.
And this affects us as filmmakers in big ways. For example: My latest film required shooting in tight places. Barns. Old cabins. And a micro-four thirds camera required me to be on a wide lens at times. One scene in particular forced me onto a 24mm lens in order to just get a medium shot, because I couldn’t back up due to space constraints. And this can be a problem if I don’t want the distortion of a wider lens. It can also be a challenge for beginning filmmakers who can’t afford multiple lenses.
What required a 24mm lens on the MFT camera would have been a 50mm lens on a full frame. And 50mm is more true to what the human eye sees. Meaning, less distortion. A wide lens is still going to be a wide lens. A long lens is still going to be a long lens—regardless of crop factor.
What About Depth of Field?
You might hear someone say crop factor also affects depth of field. This is not true. Crop factor can indirectly affect depth of field in certain scenarios. I cover this in detail in our depth of field post. DOF is an important thing to wrap your head around, and there are misnomers out there about it.
In Summary, What is Crop Factor?
A way to measure sensors compared to 8-perf 35mm film.
A digital sensor the same size as 8-perf is called full frame with a 1:1 crop ratio.
Crop factor is not tied to resolution.
All things being equal, full frame will deliver better images than cropped sensors.
Crop factor affects field of view.
Which Crop Factor Is Best?
I shot 98% of my latest film (RECKONING) on the Pocket 4K which has an MFT sensor. I used 24mm and 50mm lenses for the entire shoot. This worked just fine. The most important thing to understand is what FOV your scenes require and what spaces are you shooting in?
If your movie is confined to small spaces, full frame all the way. If you’re shooting outside or with plenty of space, an MFT setup can do just fine. But know that purchasing lenses for full frame typically costs A LOT more than MFT.
Hopefully this was helpful! If you’re new to Write & Direct we are an online film school for aspiring directors. You can read more about the school here.
Of course. We all do, right? As modern filmmakers we LOVE the convenience and cost of digital cinema cameras and all that goes with that. No expensive film. No problems when the 1st AC lets a reel unwind in the tent. We can watch a take instantly instead of waiting for dailies…the list is endless.
But, there’s a downside to digital. At least a perceived downside: It doesn’t look like film! You can shoot 24 frames with a 1/48 shutter. But we cannot obtain the gorgeous personality traits of film with a digital sensor. And this is the problem Dehancer was designed to address.
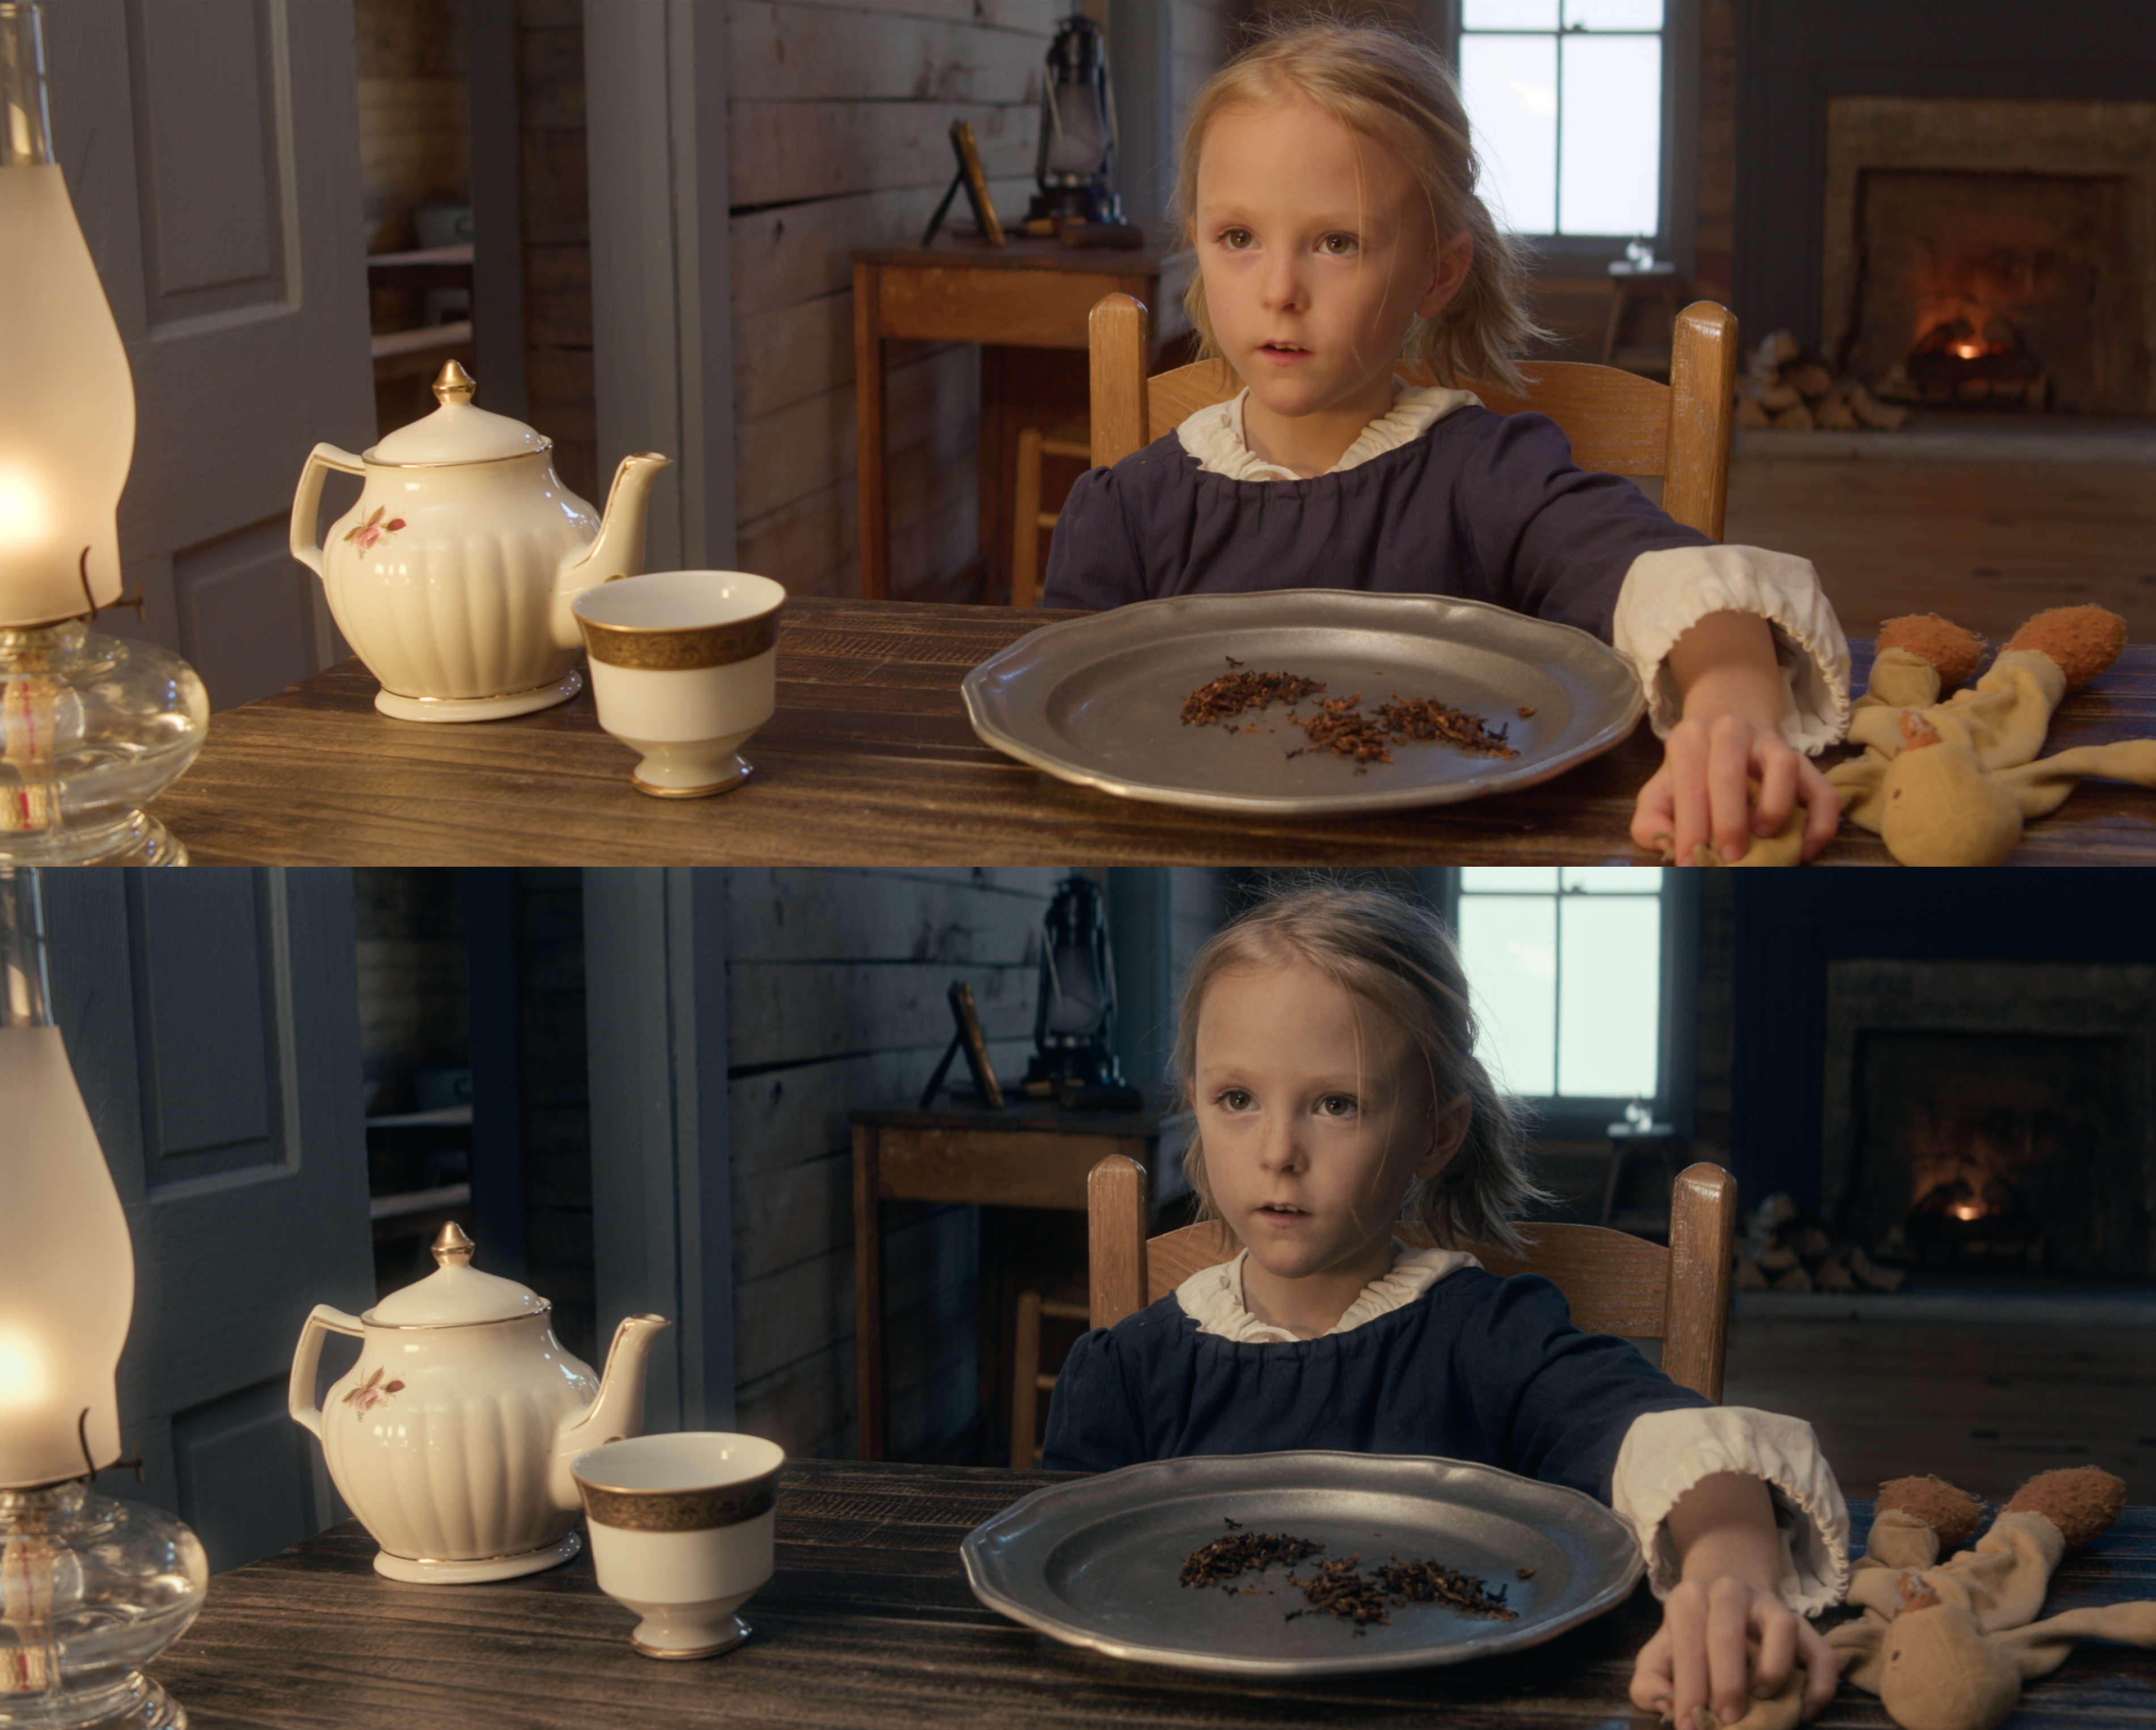
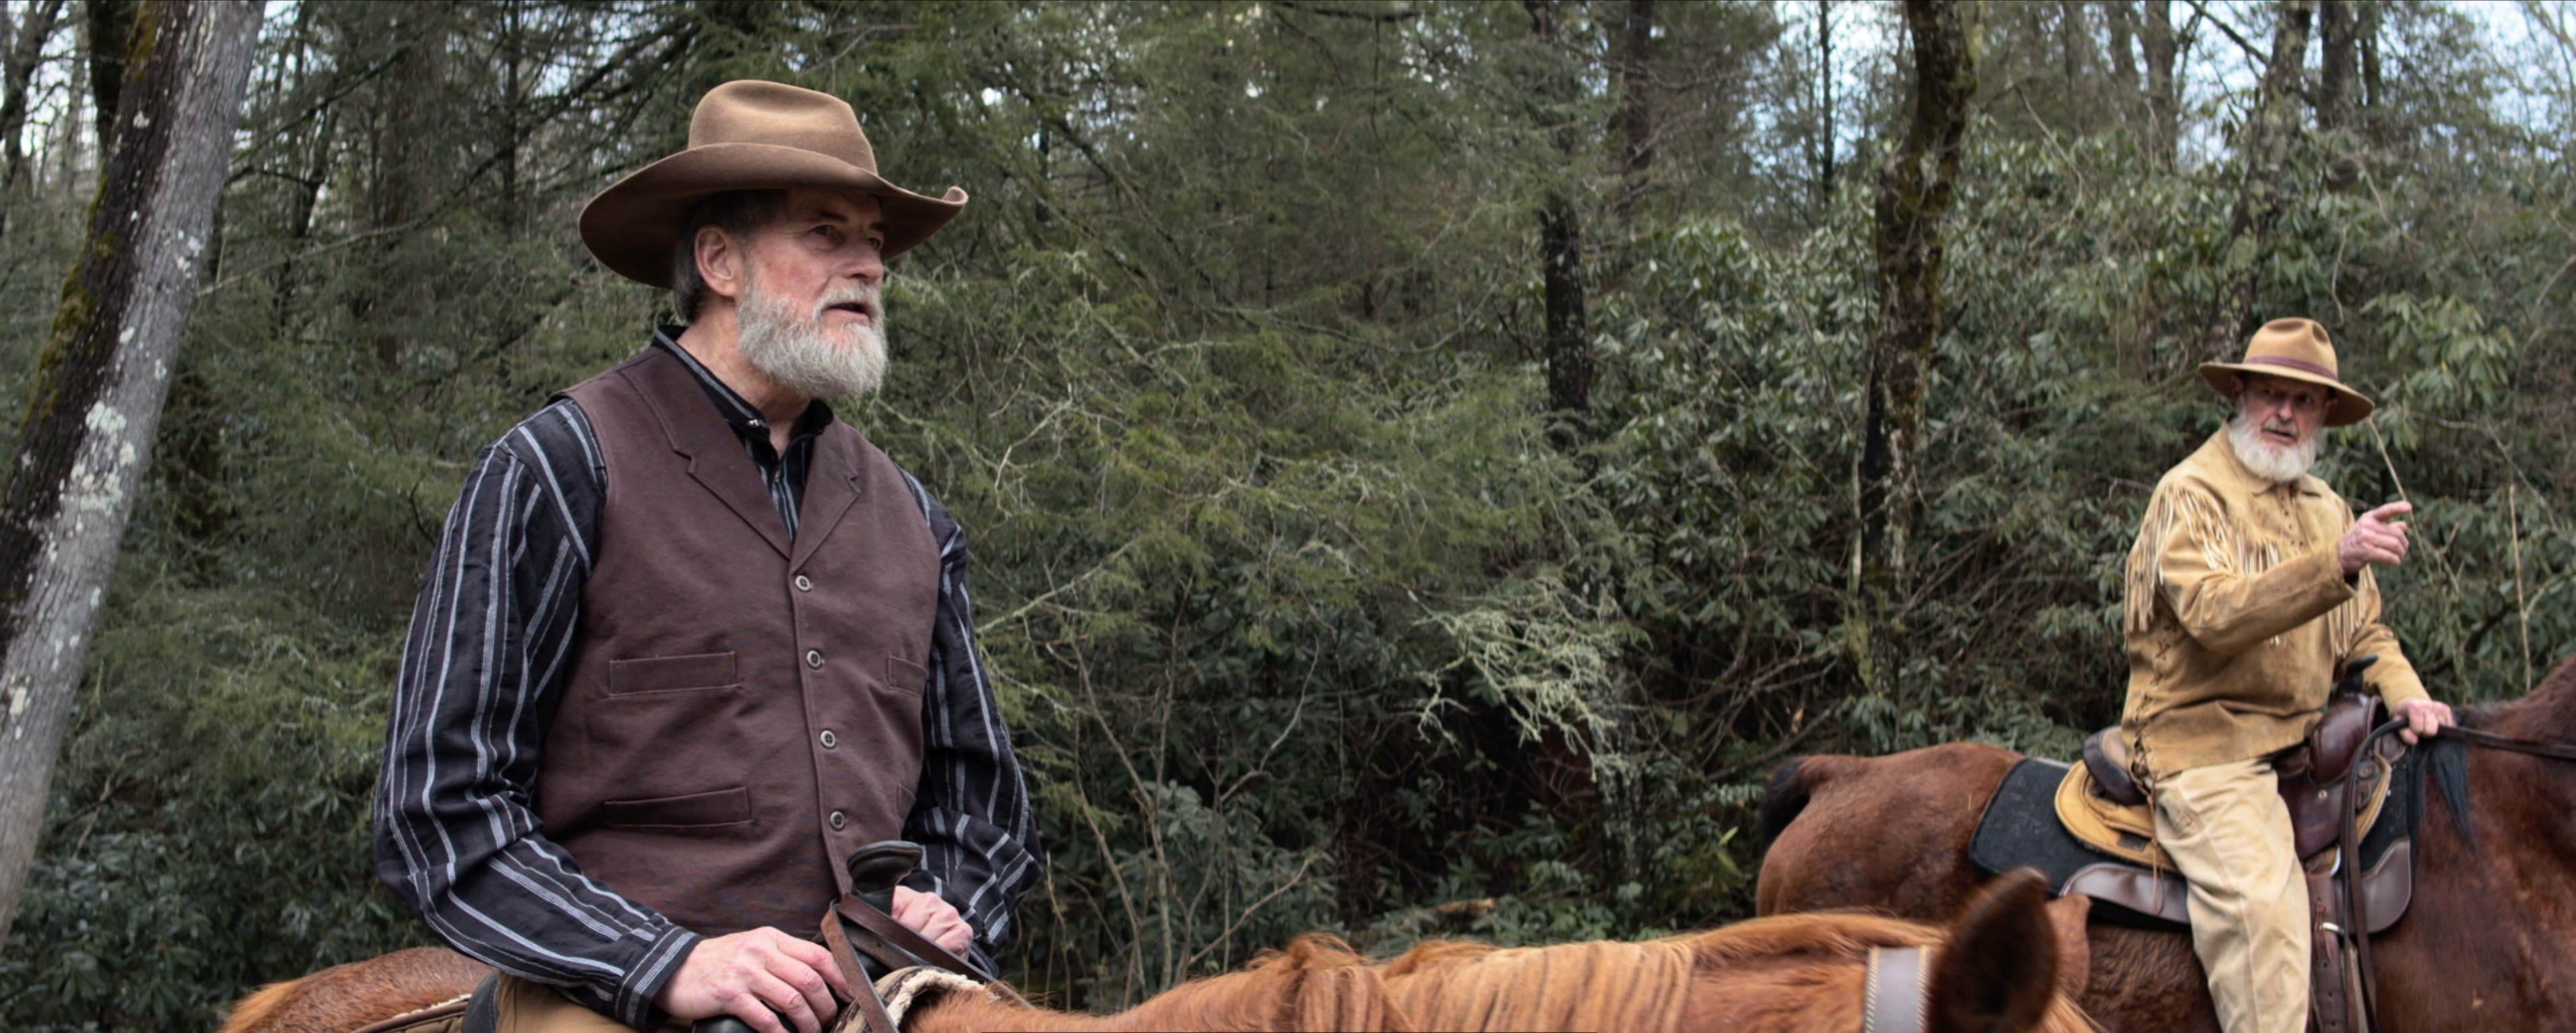
Check out a before and after shot from my latest film below. This was shot on a Blackmagic Design Pocket 4K with a Sirui anamorphic lens. It was 4K DCI Blackmagic RAW.
A big difference right? The lower image looks much more cinematic. So what is Dehancer doing exactly? First, analog film has many characteristics. How it handles light. How exposure changes more than just details in brights and shadows. How the development process affects the look. How the optical printing process also affects the look.
And so much more.
Dehancer emulates the entire film process in a very technical way. This means some tools might appear redundant as we go through them, but they’re not. Take contrast for example: There are many ways contrast can be tweaked with actual film. So the Dehancer tools accurately reproduce these steps and make them available to us.
The people behind Dehancer have their own lab. They do their own development. They've studied and countless numbers of actual film stocks. They have also researched cognitive stuff like how the human eye sees color. They've developed their own mathematical models because they couldn't find models accurate enough for their purposes. Dehancer is a very accurate film emulation tool. We're not just dumping on grain or bloom FX. It's way beyond that.
In this article we’re gonna walk through Dehancer in detail. I’m gonna give you examples from my latest film RECKONING. So with all of that said, let’s dive in:
Installation & Intial Default Settings
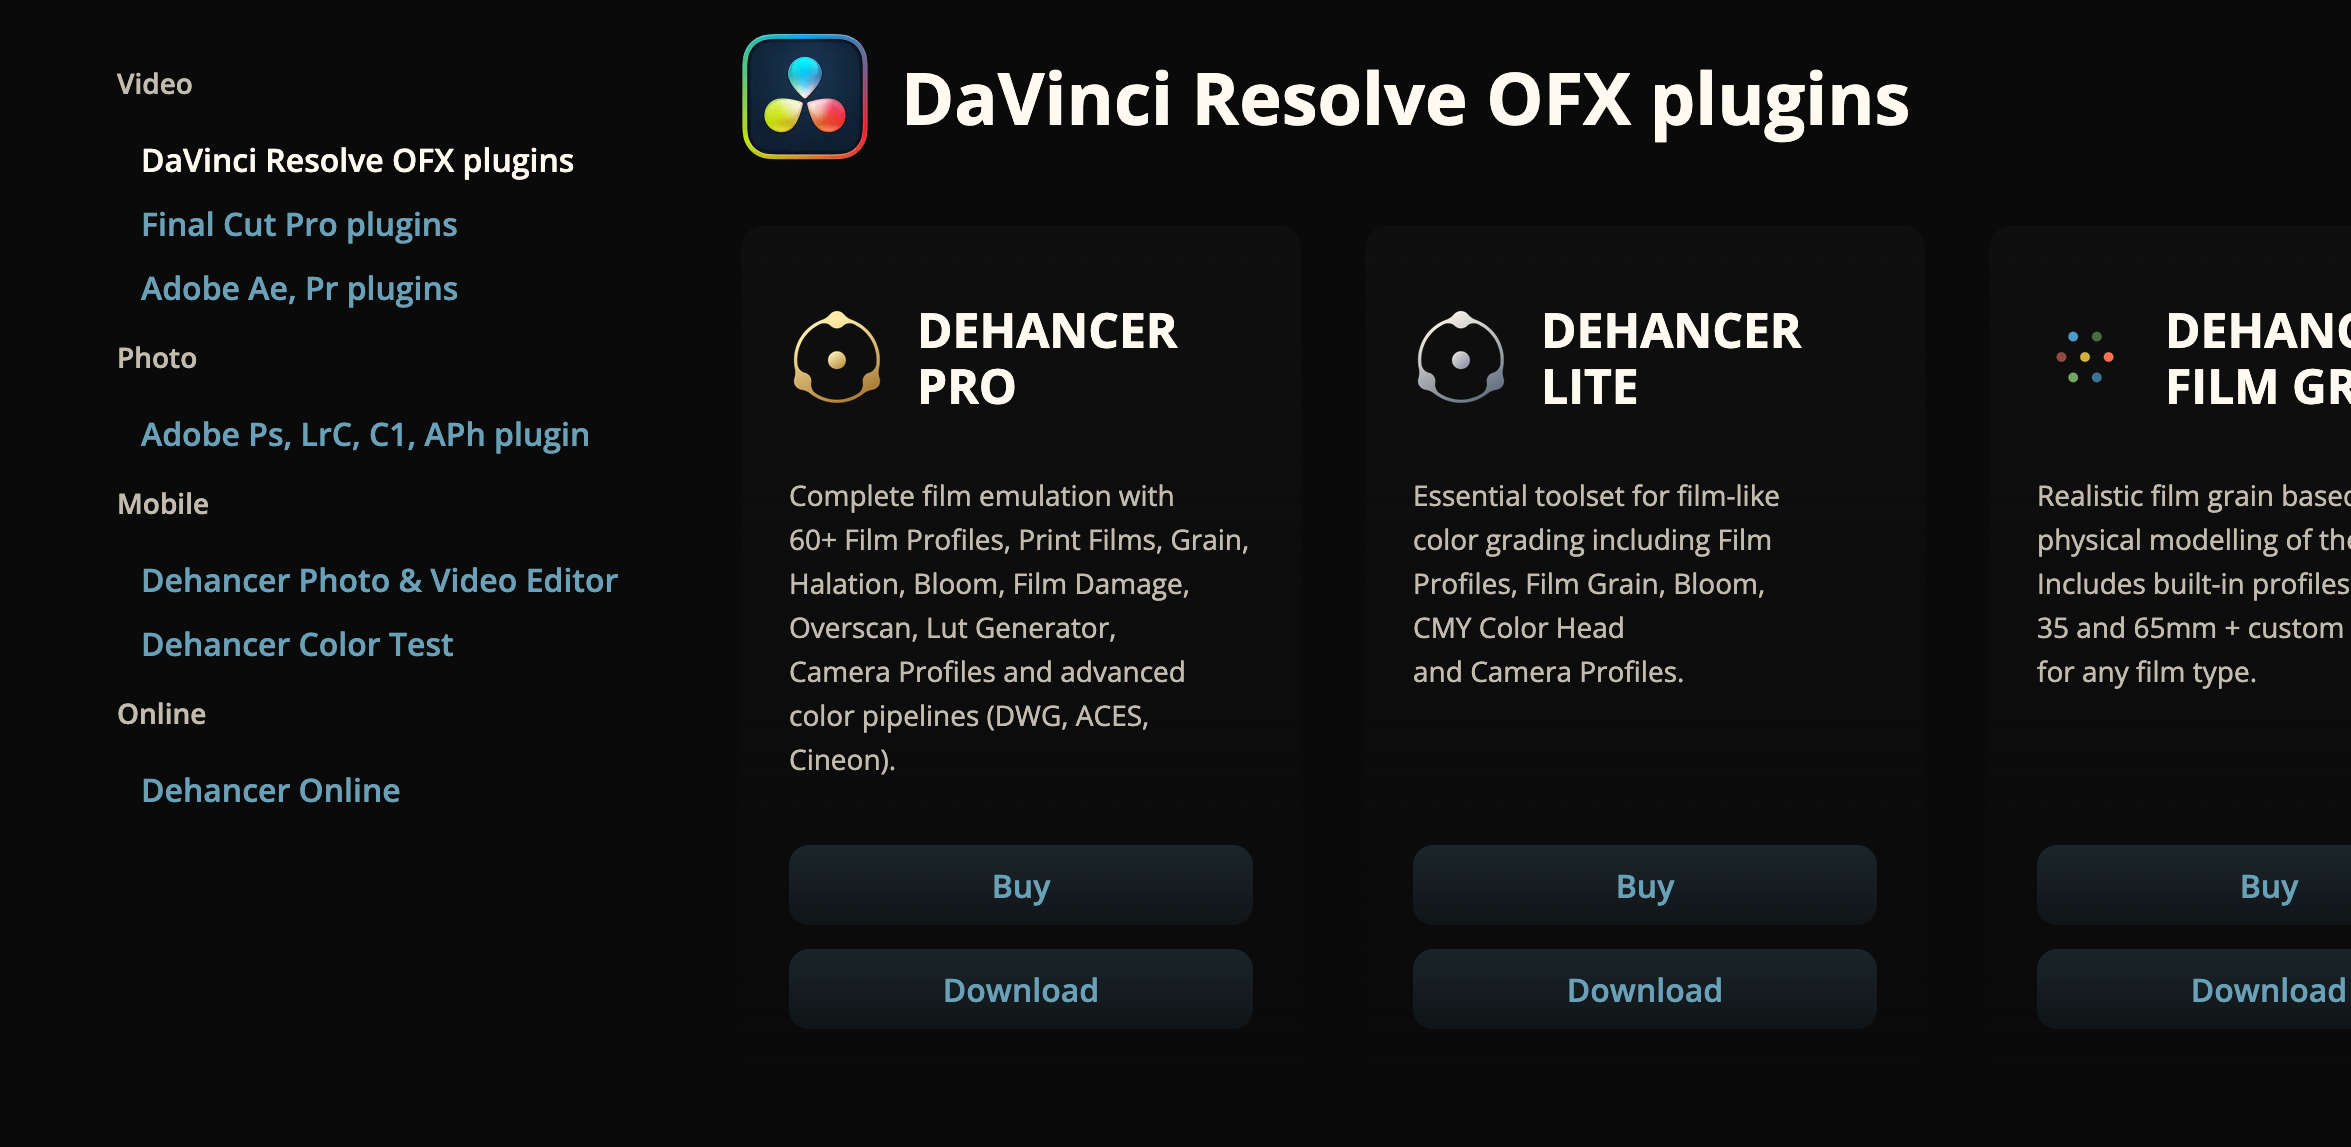
Dehancer provides a free trial option that you can test out. Visit their website. Select “Products” from the main menu. Look for “Dehancer Pro” and download. Choose the free trial option. Once the download completes, you should have a zip file.
Close DaVinci Resolve (if open). Double-click on the zip file, open the folder. Double-click on the application file. Continue > Accept License > Continue > Install. And we’re done. Now let’s open up Resolve and go to Preferences > System > Video Plugins. Make sure Dehancer is checked.
The Dehancer Settings
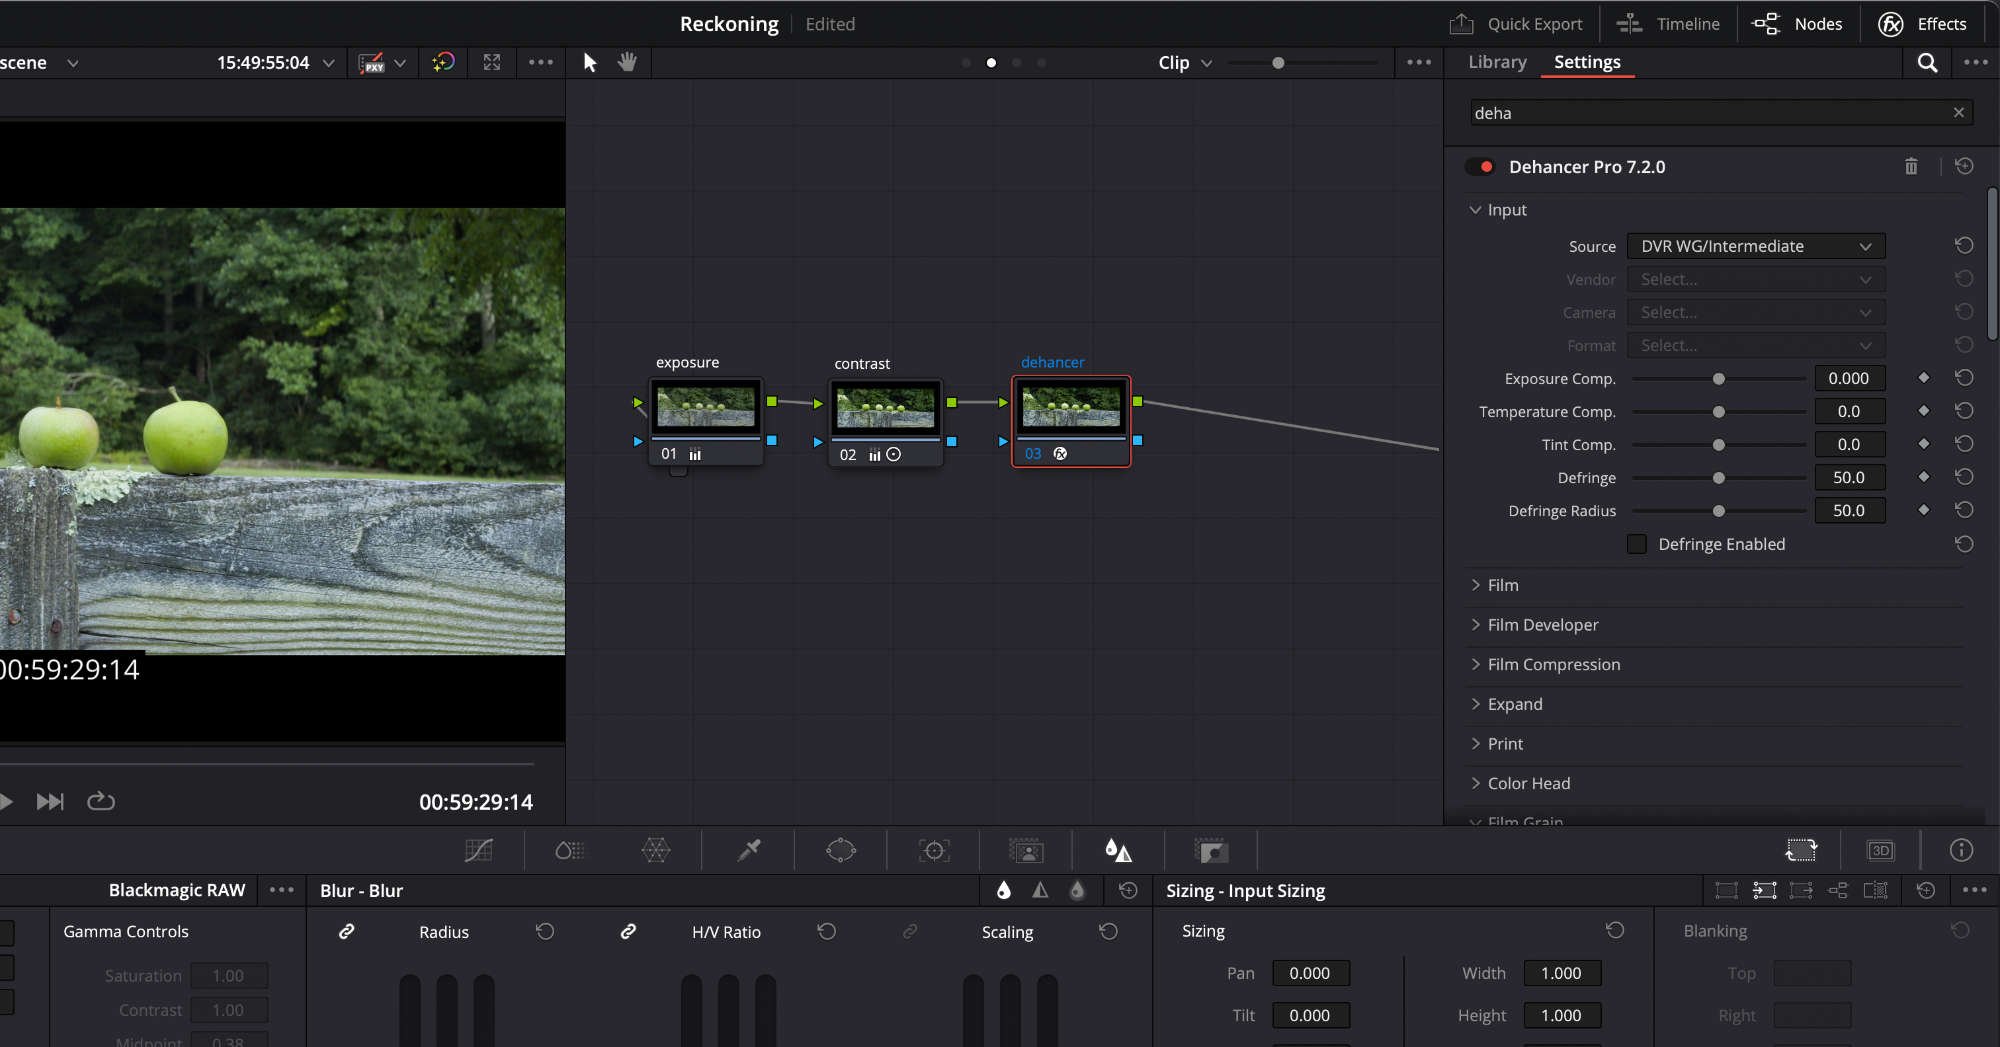
For the next steps you want to have a timeline open with footage. Jump over to the COLOR PAGE in Resolve. Dehancer works kind of like a LUT—if you’ve ever used a LUT before. You place Dehancer at the END of your clip node tree—remember, the video signal moves from left to right.
Here’s how to add Dehancer to a clip:
Add a node to the end of this clip’s node tree and name it “Dehancer”.
Go to Effects top right, hit the magnifying glass and search for Dehancer.
Drag it over to your new serial node.
Keep Effects open.
SET QUALITY & DISABLE DEFAULTS
The first thing we need to do is scroll down to Options in the Dehancer settings area on the right of the Color Page. Set quality to high. Next click Disable All Tools. When you add Dehancer to a serial node, it enables some things by default, which is never the look you want, so just disable it.
If you purchased Dehancer click License Info, paste in your license key and activate the plugin. With it activated, click Check Profiles. This will download the latest updates from Dehancer.
Scroll back to the top of Dehancer options. Now we’re ready to step through the settings. It might seem daunting, but once you used to them you will love this software!
INPUT SETTINGS
Here we tell Dehancer what type of timeline we’re working in. Set the source to the same as your timeline. I’m in a DaVinci Wide Gamut, color managed project. If I go to my project settings > color management it will show a DWG timeline. So my choice would be DVR WG/Intermediate.
But what if you're exporting and/or monitoring in Rec.709? DaVinci Resolve is gracefully taking everything down to a Rec.709 output from DWG. Dehancer is happening before that. The input and output for Dehancer is what your Resolve timeline is set to.
INPUT TOOLS
Under Input we have: Exposure, Temperature, Tint and Defringe. I rarely use these tools. I always adjust color, exposure and tint in native Resolve via the Camera RAW tab (at a meta data level with BRAW footage) or with the Resolve HDR palette.
Defringe has to do with chromatic aberrations. Some tools in Dehancer might react negatively with chromatic aberrations in your footage and this allows for correcting such. Notice Defringe has an on and off checkbox—this tool (and others) must be enabled for your changes to take affect. This is handy as you can simply turn and entire tool on and off to see easily the affect on picture.
What are chromatic aberrations? When light enters a lens, the light waves are bent and can hit the sensor slightly different causing a "rainbow" fringe on parts of the image. Some lenses won't do this like others. So in a nutshell, chromatic aberration gives a rainbow look to edges.
Something to know about the tools under Input: These are processed before other tools in Dehancer. For example, if I go down to Print, there’s an exposure setting there as well. But the Input exposure happens earlier in the pipeline than the Print exposure. Make sense? There’s something else about the Input tools, but we’ll get to that later. Let’s cut to:
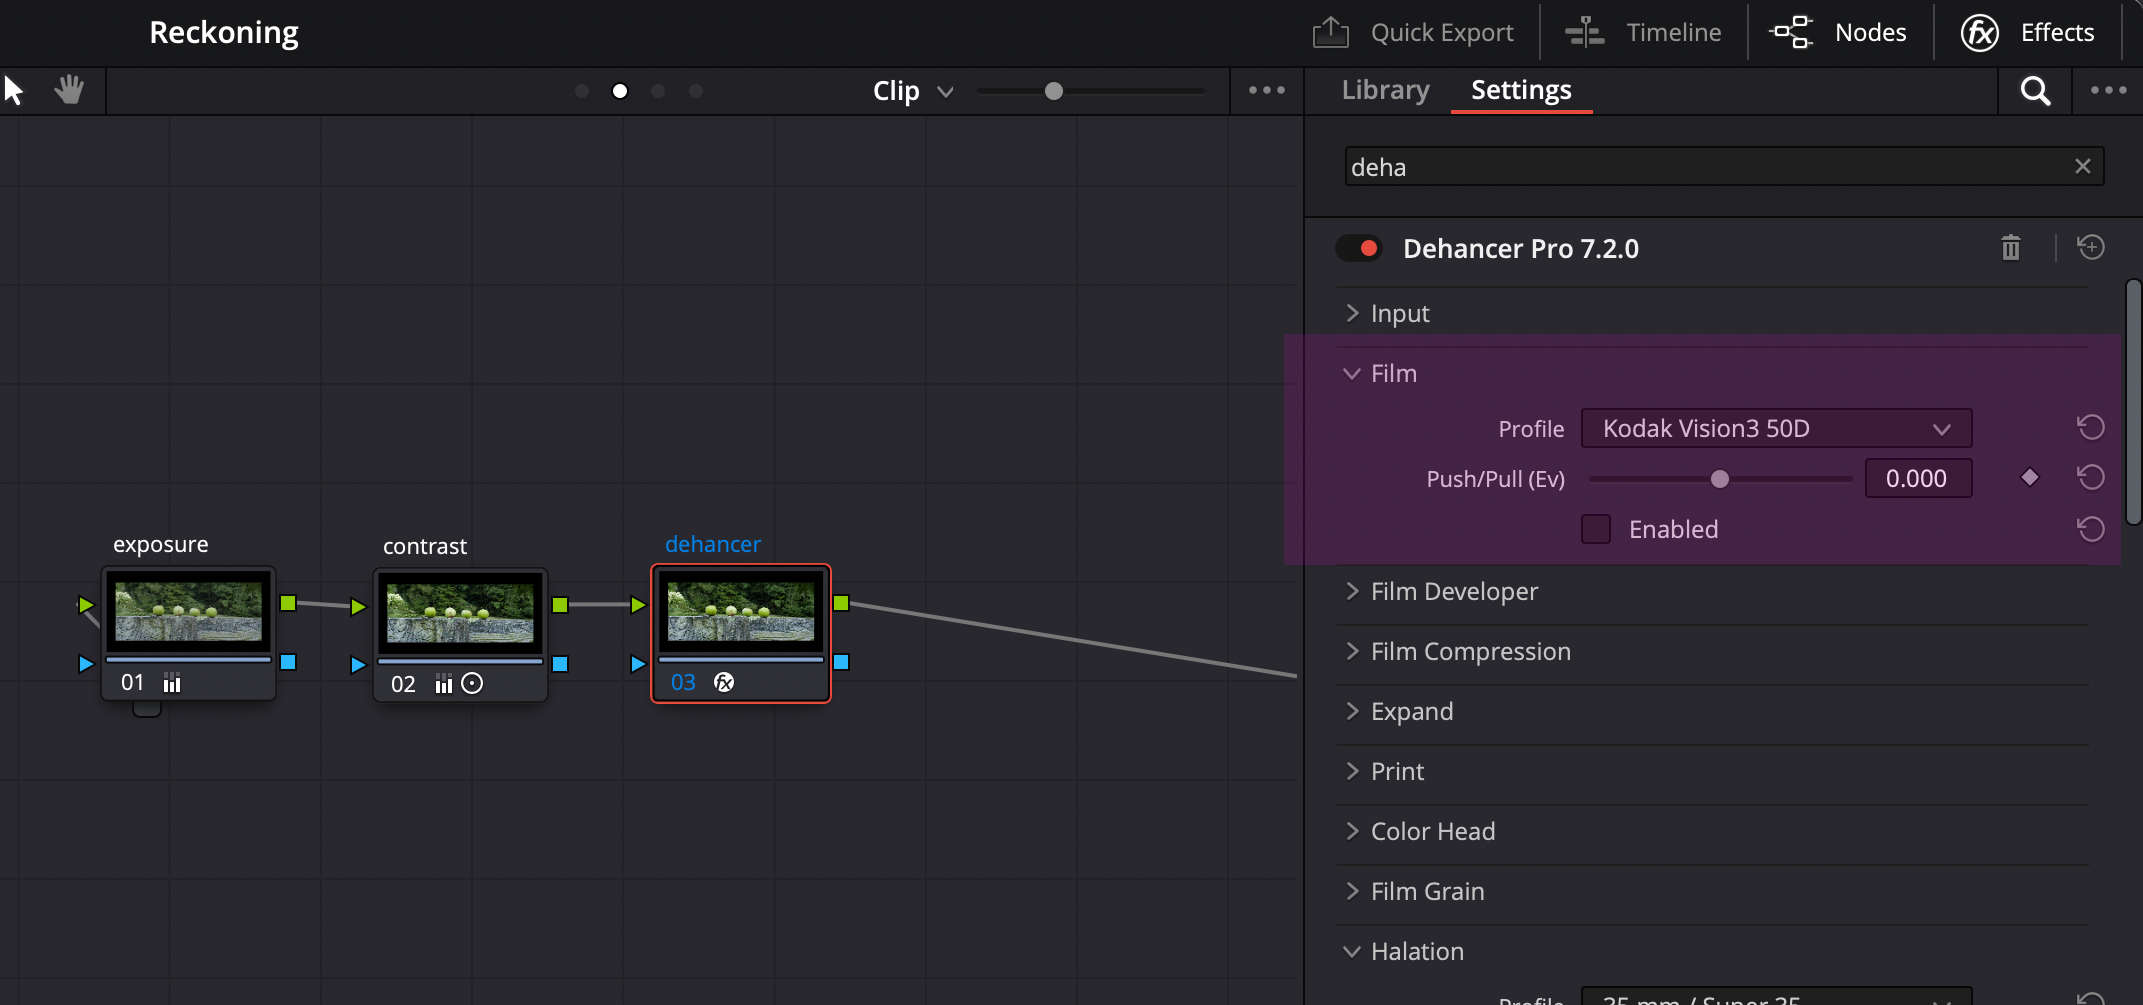
FILM SETTINGS
The Film area allows us to choose a negative film stock. Now you might be thinking, “How am I applying negative film stock to my digital footage?” How does that even work? I wondered this too.
Here’s what’s going on. As I’ve said, Dehancer has a lab. They know how to actually develop film. They’ve done A LOT of sampling with all types of actual film stocks. And they figured out ways to bring characteristics of those film stocks to your digital footage.
I’ve tested and it works—it’s really, really cool. Nowadays there are four primary film stocks used nfrom Kodak (by people like Chris Nolan). Kodak Vision 3 50D, 250D, 200T and 500T. The T stands for tungsten and it’s for lower light. The D stands for daylight. However the full list of actual film stocks in Dehancer is huge! You’ll enjoy experimenting.
Info: Negative film is basically raw data that requires further interpretation to be seen, kind of like log footage or raw footage from a camera. A color negative is developed and then optically printed to a positive film or print film. Digital scans of the negative are also possible, but are not the same quality as an optical print.
Film Settings | Push/Pull (Ev)
Now what’s the Push/Pull (ev) about? This is amazing. In a basic sense, it’s messing with exposure. But if you know anything about film, when you change exposure, it doesn’t just affect shadows and highlights. It also affects color. Dehancer has tested exposure on their film stocks to get accurate push/pull data. These settings change based on the color negative you choose! So I can go two stops above or two stops below, and it will change the color as well as the exposure.
I think even Chris Nolan would be impressed.
EXPAND SETTINGS
Next we jump down to expand. Why? Dehancer recommends momentarily skipping Film Developer and Film Compression when using a negative film stock. We need to tweak Expand first before checking out the other settings. So what’s Expand about?
All film stocks have different contrasts. They have different black and white points. Dehancer is really keyed in on accuracy, so they avoid any digital corrections on their end. This means sometimes when we apply a color negative film stock (or whatever negative film stock), we might lose contrast. And so they allow us to tweak this here. They refuse to do it on their end as their goal is to be as accurate as possible. I can enable Expand and if I take black down, it’s gonna lower contrast. If I take it up, it’s gonna raise it. We can also adjust our white point, etc.
Tip: Even though Dehancer says to use Expand next after Film, don't spend too much time tweaking because there are other tools that affect contrast and exposure that we'll get to. You must get familiar with everything before you spend a ton of time dialing something in with a single tool. And then it's all about experimentation.
FILM DEVELOPER
When developing film—which I haven’t done—you can radically change the look based on the development process alone. An experienced lab technician can use certain chemical combinations and make miracles happen. They could take the same scene shot with the same color negative film stock and make it look radically different based on what they do with development.
Dehancer has added the Film Developer toolset, which allows us to play lab tech. We can come in here and say, okay, I’m gonna make my own creative concoction for this shot, and that’s what this is all about. So I can enable it, and then the first thing is contrast boost. Next, we have Gamma Correction which allows us to change how much the mid-tones are shifted towards shadows or highlights.
Color Separation and Color Boost deal with saturation. Color separation relates to color filters in the emulsion layers of film. The emulsion layer is like a layer of gelatin with suspended crystals that react to light. Color separation defaults to 100. If you drop that back, it removes saturation from the most intense colors first. Color boost affects everything more simultaneously.
Info: As mentioned up top, Dehancer tools are not redundant. Dehancer has created tools that match certain aspects or steps of the analog film development process—even the optical scan process and printing to positive film. Their goal is to emulate the entire film development chain as so any creative applications exist. Our job is to become familiar and choose the best tools for the job. For example: If you wanted to change contrast on your image you could do that with Resolve HDR tools, the Resolve Primaries or several places within Dehancer!
FILM COMPRESSION
If you overexpose when you’re shooting on film, you don’t lose details in your highlights as fast as you do with a digital sensor. And to be clear, the Film Compression tool is not going to help you recover stuff that you’ve clipped due to bad exposure with a digital sensor. But it may allow recovery on shots where it’s not actually lost to data. What the tool is doing is bringing down or “compressing” extremes back towards the mid-tones. And we can tweak aspects of how and where the compression happens.
Impact controls how much compression we introduce. How much we push highlights down towards mid-tones. The default is 60. If I increase it will compress the range even more.
White Point controls the transition to the clipped area. The default setting is 100. If I lower that, contrast is going to go up in the clipped range. If I go above 100, contrast goes down.
Tonal Range is where we control the overall reach of the tool.
Color Density allows us to tweak saturation in the actual compressed area.
PRINT SETTINGS
Under Film we chose a color negative which applied characteristics of that stock to our digital footage, right? Is this making sense? Now with the Print tools we can apply the characteristics of a print film to our footage. Remember, in the “real” world of film we have a negative the stores the image, and a positive or “print” film which is designed for viewing.
The most accurate way to go from a color negative to print film is via optical printing. And this is what Dehancer emulates. For example, with Chris Nolan films they primarily use optical printing vs digital scanning.
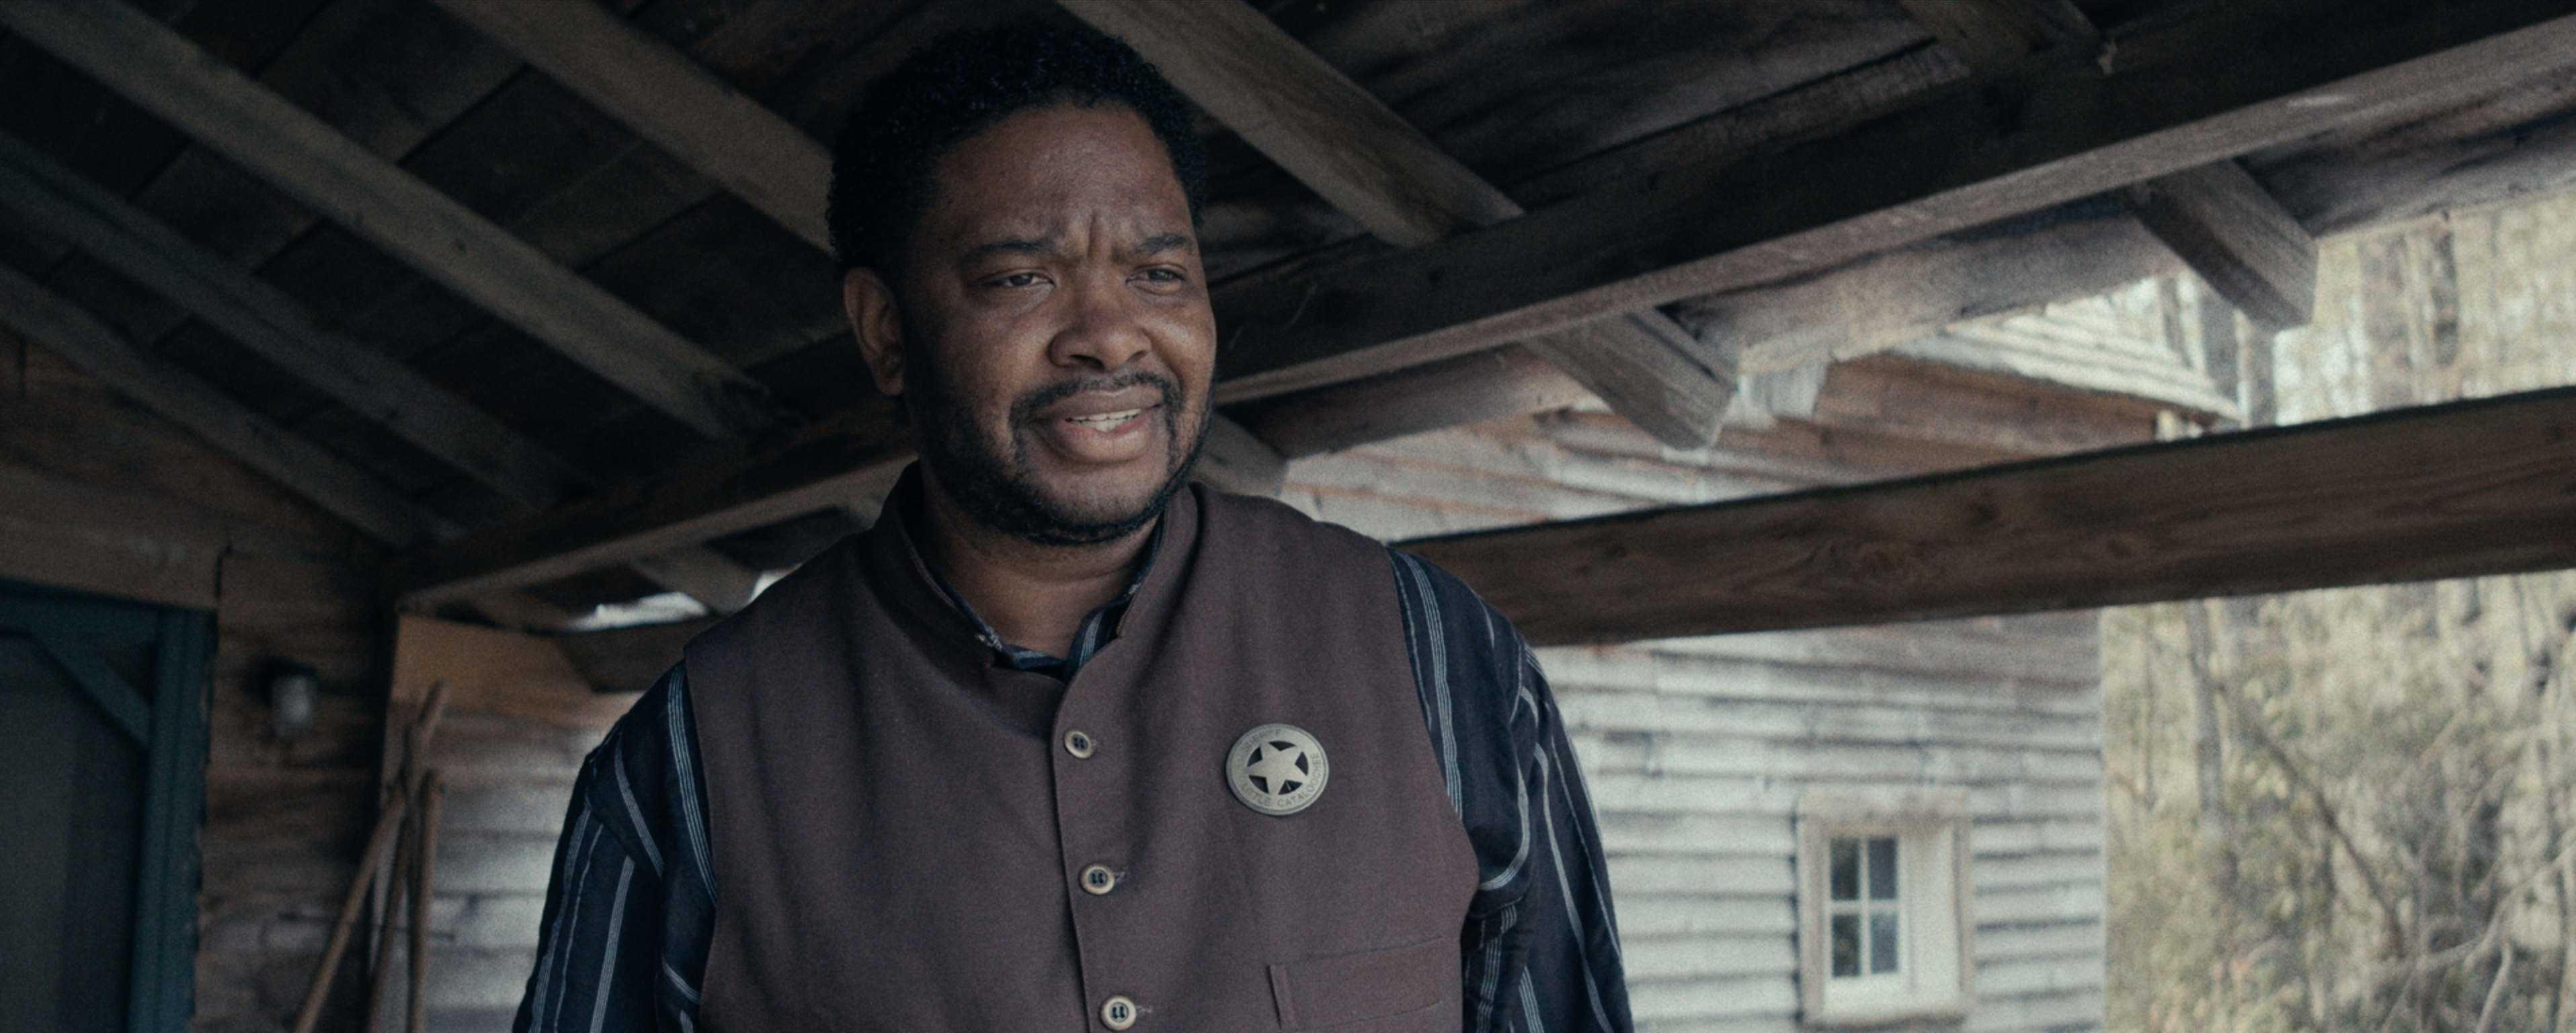
Dehancer provides two print film stock choices: Fujifilm 3513 and the classic Kodak 2383. The image below uses the Kodak Vision 3 50D color negative with the Kodak 2383 print film.
You will see massive changes to your footage my just selecting a Kodak Vision 3 color negative and the Kodak 2383 print film. Those two changes alone are huge. The Print tool allows for further tweaking of your image based on things they can do in the actual optical printing process: Target White, Exposure, Tonal Contrast, Color Density and Saturation.
Target White
This allows you to tweak color temp—as we’ve already been able to do, right? So let’s talk practical: how could this benefit you? Imagine under Film you choose a color negative and adjust Push/Pull to one stop under which changes the color slightly. Next you choose the Kodak 2383 print film and with Target White you lean the color in the same direction. This will yield a different look vs using a single tool alone. As is true with actual film! Make sense?
Exposure
Exposure is pretty straight forward. When performing an optical print, exposure can be tweaked. Dehancer actually recommends starting with tonal contrastbecause exposure affects the way they work together. If you want to change anything with contrast in the Print tool, begin with tonal contrast and then tweak exposure.
Tonal Contrast
This contrast tool uses a very sophisticated nonlinear compression. However, still keep an eye on your scopes whenever messing with contrast in any shape or form. If you do get anything too hot like blown out clouds or something, you can always return to Film Compression.
Color Density & Saturation
These both deal with saturation and may sound very familiar to Color Separation and Color Boost under Film Developer. However, Color Density provides perceptual saturation. It’s not a one-to-one linear mode correction. Which means it will affect significant colors in a higher degree. Saturation itself is more of a traditional saturation control, but here you can only reduce it, you can’t add to it.
Next we have…
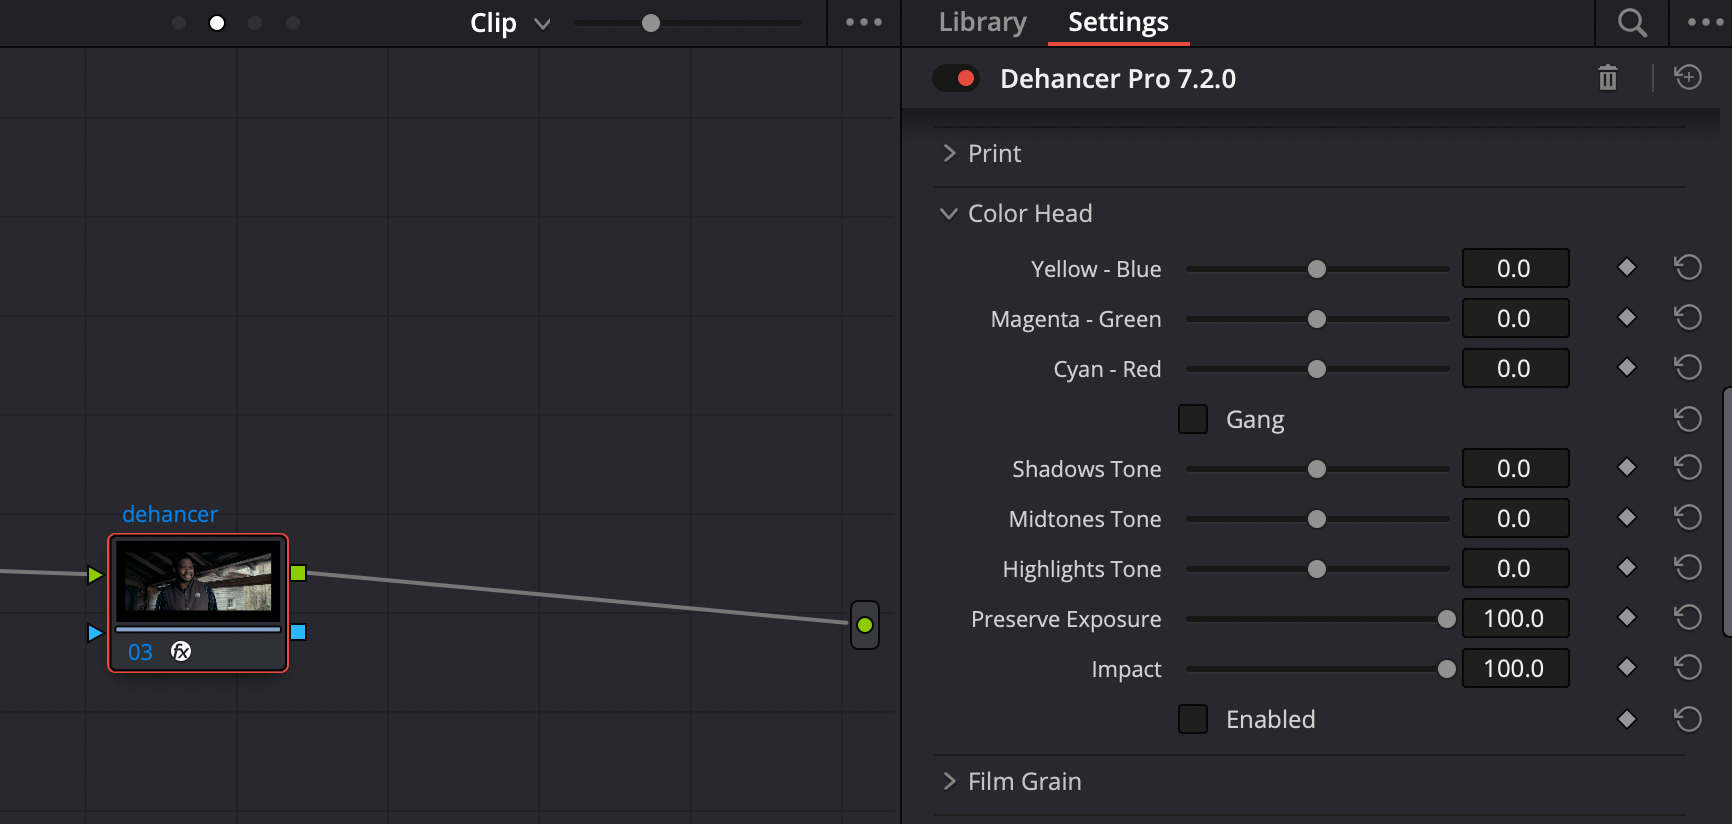
COLOR HEAD TOOL
This tool simulates changing the color of light used for print exposure with positive film (the film you print to). Color Head allows us to tweak a light by a little bit from like 5500 to 6500 Kelvin. We can change these individually or we can gang them. You can also get specific as to where color changes happen. Why? Analog film isn’t just like a digital file—you don’t just pump a hue into the whole file. So we can move more of our change into the shadows, mid tones, etc. Crazy amounts of control all mapped back to the analog film process!
Preserve Exposure & Impact
This option is super nice. When set to 100 it preserves whatever exposure you already have. So if you’ve got skin tone dialed in, any changes performed with the Color Head tool will not affect exposure. I’ve tested and it is superb. Impact is like an overall opacity for the Color Head tool. Drag it down and the intensity of all changes are reduced. Very handy!
Tip: Remember when I said there's more regarding Input that we'd get to later? Here it is: Dehancer recommends using Color Head vs messing with anything under Input. So if you didn't have camera raw footage and you couldn't go to the camera raw tab or you didn't want to use the HDR tools but you did want to change color temperature, Dehancer says do it here vs Input.
FILM GRAIN
Real film grain isn’t just overlaid on the top of the image. The image itself entirely consists of the grain. In the light of real emulation, Dehancer reconstructs a shot to give it a more analog feel. You have options for different types of film. 8mm will have more grain than 65mm. And each of these has different ISO settings. So a lower ISO will have less grain. The image above uses 65mm ISO 500 film grain. The footage is from a Pocket 4K.
We can also use the Amount slider to control how much grain is applied. And if you choose a film profile and choose custom, it will bring over all the individual settings that make up the profile and you can configure from there. VERY COOL. This includes the size, amount and resolution. You can specify how much in the shadows vs the mid tones vs the highlights. AMAZING.
Chroma has to do with the film emulsion layer. The Film Type affects the grain amount (positive has less grain than negative). And for Mode, analog is always your best look. If you need to kick something out fast for review, you can choose noise. But you want to do analog for your final product. This is a very sophisticated film grain tool, in theme with everything else Dehancer does.
FILM HALATION
So what is halation? Halation is a film emulsion effect that can give a red/orange glow or halo around bright light sources and distinct contrast areas in your image. Now the big warning with the Halation tool is that it can affect skin tone. I typically do not use this tool because of that. If you do want the throwback look of halation on your footage, start here before dialing in your skin tone.
Tip: Scroll down to output and you'll discover a Total Impact setting. This takes all the changes you did in Dehancer on a particular serial node and performs a global adjustment. Sort of like the "opacity" of the Dehancer effect.
BLOOM
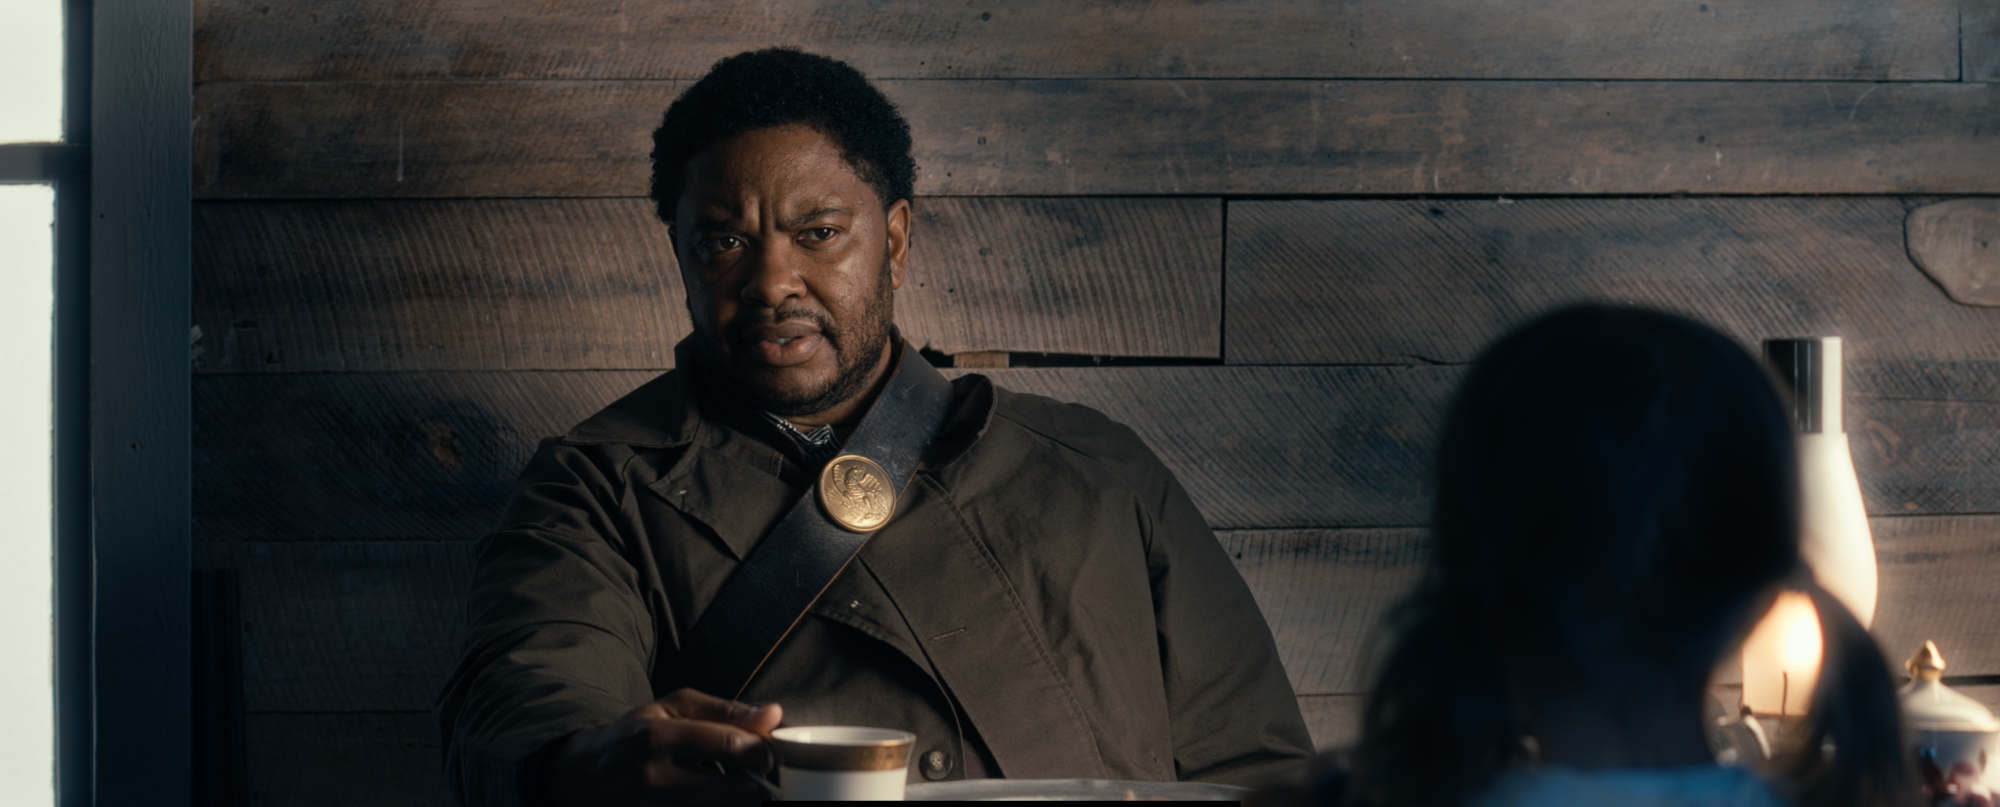
Bloom is a gorgeous tool. You used to get bloom with old vintage lenses, stuff like that. With modern cameras and lenses, you can purchase filters like the Black Pro Mist from Tiffin. Screw them onto your lens and get a glow while shooting. The problem? You’re baking that into the image. And from my personal experience, Black Pro Mist filters can do funky stuff with anamorphic lenses. I’d much rather use this tool in Dehancer. It’s applies to the above image and adds a beautiful glow to the officer’s metal badge, the coffee cup and more.
Tip: Some Dehancer tools (like Bloom) have a mask mode which allows you to see exactly what areas of the image the tool is affecting. Very handy when tweaking profiles beyond defaults.
Similar to the Film Grain tool, you can further configure a bunch of detailed settings for Bloom.
FILM DAMAGE
Another retro throwback item is film damage. Dust, hair, scratches and other items inevitably show up on a movie shot with film. The Film Damage tool allows you to add this vintage feel to your digital footage. You can choose a profile, set the total amount and jump out to custom for more fine control.
FILM BREATH / GATE WEAVE
Film breath has to do with issues where exposure changes from frame to frame. Gate weave has to do with the film itself physically moving. These are old school problems that nobody wants. These tools are for very specific purposes—a 1912 class reunion video maybe? But you get it.
OVERSCAN & VIGNETTE
Overscan happens when they purposely scan outside the image and pick up film perfs. You can change it to match different film stocks. Vignetting is considered a flaw with the lens. It’s not what you want when you’re shooting a movie, but we’ve seen it before, and now it’s kind of a creative tool at times.
Tip: If you will use a vignette, do it on the early end because it will mess with your exposure, your contrast, stuff like that. And remember the mask mode will show you exactly what's going on.
MONITOR & CLIPPING INDICATOR
Dehancer has an implementation of False Colors under Monitor. Could be kind of handy if you don’t have another tool you like. Personally I’m good with my scopes. The Clipping Indicator is also located here if you need that for any reason.
OUTPUT
We discussed this above, but this allows you to adjust the strength of all the Dehancer tools combined.
LUT GENERATOR
I’ve not used this and won’t try to speak to it. But obviously it looks like a way to create a LUT based off changes and export that for use. Which is VERY handy for monitoring on set.
The Ultimate Film Emulation Tool
When introduced to Dehancer I was 90% through grading my current film with native Resolve tools (which are amazing). But after witnessing the beauty that Dehancer could bring to my digital footage, I started the grade over from Scene 1.
Dehancer is incredible. I know it costs money, but in the grand scheme of things, it’s not that much. You nuke more on craft services for the average short film. I can definitely say Dehancer TRANSFORMED the look of my current film!
If you’re new to Write & Direct we are an online film school for DIRECTORS. We teach the craft from development through post production in a self-paced, hands-on manner. If you want to make movies, consider our online film school before draining your bank account on traditional film school!
As filmmakers we want depth in our 2D medium of film. We also need to find a motivated light for each scene so the audience isn’t confused. And most of the time we want to shoot on the fill or shadow side of our actor’s faces—And that’s just getting started! But how do you approach it all?
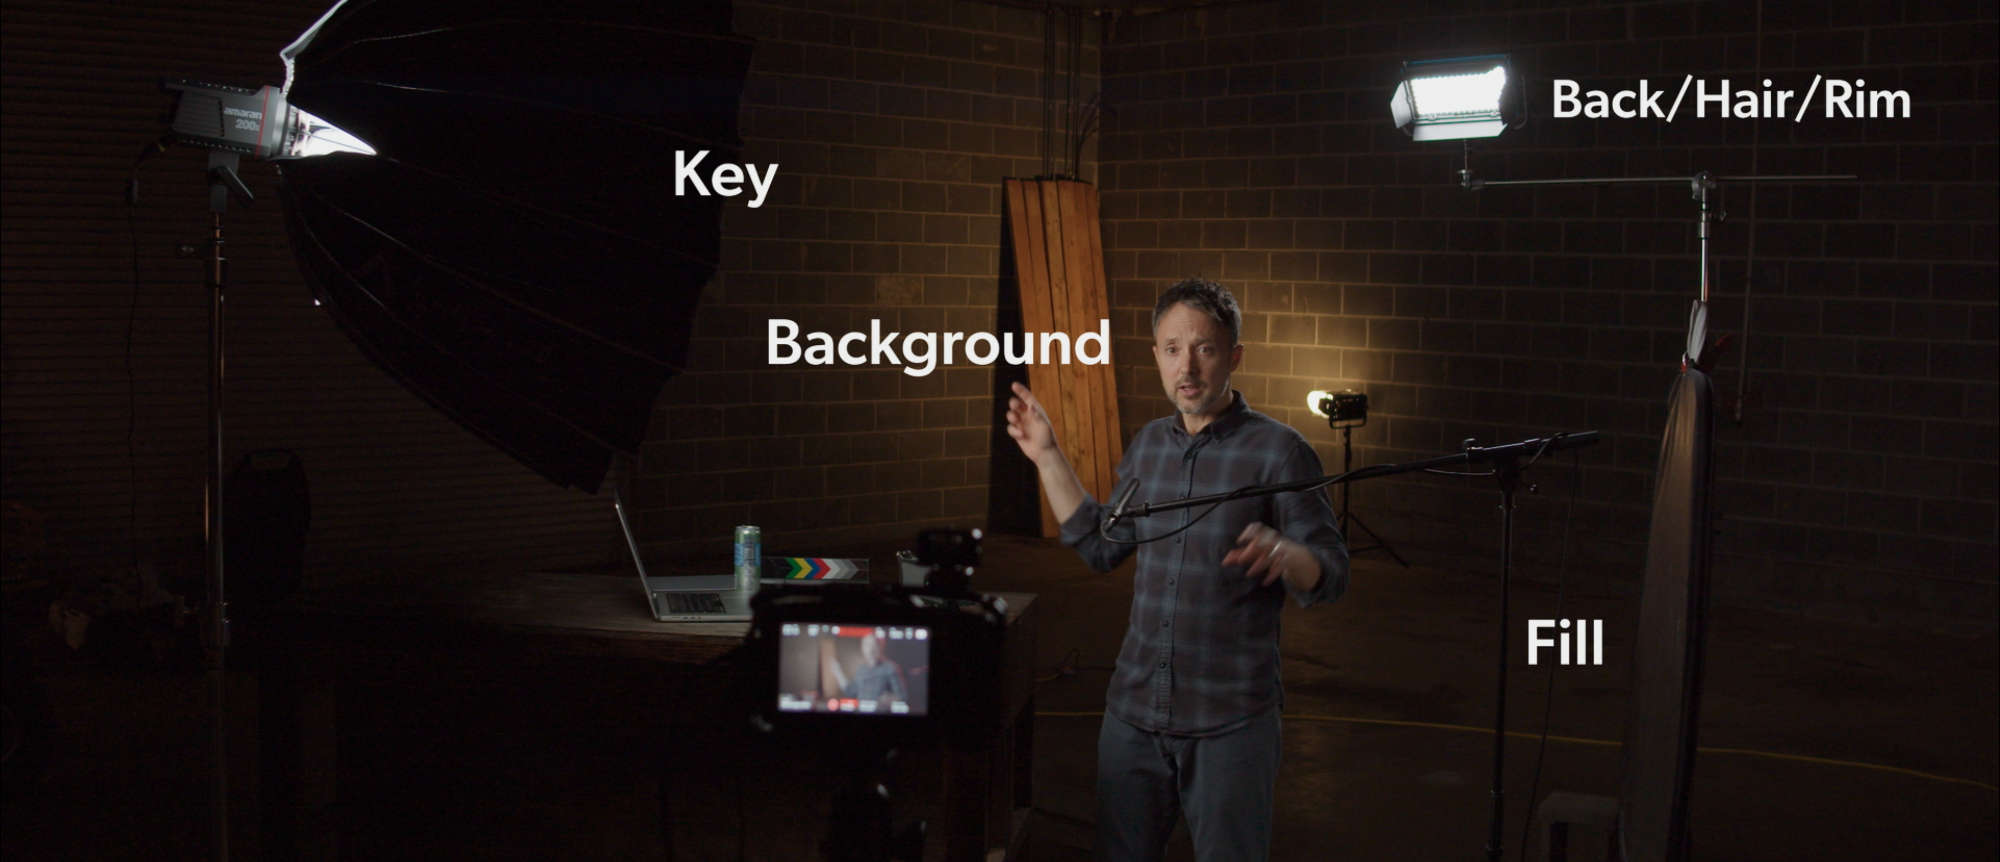
Understanding 3-point and 4-point lighting setups will give us the foundation needed to tackle everything else. Take the image below—me in a large garage. We’re going to walk through four different lights to see what they do and discuss when to use them. The lights we’re covering are key, fill, hair and background lights. Are you ready?
KEY LIGHT
Your main light is called a key light. It’s typically placed at a 30-60 degree angle, and often just above eye-line. But this varies based on what you’re after. The key light typically does at least three things:
1) EXPOSURE
Your key light is often where you’re getting needed light for proper exposure. Not always, but that’s often a primary purpose. Sometimes I bounce a light off the ceiling or use a lantern soft box to lift overall luminance, and this has nothing to do with the key light. But often, the key is doing this for you. A key light is typically supporting your motivated light source.
Motivated Light: Every scene's lighting must have a motivated light. Meaning the source of the light we see. If there's a window in the room with sunlight coming in, that's a motivated light source. But it was night in the same room, you couldn't light the same way. It wouldn't make sense.
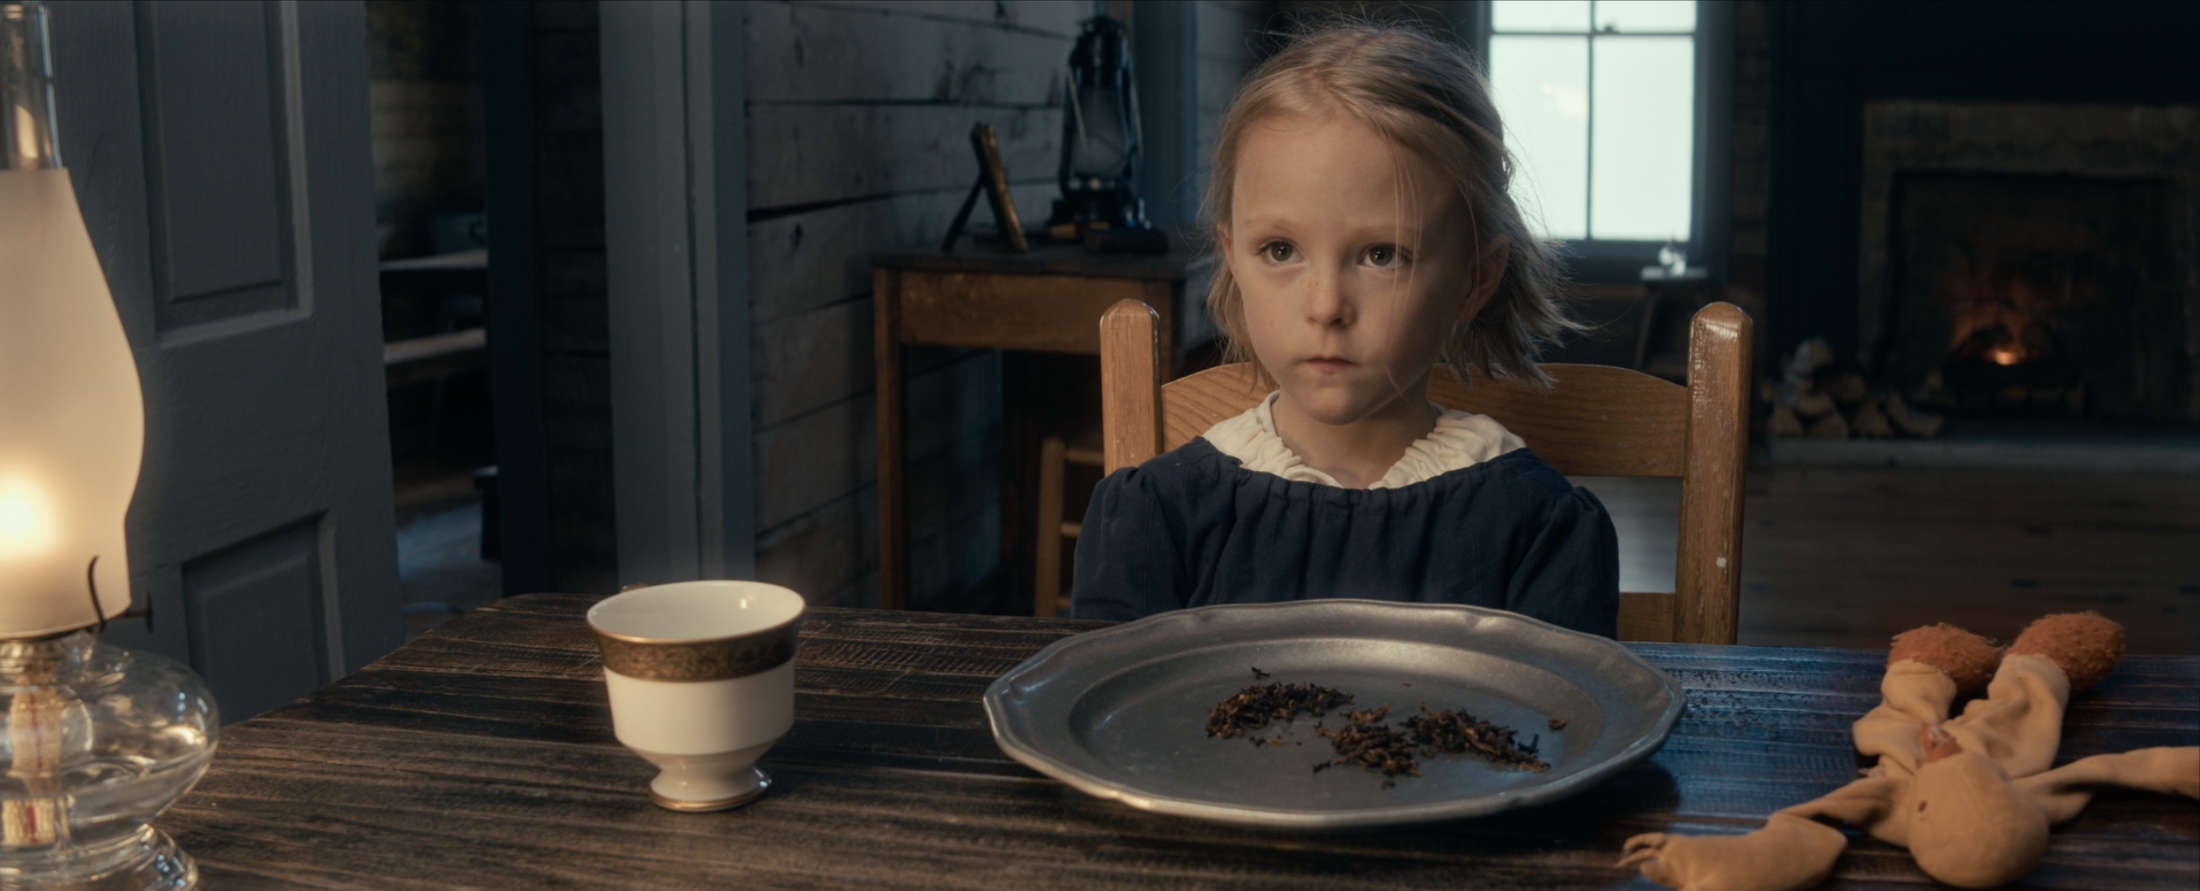
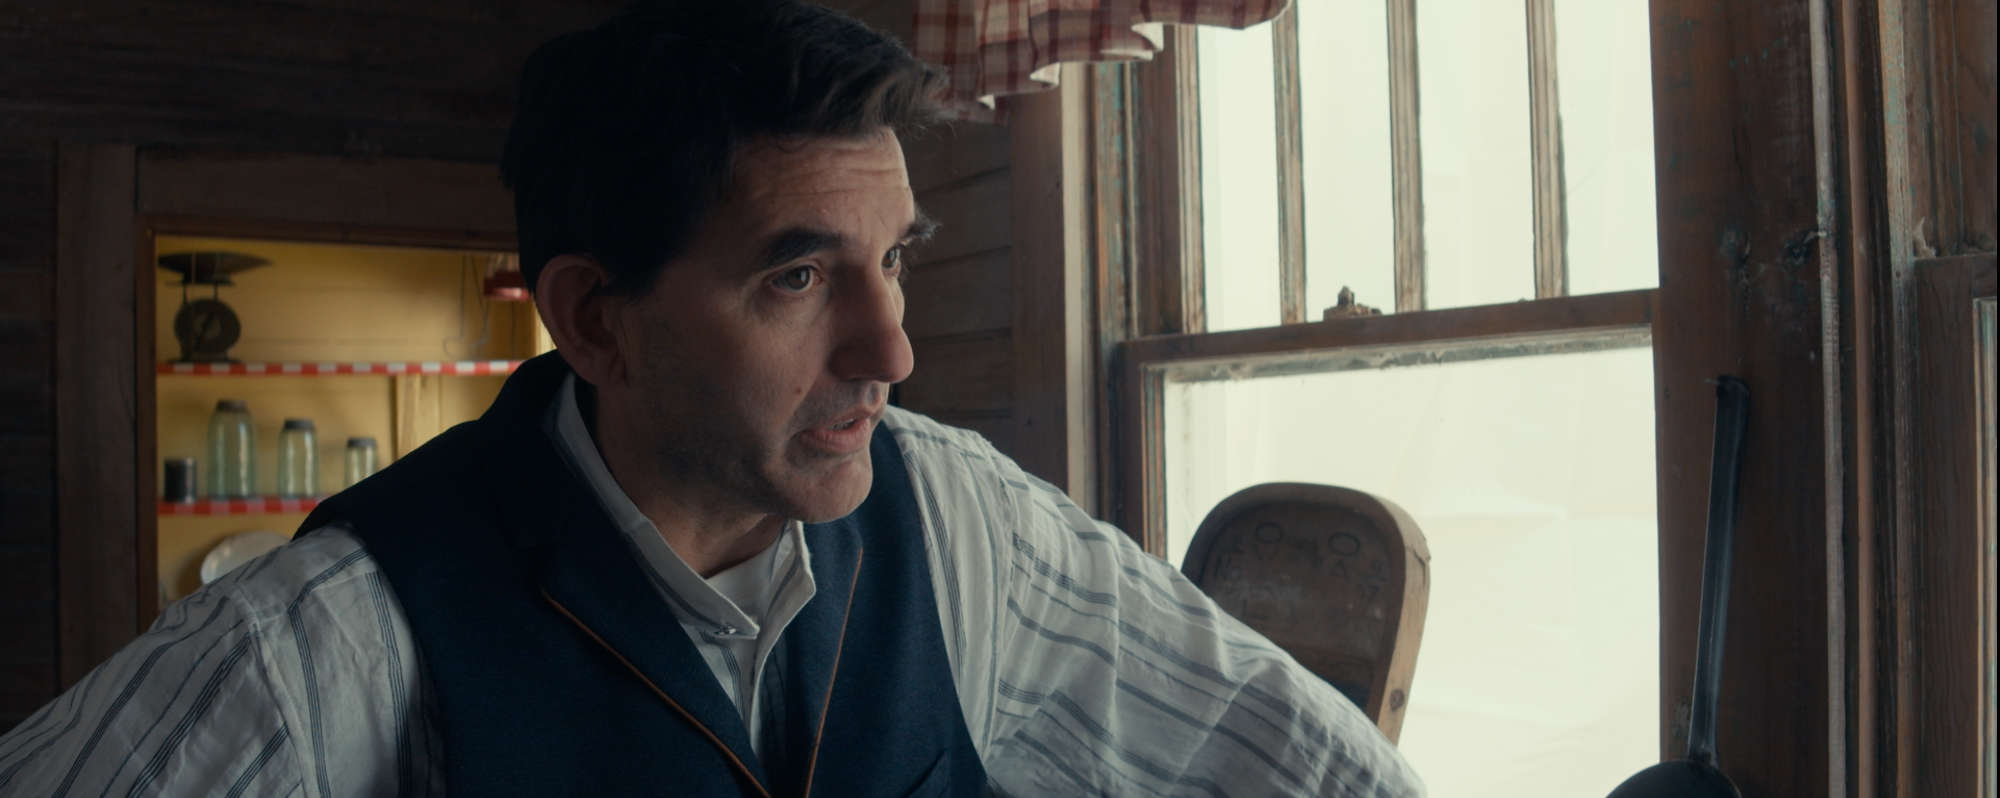
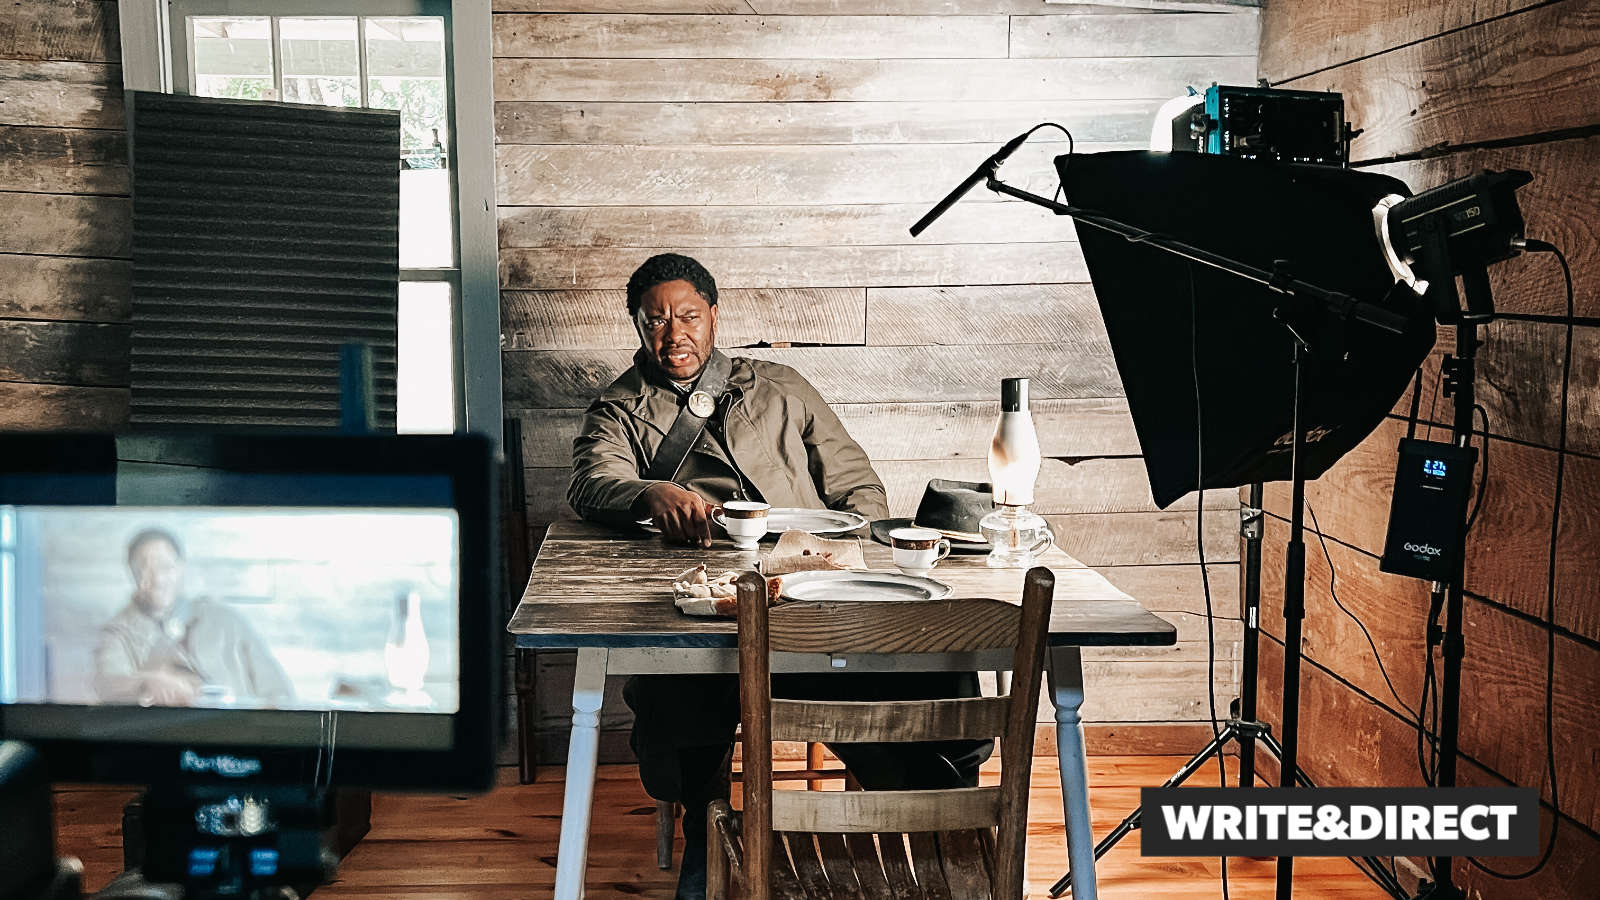
The above applies to narrative filmmaking. For this example where I’m just standing in a garage and teaching? Different story. Light however you want. But for narrative film sets, you must have a motivated light or the audience will be confused. Take this image from RECKONING:
The lantern is the motivated light, and my key light (obviously not in the shot) is angled up and set to the same color temperature of the lantern. This gives me the look I wanted and helps with overall exposure.
2) SHADOWS
The height, angle, intensity and diffusion of your key affects the shadows on your actors in unique ways. And your choice affects the emotions of the scene. A classic way to light is called “Rembrandt Lighting.” Check out the painting of a polish Nobleman:
Rembrandt often placed a small triangle of light on the shadow side of the subject’s face, just under the eye. Gaffers will often do this by placing the key light at a 45-degree angle and a little higher than the actor’s eye line. Looks cool, as long as it supports what’s going on with your story.
It’s all about story.
How can the placement of shadows on your actor’s face help the audience feel a certain way? Don’t just throw up your key light. For example, a couple sitting by a campfire on their first romantic outing vs kids sitting around the same campfire telling ghost stories are both going to require a different approach.
Play with your angles. Experimenting with lights ALWAYS pays off.
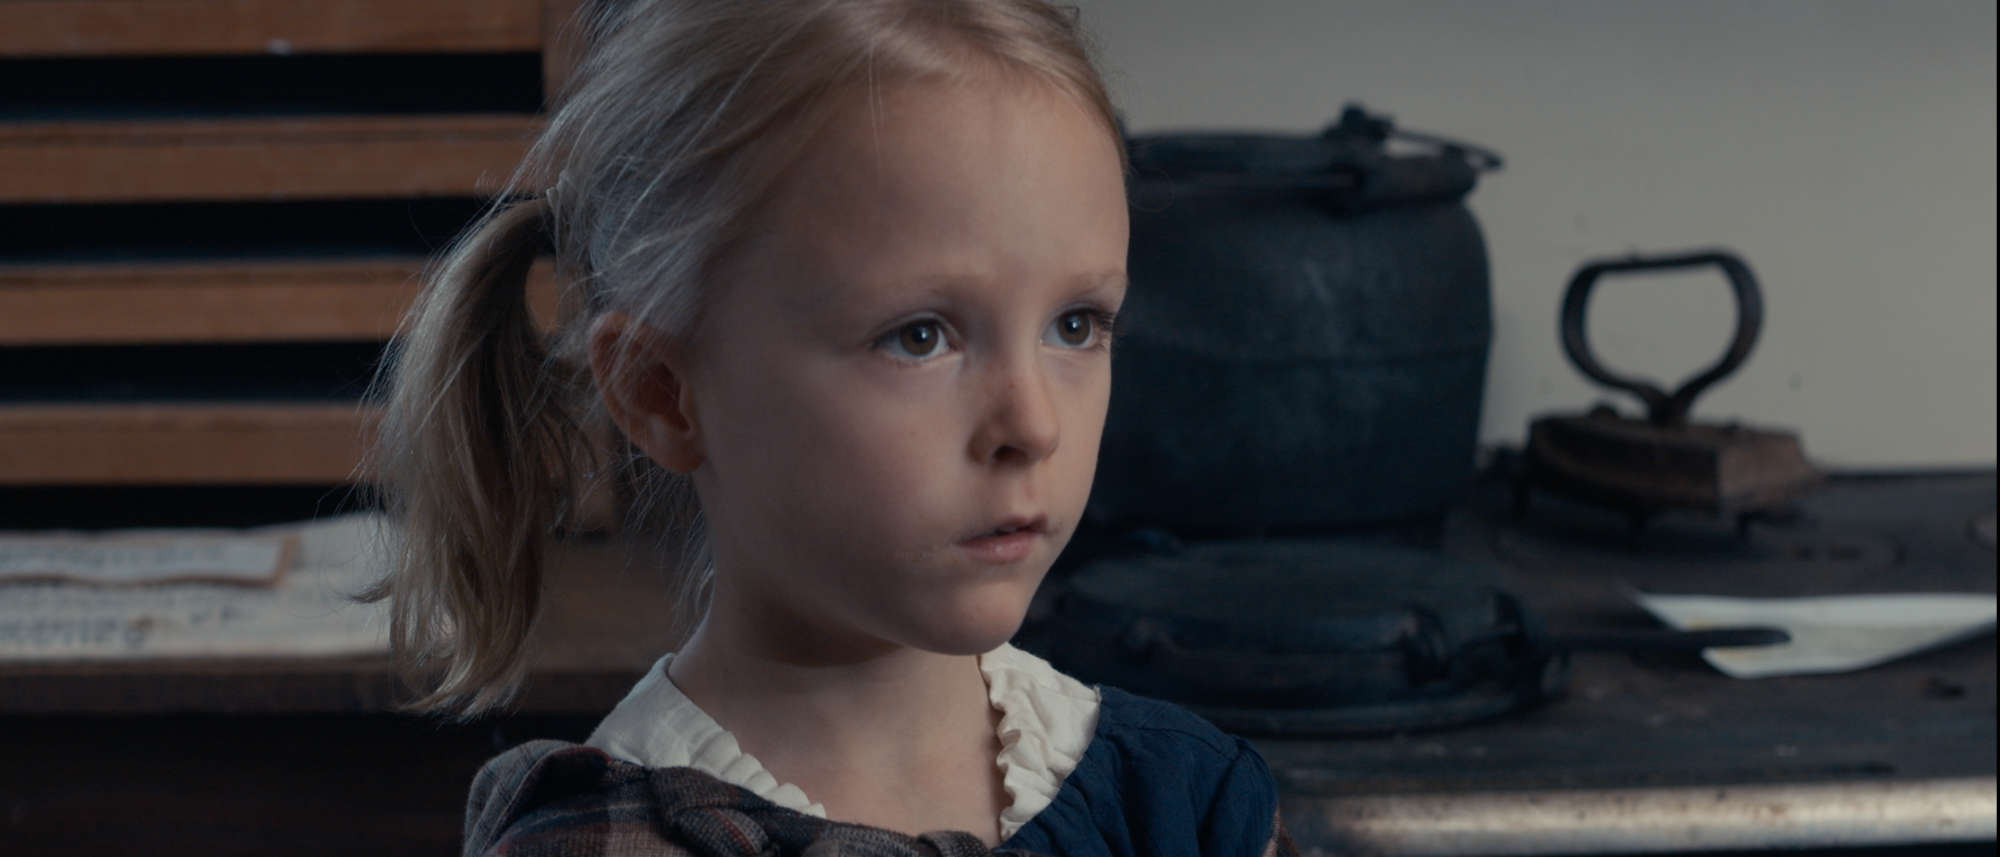
3) CATCHLIGHT
Another function of your key light is to provide a catchlight, which is a reflection in your actor’s eyes.
See the key light reflected in her eyes above? You want to do this. For whatever reason, it shows life. Take your favorite animation from Bluey to Pixar and you’ll see this in the character’s eyes. So when you’re lighting, make sure you see the catchlight in their eyes.
So that’s a key light in a nutshell! Let’s turn off the overhead fluorescent lights and turn on only our key in the garage shot example:
FILL LIGHT
Some setups will not require a fill light, but most of the time you’re using one. First, understand that your actor’s face has a key side and a shadow or fill side. The key side is lit by the key light and the fill side is lit by the fill light. Make sense?
The fill light controls the light ratio on your actor’s face. The higher the ratio, the more contrast you have, and this is measured in stops. If you have an evenly lit subject, you have a 1:1 lighting ratio. If you have shadows on the fill side with the key light side 4 stops brighter, you’d have a 4:1 lighting ratio.
For our garage example I’m not using an actual powered light but simply a bounce board to provide a bit of fill, which means I still have a decent amount of contrast going on. Let’s add the bounce board and see how it looks:
See the difference even with a bounce board? The fill side of my fair has illumination, giving more detail to the cheek, ear, etc. With a dimmable LED you can dial this in to the precise lighting ratio you’re after.
BACKLIGHT / HAIR LIGHT / RIM LIGHT
Positioning a light source behind your subject can do A LOT. You’re typically placing fill lights on the fill side of your talent. Check out the image below:
The window has a large silk over it, offering a soft glow that highlights the subject’s hair in a pleasing way. Like the fill light, you’re not always using a back light. If you do, remember to anchor it with a motivated light source. You can’t just light up the rear of your actor because it looks cool. Always ask yourself, “where is this light coming from?”
I’ll position a hair light in the garage and turn it on:
BACKGROUND LIGHT
As filmmakers we’re dealing with a 2D medium to tell our stories. Unless of course you’re shooting 3D. With 2D limitations we want to use our lights to create depth. This goes a LONG WAY in feeling cinematic vs feeling amateurish. A background light helps with this. It adds contrast and depth to your scene. Take the example below:
The canning closet behind the actor has a window which adds a lot of dimension to this image. If this was a night scene, we could simply place an oil lamp or candle in the closet—a motivated light source that goes with this 19th century film and gives us the background light for depth.
And something you can do is change the color temperature of the background light. Changing the colors of lights in your scene is another way to add depth.
Now I’ll turn on our garage background light and see what it looks like:
A lot better, right? Do I always do a three point lighting setup in my scenes? No. Sometimes on RECKONING the only light I used was a key light. However, the times I put more time and effort into my lighting changed the end result significantly!
I hope this basic run down of 3 and 4-point lighting helps you dial things in even more on your next film! If you’re a beginning filmmaker trying to learn the ropes, I highly recommend you check out our online film school! Write & Direct exists to teach aspiring directors the craft from development through post production. The right way with less month spent and an action plan to keep moving forward!
Video Version
Also, if you’d like to see a video version of this lesson taken from the film school, here it is:
I was in the middle of a career in IT when the filmmaking bug hit. I was crazy about movies—watched THE MATRIX 18 times in the theater. But for whatever reason, the idea to make movies didn’t hit until age 27. I swiveled in my office chair, Googled film schools in Los Angeles and the rest is history.
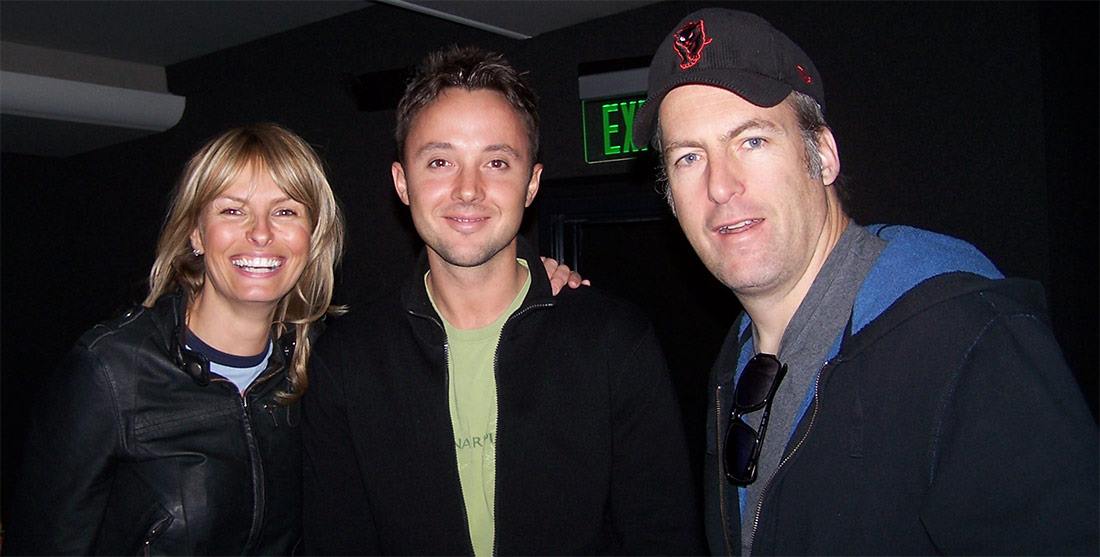
Below is a pic of me fresh out of film school. I was an editorial PA working on a couple films directed by the talented Bob Odenkirk. But I’m getting distracted. Nowadays if you hop over to Google and search for something like, “What film school should I go to?” you’ll see A LOT of SERP results. At the very top, Google Generative AI attempts to answer the question.
So let’s do that—we’ll see what AI tells us to do. Then I’ll comment based on my experience in film school, Hollywood and now working as an independent filmmaker. We’ll also assume we’re talking about directing jobs. Not producing, camera, sound, etc.
Cool? First, a few basic industry statistics:
Current Film Industry Stats
The MPA reports that the film industry supports approximately 2.74 million jobs as of 2024. But these are both behind and in front of the camera. According to Perplexity AI there are approximately 175,300 film directors employed in the US as of 2024. This encompasses a wide range of directorial roles in the film and television industry. The director’s guild (DGA) represents around 8000 directors. And these directors work essentially as contractors, from project to project.
In summary there are 8000 directors in the DGA who can work on union TV and film productions. Now, this doesn’t mean they’re all working. For example, there are about 100 films each year produced by major studios. And sure there’s TV, but you get it. The competition to direct is fierce.
So with that said, let’s cut to our AI responses when we ask about the right film school to attend:
AI Response 1: Industry Reputation
Google’s Generative AI says USC and NYU are often considered top film schools to go to. Why? Extensive alumni networks within Hollywood. Interesting. So let’s assume that’s true. If I ask AI how many people graduate from these two schools each year it’s around 960. So a thousand NEW people each year who need jobs. This doesn’t take into account the other 62 accredited film schools in the U.S.
Can An Alumni Network Land You A Directing Job?
My two cents? No. Not for directing jobs. Alumni networks do help however. For instance, I helped my classmate get on as an editorial PA for Fast & The Furious Tokyo Drift. But here’s the thing: He was a directing major in film school. Editorial PA isn’t really a career path to directing.
The truth of that matter is this: Hollywood doesn’t care about your education. They care about what you have done. What your skills are. Who you know. Stuff like that. One of my classmates in school was related to Jerry Bruckheimer. One of my teachers actively worked on Law & Order Special Victims Unit. My directing teacher was in the DGA. And NONE of that did anything for me or anyone else in my class.
Film school teachers see boat loads of creative geniuses who think they’re God’s gift to cinema. These teachers cannot hook you up. If they could, they’d probably be directing themselves.
AI Response 2: Focus Area
Google AI recommends seeking a school out that complements your interests. Not a bad idea if you wanna work as crew (DP, Editor, etc). I was a double major in film school. Editing and Sound Design. The reason? I knew there were zero directing jobs waiting for me, so my angle into the industry was as crew. I had the most polished reel in my class. Began calling studios before graduation hoping to land an assistant editor job. You know what a studio receptionist told me? “We only hire award winning editors.”
So sure, if you want to work in VFX and you can find a school that Pixar recruits from, have at it. But you’re competing against a lot of people even to land work as crew. For those of us who want to direct, there are no film schools where studios go to find directors. Hollywood doesn’t work that way.
AI Response 3: Location
Google AI suggests Los Angeles for “greater access to industry opportunities.” Again, a logical response. But here’s the thing and there’s no getting around it: LA is SATURATED with creatives hoping to break into the industry. Craigslist is full of bitter crew hating on new directors trying to get films off the ground with no money. Malibu restaurants employ wanna-be filmmakers just trying to make ends meet.
For those of us who want to direct, LA is one of the most difficult places to do it. Nobody is going to “discover” you. We hear the magical GOODWILL HUNTING stories and hope for the same. But your chances of becoming a millionaire at the slots in Vegas are higher. A lot higher.
So what gives? What film school should you go to if you want to direct movies? I have an answer, but there’s something you need to understand about the entertainment industry first.
What Hollywood Cares About
Hollywood does not care about school pedigree. They don’t care about your amazing thesis project, or the fact that you graduated top of your class. But hey, don’t take my word for it. Call up studios and pitch: “I just graduated as a directing major with honors from SCHOOL NAME.”
They might let you be a production assistant (PA) and get coffee. I know, it’s a harsh reality. My common gripe after film school was “Hollywood is a sweat shop!” Because I had to do A LOT of free work even as crew. I cut three feature films for a total of $4000. Not forty. FOUR.
Hollywood cares about the films you’ve already done, and the ones you have cooking. They care about the size of your audience. About your connections. Your skill level. Why hire you if they can hire Ron Howard, Edward Zwick, Andy Tennant or one of the other 8000 directors in the DGA?
What Aspiring Directors Must Do
If you want a chance at making it as a movie director, you have two primary things to do: Learn the craft and start making movies. Who funds these productions? You do. Along with rent, insurance, food…all of that jazz. So the very last thing you want to do is nuke $63K for two semesters at USC. Sorry AI, but that was the WRONG answer.
After graduation you need money to begin making movies Rebel Without A Crew Style. You must hone experience. Master the craft. Build an audience. Gain momentum. You need a school that economically teaches the craft of filmmaking, but teaches it well—It was for this reason that I started Write & Direct.
The Director’s Film School
Write & Direct is a self-paced, hands-on film school that teaches aspiring directors what they need to know—from development through post production. Because as you’re starting out, you won’t be able to afford crew day rates. And sure, you can pull favors. But when your gaffer gets a paid gig, you’d better know something about lighting or your production stalls. Your filmmaking career stalls.
Write & Direct not only teaches you the craft in a unique way, but you will purchase the gear you need to make a film during school and then continue making films—All for a FRACTION of the cost of traditional film schools.
This isn’t some fly-by-night offering. The Write & Direct online film school will be a catalyst to pursuing your filmmaking dreams. Enroll today! We have a full money-back guarantee. Check the school out for 30-days and if it’s not for you, your money is returned.
I hope to see you on the other side! If you have questions, the film school details page might help. You can also schedule a free call to get specific questions answered.
Whatever you do, don’t give up on your dream to become a filmmaker!
Why hear what I have to say about film school? Two reasons. First, I attended The Los Angeles Film School in the heart of Hollywood on Sunset Boulevard. Private school. $32K for one year of education—not including room and board in LA.
Secondly, I’m an active independent filmmaker. I have a film in post production right now called RECKONING. Have a feature film in development. I’ve also worked on a couple studio films. And you can hit up my IMDb. So with that out of the way, let’s cut to:
The Rising Cost of Film Education
Simply hit up your favorite AI (mine is Perplexity) to get fast estimates on updated tuition costs for film school. Average in-state hits around $6,100 per year. Average out-of-state around $16,650 annual. Private schools range from $30K to $100K annual. None of this includes room and board.
This all adds up to a lot of money really fast—so a growing consideration for many aspiring filmmakers is online education. But it’s film school, not an accounting program. Doesn’t film school need to be hands-on? Don’t you need to network with others and all of that jazz?
The answer is YES. Learning the craft of filmmaking must be hands-on. You need access to gear. You do need to network. Can you get this hands-on experience with an online film school?
The Answer About Hands-On Training
This is a larger topic, but the fast answer is YES. You can get hands-on experience with an online film school—if you’re enrolled in the right school. See, there’s always an “if” right? But it’s true. And as someone who went to that private LA-based film school, I can tell you that film school gave us access to all the gear we needed: Cameras, lighting, dollies, mics, field recorders, sound stages, editing workstations and the list goes on. So how can you get all of that with online schools?
The Real Answer About Film Gear
Here we breach the larger topic, but it’s WILDLY important if you’re thinking about film school, whether online or in person. So please stay with me. In fact, if any of this doesn’t make sense hit up the contact page as those messages go directly to me. So here we go with point 1:
1) Gear Goes Away After Graduation
It was super cool to have access to gear at LAFS: Cinema cameras, Sound Devices field recorders, Fisher dollies, Sennheiser shotgun mics and Avid workstations—to name just a few things. But after I graduated, all of that shiny gear went bye-bye. I was on the streets of LA with $62K of school debt and no film-related job in sight. But why? Was I a slacker in school? Nope. My instructors would have said the complete opposite. Then why the dismal situation after graduation?
2) Hollywood Doesn’t Care About Your Education
This singular point is what EVERY aspiring director must wrap their head around, because it’s the truth and there’s no getting around it. Ready? The entertainment industry doesn’t care about your film school education. They don’t care that you were top of your class or had a cool thesis film.
If you don’t believe me, simply start calling studios right now. Tell them you graduated from SCHOOL NAME with honors as a directing major. Then ask them if they have any jobs. They might let you be a PA and get coffee. Maybe.
I know this sounds harsh, but it is the harsh reality awaiting every directing major after graduating from film school. So why bring all this up? How does it apply to hands-on training?
3) What Film School Grads Must Do After Graduation
If you want to be a director, your objective after film school is to begin making movies. But it’s on your dime. You have to do a lot of it Rebel Without A Crew style, because you won’t have money for day rates. You also won’t have access to all of that hands-on gear you had during school.
See where this is going?
The Hands-On Online Film School Solution
This is what Write & Direct was created for. We teach aspiring filmmakers the craft of filmmaking from development through post production. You will actually make a movie from idea through final sound design and color grading. Everything. We show you how to do it step by step. And you’ll purchase the gear you need to do it. Now wait—that sounds expensive! Actually, it’s a no-brainer:
To purchase a solid computer with industry leading NLE, DAW & grading capabilities, 6K cinema camera, DJI Ronin gimbal, Aputure lighting, Sennheiser mic, Sound Devices field recorder—and everything else you need—all of this film gear plus the cost of Write & Direct tuition will ring in LESS than attending a single year of out of state film school. It will cost tens of thousands less than going to a private school.
Make Movies Post Graduation
With this online film school and equipment model, once you’ve completed your thesis project and you graduate, you’re JUST GETTING STARTED. The gear doesn’t go away. You can continue to do the single most important thing for your filmmaking career: Make movies.
What About Networking During School?
Okay, okay. This sounds interesting. But what about networking? Teachers with industry connections. Fellow students—what about all of that?
Another important topic. One of my teachers was an honorary member of the DGA. He went to school with M. Night Shyamalan. Another teacher worked at Universal Pictures (Law & Order) and taught at the school at night. Cool connections! Did nothing for us. Teachers see WAY more students than there are jobs available. And often, teachers have their own dreams cooking. Teaching is just paying the bills.
But networking with fellow students, that’s good right? It can be. If one of them is loaded with millions and can fund your movies after school. Yes, I did work with a couple students on their indie feature films after school. But one was 100% for free and the other paid me I think $3500 total for 6 months of work. And my very first indie feature after school? Found that on Craigslist.
I’m not saying there can never be a connection through a student—that absolutely happens. When I got an editorial PA gig on a Bob Odenkirk film, Universal called me because they needed a PA on Fast and the Furious Tokyo Drift. I was already working, so I hooked up one of my classmates. But as cool as that sounds, it was a PA job. Had nothing to do with directing.
You Can Network Anywhere
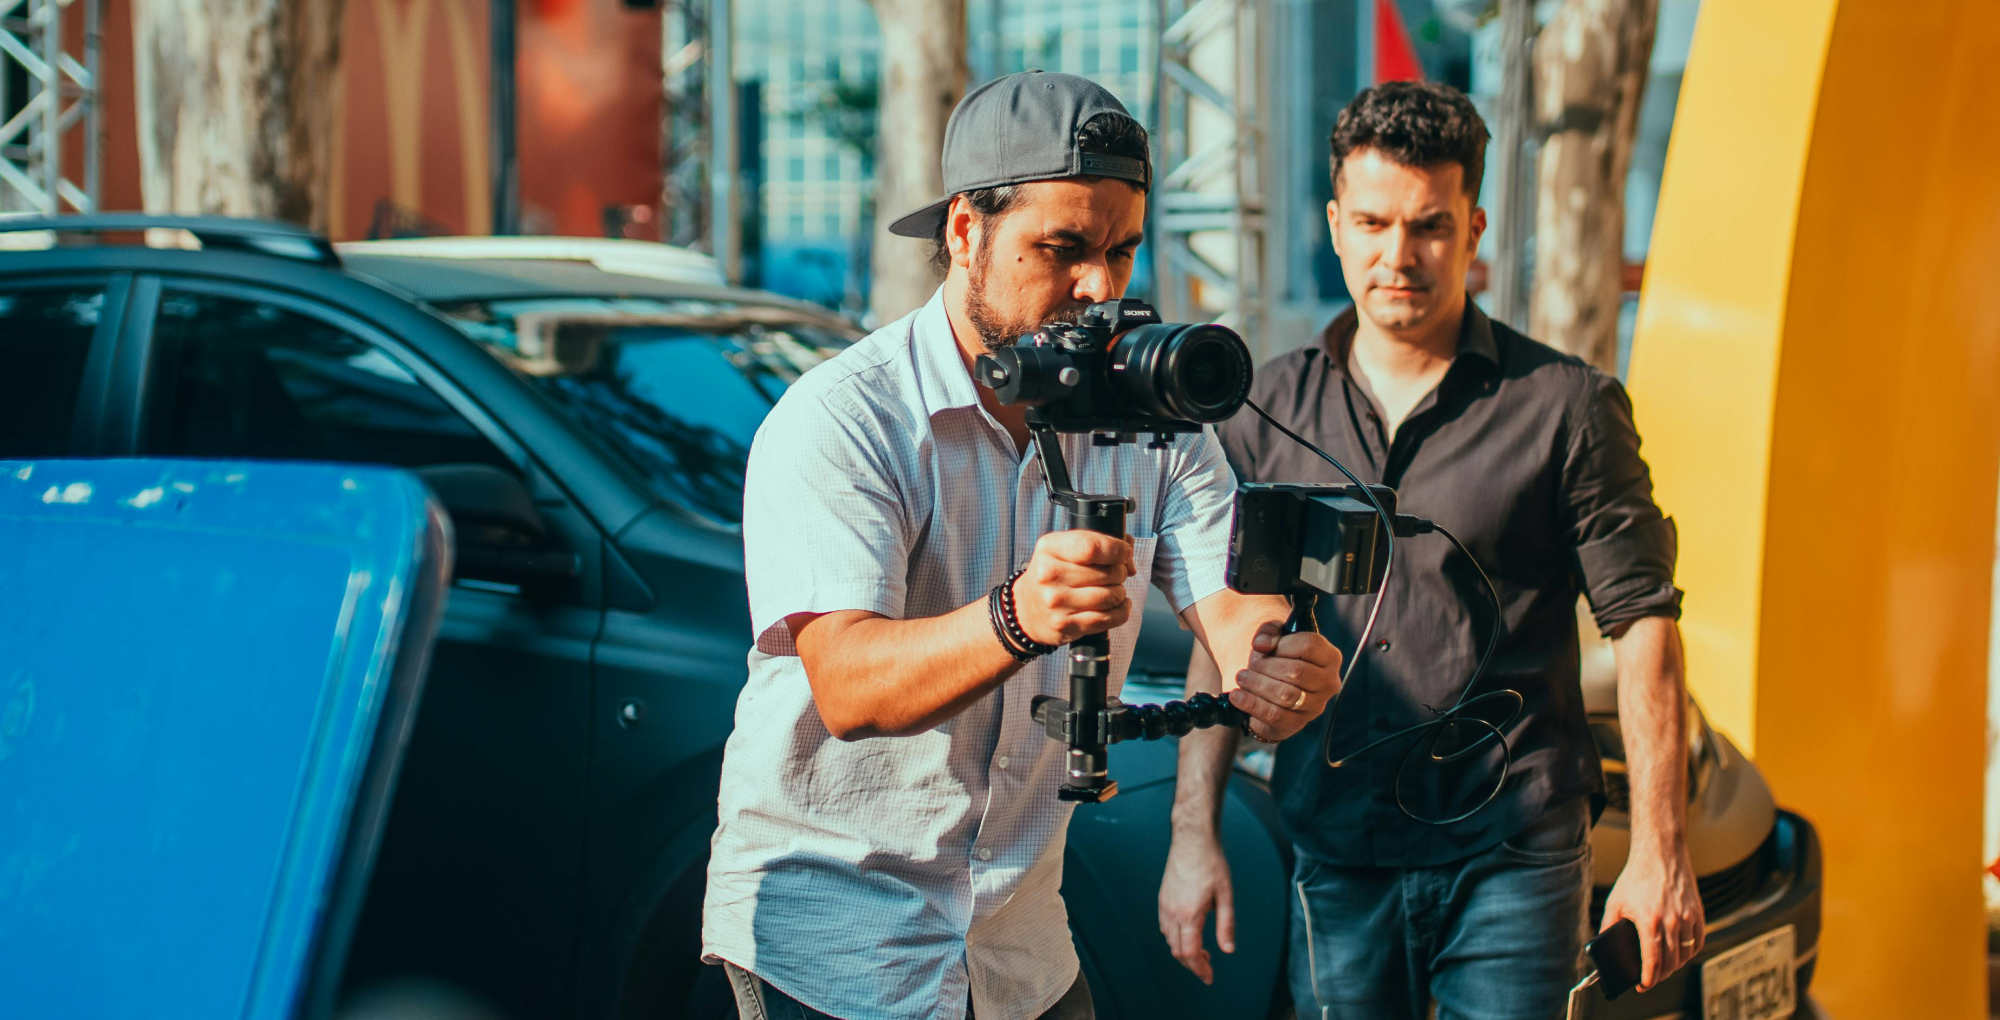
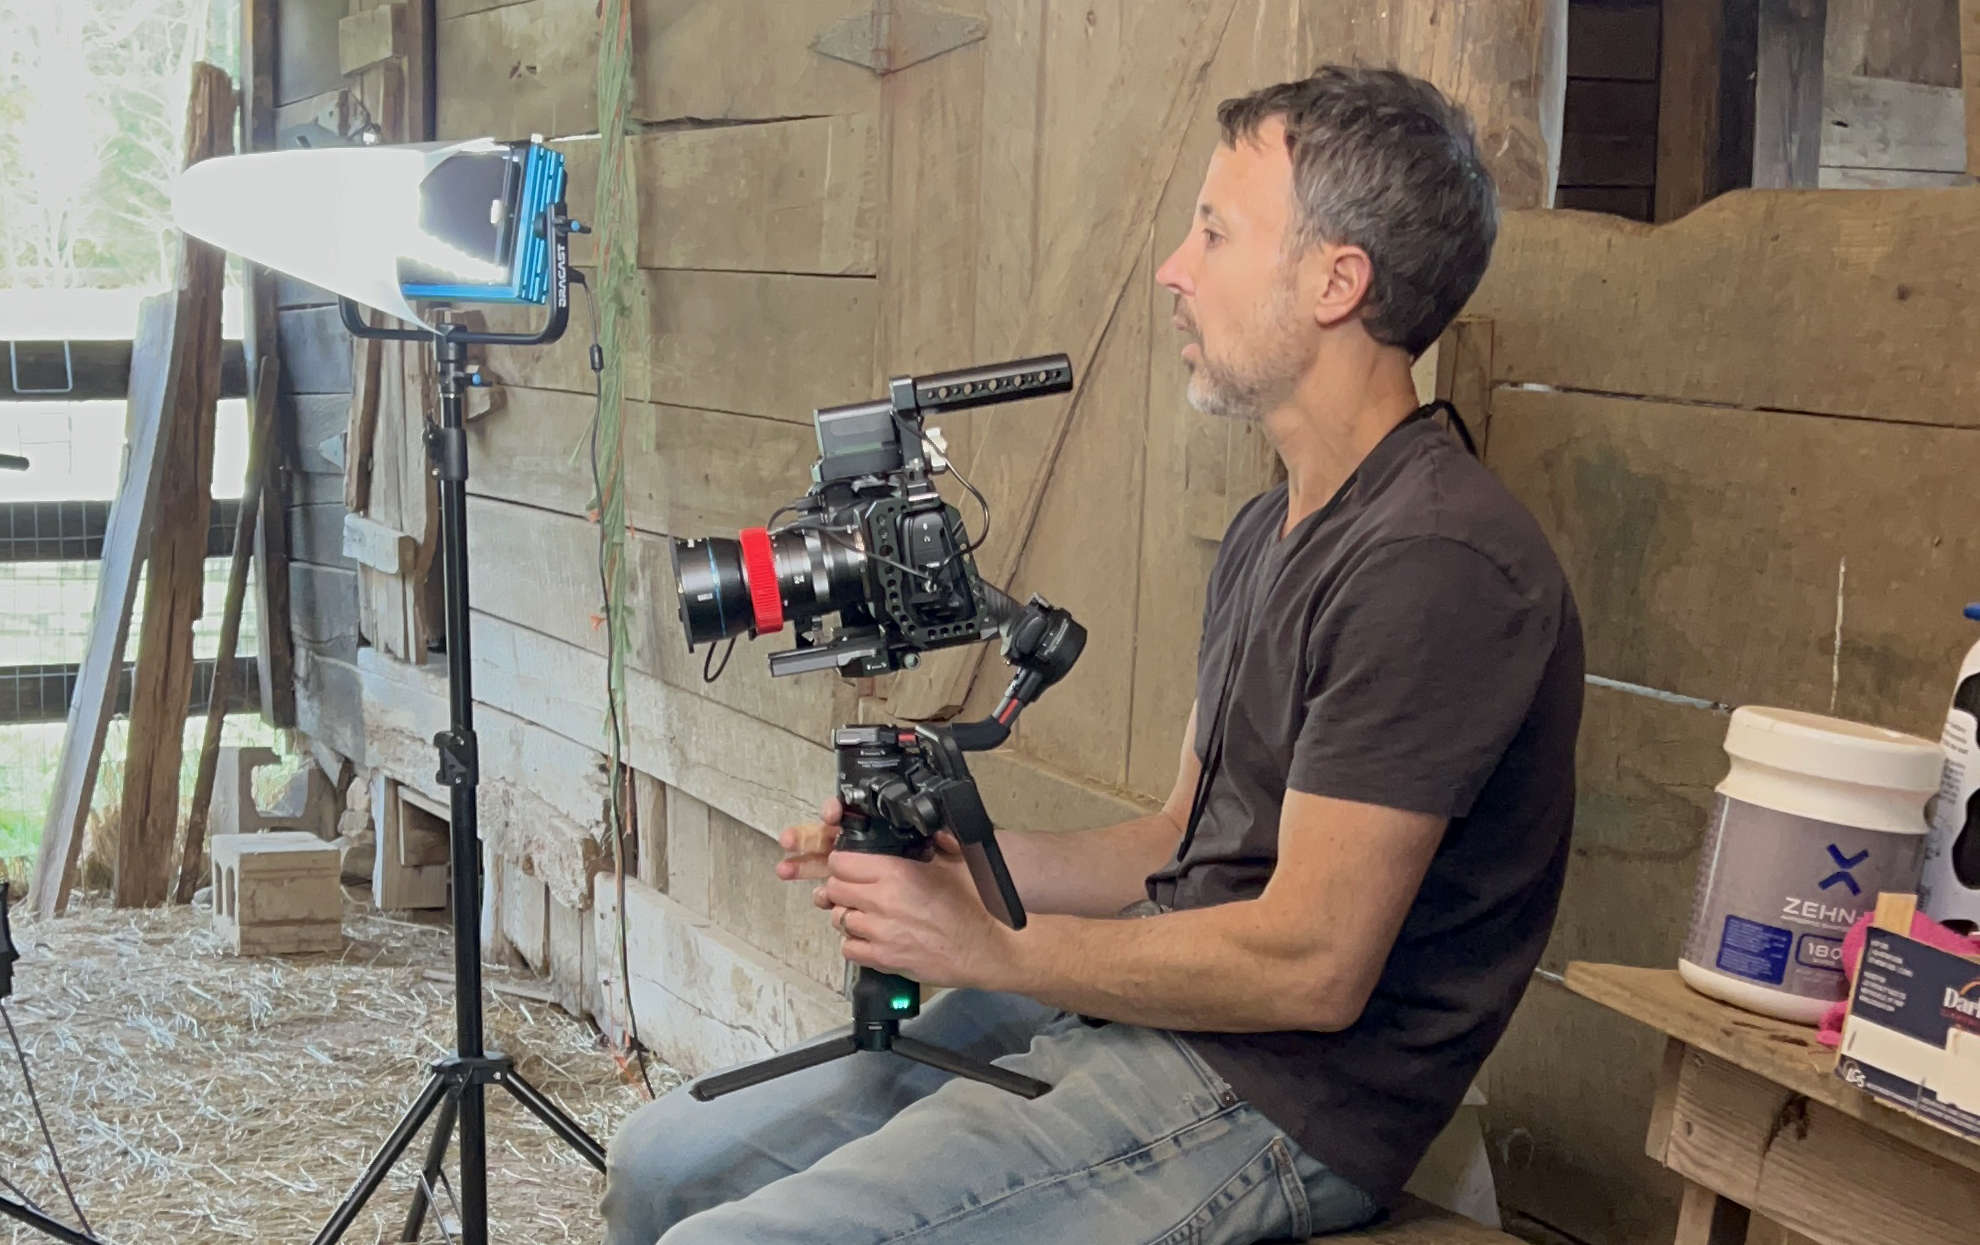
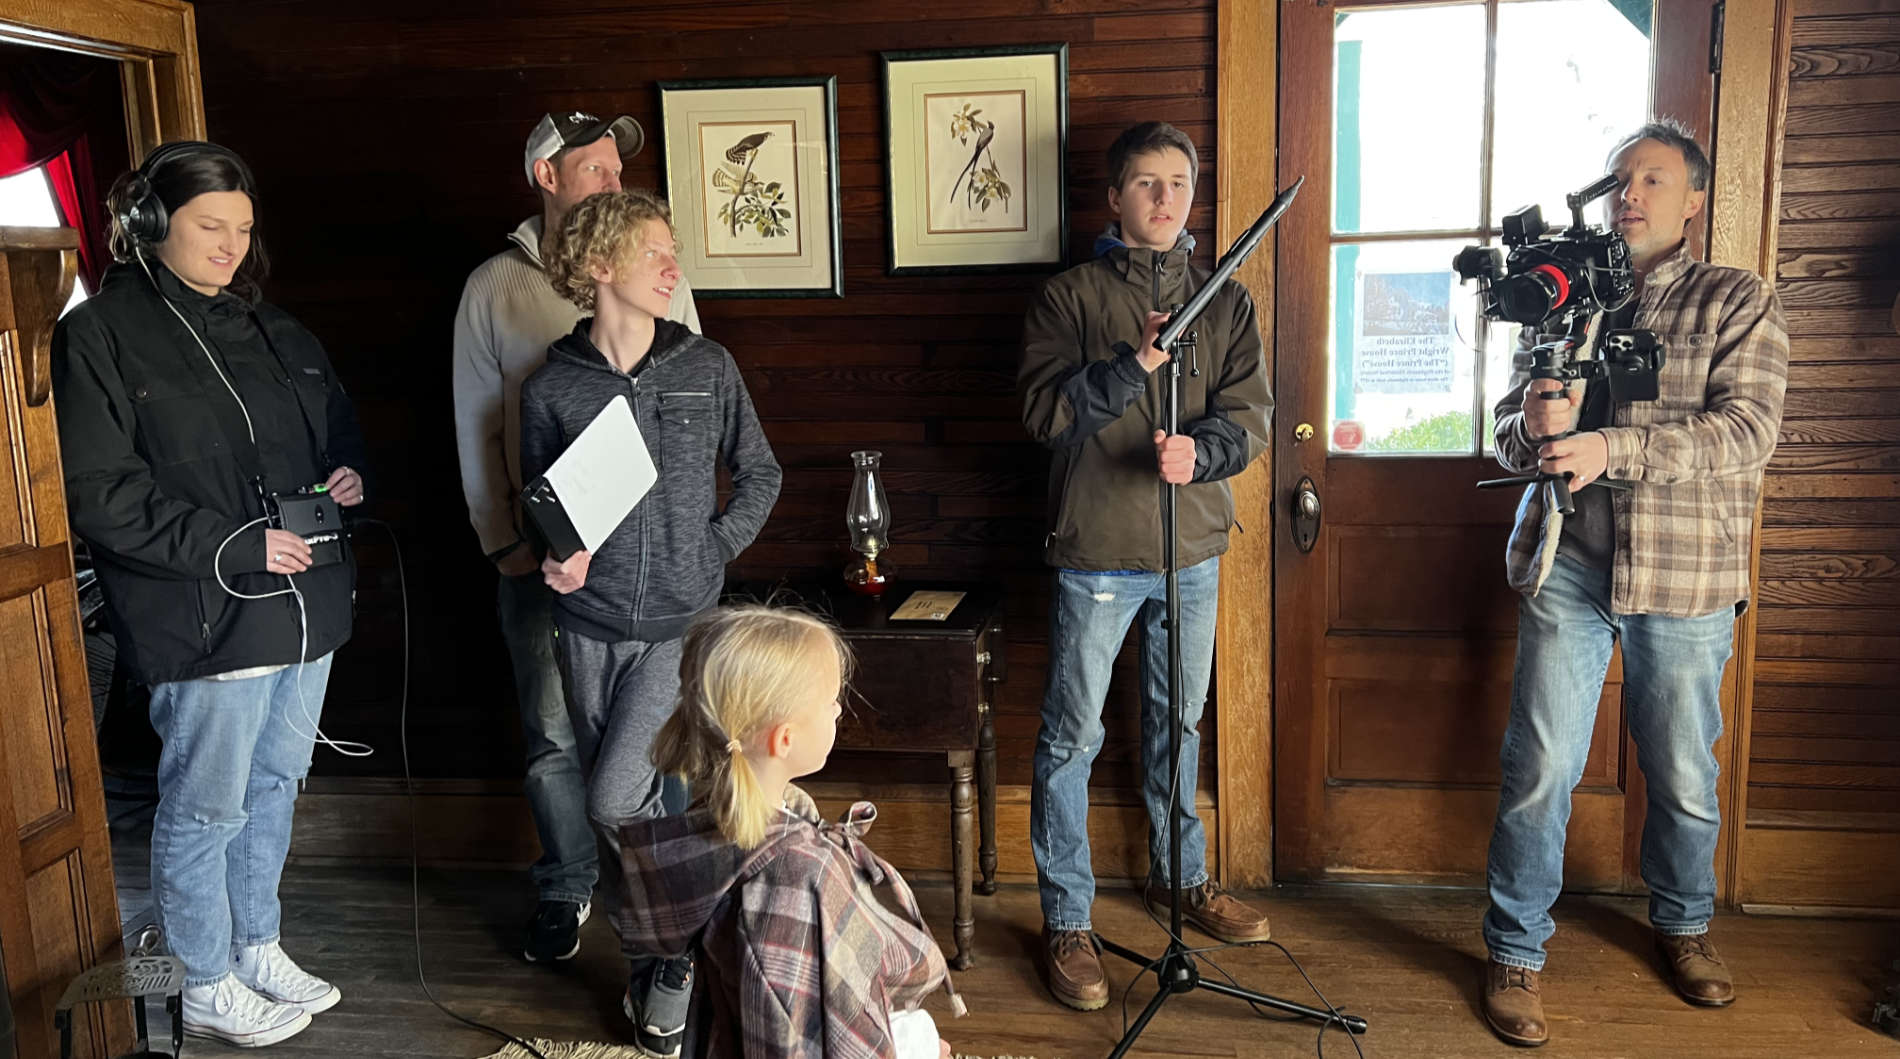
My latest film RECKONING is an example of how you can network anywhere. I shot this film in the mountains of NC. My crew was made up of local teens who thought it would be fun to work on a film set. You can network and find wanna-be filmmakers ANYWHERE now. You don’t have to go to LA. You don’t need to go to film school. When you’re the director, you’re a creative magnet. People will flock to your passion. To your drive.
The Ultimate Online Film School
You can’t go wrong with Write & Direct. In fact, even if you wanted to spend $30K on film school, going through Write & Direct first will definitely put you at the top of your class. But what it will really do is teach you the craft in a unique way that I believe will open your eyes to the process AND the lack of need to attend a film school in person.
This belief is backed by a 30-day money-back guarantee. Try the school out. If it’s not the perfect solution for you as an aspiring filmmaker, we’ll refund you 100%.
Part of the director’s job during pre-production is to “see” an entire film ahead of time. By this I don’t mean some relaxed, dreamlike state on a beach sipping tropical drinks. It’s a meticulous task of visualizing every single shot for every scene in the entire movie.
And it’s so much fun!
Stick in one of your favorite films, watch the first 5 minutes and count every time the camera cuts to a different setup (framing, angle, perspective). A prepared director sees all of this before anyone’s holding a camera, and they detail it out in a shot list.
And this varies by director. Steven Spielberg is known for planning while John Ford was known for avoiding things like Storyboards, etc.
But what if you’re a one-man crew? Can’t you just wing it? NO. You still must plan your shots. Waiting until you’re on set will cause you to end up with a film that isn’t what it could have been. Trust me on that. Any preparation you do ahead time with a shot list allows you to be more creative on set.
As Louis Pasteur said: “Fortune favors the prepared mind.”
Example Shot List
Below is a sample shot list from the short film RECKONING:
Steps To Create a Shot List
There isn’t a single right way to record your shots. Some filmmakers use software like Studio Binder or Celtx. Personally, I prefer a spreadsheet that references every shot with an associated story board.
1) Scene Numbers
When you break down your script, each scene is given a number. This allows you to map things like your shot list back to the script even when there are changes.
2) Shot Numbers (Setups)
Every camera setup needs a new shot number. For example, you’re shooting a wide shot of someone and want to move to a medium close up? That’s a new camera setup. As are angle changes, etc. Start with number one and assign a number to each one of your shots for a particular scene. Scene 7 might only have 3 shots while scene 22 has 15. Personally, I use a decimal system. Scene 3 setup 5 would be labeled 3.5 and used on corresponding story boards or story maps (if using).
3) Shot Description
Describe your vision for the shot. How are you affecting tone or character? What’s the purpose of the shot? Is there action in it? What is the intended emotional charge?
4) Shot Size
This describes what the camera and lens combo see. Essentially the camera perspective.
WS (Wide Shot) FS (Full Shot) CS (Cowboy Shot) MS (Medium Shot) MCU (Medium Close Up) CU (Close Up) ECU (Extreme Close Up) OTS (Over the Shoulder) POV (Point of View)
5) Specify Shot Angle
The angle of the camera drastically effects the feel of the shot. What do you want the audience to feel in this particular scene and setup?
Eye Level Low Angle High Angle Hip Level Knee Level Ground Level Shoulder Level Dutch Angle Overhead Aerial
6) Camera Movement
Will this be a moving shot? A classic example is The Dark Knight when the Joker first enters the pent house party. He’s moving the entire time, and this would all be noted on the shot list.
Pan Whip-Pan Tilt Whip-Tilt Dolly Truck Pedestal Zoom
7) Equipment & Lens
If this is a static shot you’ll have the camera on sticks (tripod). If it’s a tracking shot, are you using a gimbal or dolly? You’ll also want to be specific about the lens. Do you want a wide 24mm lens, or a 50mm for a more normal field of view? These creative choices affect your story, and require a lot of forethought. The more you prepare the more freedom you have to be creative during production.
8) Location
Is this an interior (INT) or exterior (EXT) shot?
9) Subject
Who or what is the subject of the shot?
Story Boards & Shot Maps
Story boards are also a common tool for directors. They allow a director’s vision for a scene to be visually laid out so department heads can get on the same page easier. Some story boards are very elaborate while my story boards are very basic. And in all honesty? I typically abandon story boards for what I call STORY MAPS. I cover these and shot list information covered here in the video below:
A Shot List Will ALWAYS Pay Off
Now you know how to create a shot list. It’s up to you to embrace the discipline of meticulously planning our your shoot ahead of time. This doesn’t mean you can’t change it later. But this discipline will open up new ideas for your film that may not have happened any other way. A great way to get ideas is to spin up some of your favorite films and watch them without sound. This will force you to study camera movements and learn from pro filmmakers.
Thanks for reading the Write & Direct blog! We’re an online film school for aspiring directors.
During pre-production your script becomes the blueprint for shooting the film. Everyone must operate off the same blueprint. But what if story changes are required? Because like it or not, it happens all the time. ESPECIALLY when you’re a filmmaker wearing many hats.
Sometimes I’ll get new story ideas while on location creating my shot list. Sometimes a tech scout reveals a location actually won’t work and this pushes a story change. The list is endless. The good news? Locking a script is actually the tool that allows for these changes. Here’s the process:
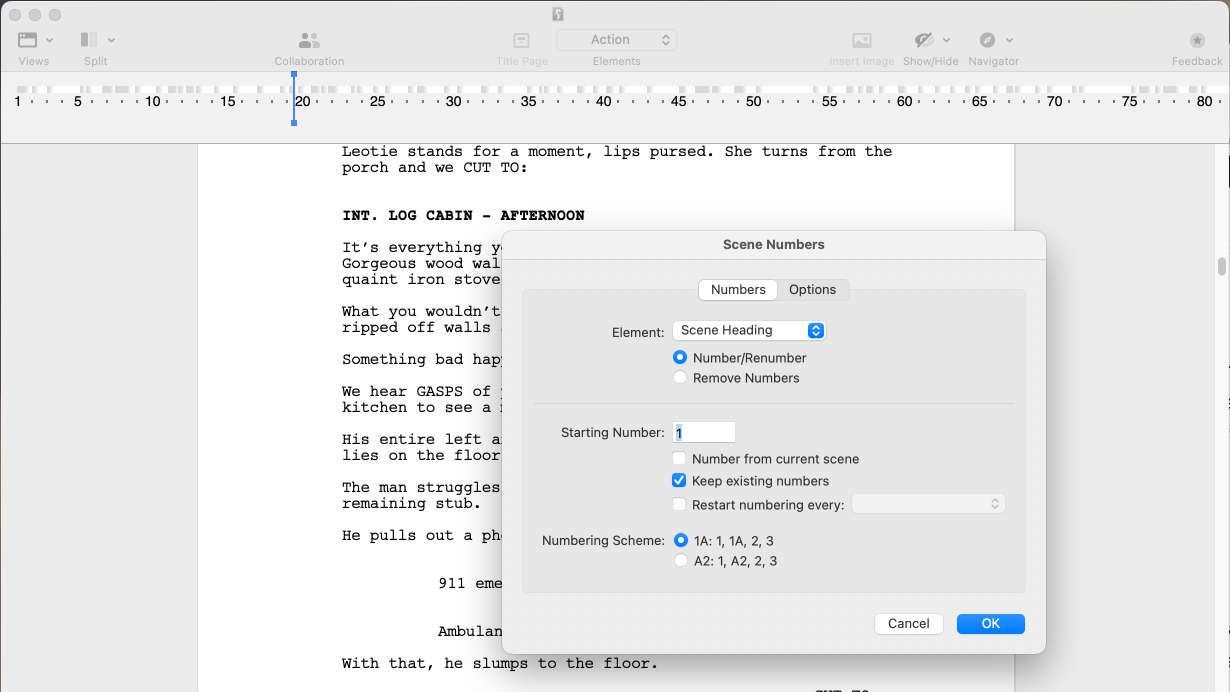
1) Enable Scene Numbering
Before locking your script you’ll need to add scene numbers. Why? Because a production runs off page and scene numbers. When you’re on set speaking with your DP about part of the script, you want to be able to say, “Look at page 2 scene 11, for this I’m thinking…” To do this, you need page and scene numbering turned on.
For Final Draft, go to Production > Scene Numbers.
For Fade In go to Production > Scene & Element Numbering > Check Show Numbering.
You’ll see the numbering appear typically on the left and right sides of your script page.
Bravo! The scene numbers should never change from here on out. But again, what happens if you need to make changes to a script once production starts?
2) Lock the Script
The official way to prep your script for changes in pre-production and production is to lock it. When you lock a script, page numbers and scene numbers remain unchanged even if you add or remove content from the script. This is HUGE!
Example, let’s say you want to add a new scene between scenes 3 & 4 in your completed script. The proper way to do this is add it and label the scene as 3A. This will also bump page one onto a new page called page 1A. Then all subsequent scenes and pages remain exactly the same. If you added two new scenes between scenes 3 & 4 they would be 3A and 3B. You get it.
The good news? Final Draft and Fade In can handle this for you.
3) How To Lock A Script in Final Draft and Fade In
Final Draft
In Final Draft go to Production > Lock Pages. You’ll see a small lock appear on the upper right of the script. Now your pages and scenes are locked. If you add a new scene heading in between two existing scenes, you’ll notice Final Draft doesn’t change the scene numbering—it leaves the new scene without a number. You can then click Production > Edit Scene and name it correctly.
Fade In
In Fade In go to Production > Lock Page Numbers. This locks the pages. Next, to lock the scenes click on an actual scene heading in your script and go to Production > Lock Element Numbers. When you do this Fade In will auto-increment your new scenes for you with the corresponding letters.
4) Track Scene Revisions in Final Draft & Fade In
What happens if you change a scene that already exists? You need to tell Final Draft and Fade In to indicate this.
In Final Draft go to Production > Revision Mode. Everything you change or add will be marked with an asterisk. You can also manually do this by highlighting the text and going to Production > Mark Revised. To change page colors, this is done under Production > Revisions.
In Fade In go to Production > Revisions and choose the revision color. This will also place and asterisk and change the color of the text.
5) Script Revisions During Production
When changes are made to the script during production, everyone must be alerted to what has changed. To do this, you pass out page revisions that are color coded vs handing out complete new versions of the script.
For example: If you were two days into shooting a film and made changes to page 5 of the script, that page would be reprinted on blue paper. If you made changes to page 5 again, it would be printed on pink. Then yellow. etc. Everyone in Hollywood knows the color order of revisions. Here they are:
Some TV shows have adapted their own versions of the above. But this is the official list from the WGA.
Cool, that all makes sense. But how do you track it all? Final Draft and Fade In can do this for you.
It Happens to Everyone
A story is never finished in Development. Personally, I’m making story changes even in the sound design and color grading phases of a movie. That’s just me, and it’s the beauty of independent film.
I’m sure no production has ever had a script that isn’t tweaked while shooting. So even though it’s a little unnerving to lock your script, you just need to bite the bullet and do it! Locking is really about freedom. It’s not as difficult as it may seem, and modern screenwriting applications do the muscle work for you. Imagine the typewriter days!
Thanks for reading our blog! Write & Direct is an online film school for aspiring directors. You can find out more about us on our film school details page.
So you’re done with development and ready for pre-production. Congrats! Now it’s time to breakdown your script. Why do we do this? It helps you plan for every detail needed for production. You don’t want to show up on set only to realize a prop isn’t there, someone’s costume didn’t arrive, etc.
Breaking down a script takes each scene of a screenplay and categorizes each needed item in order to assign to proper departments. Is it wardrobe? Props? Production design?
On a typical film the 1st AD (1st Assistant Director) is responsible for script breakdown. But in the land of independent film, it’s often the director executing the task.
1) Divide Your Pages into 8ths
Script pages are viewed in 1/8s. If you’re discussing a scene with a department head, you wouldn’t say it’s just over a page, you’d say it’s a page and 2/8s, etc. Dividing the pages into 8ths provides extra precision. Some people might even get a ruler out and divide pages into one inch sections. That’s hard core — whatever works best for you. Just be aware of the process.
Tip: One page of a script typically translates into one minute of screen time. This can be affected by the amount of dialogue, but as a rule of thumb, this is surprisingly accurate!
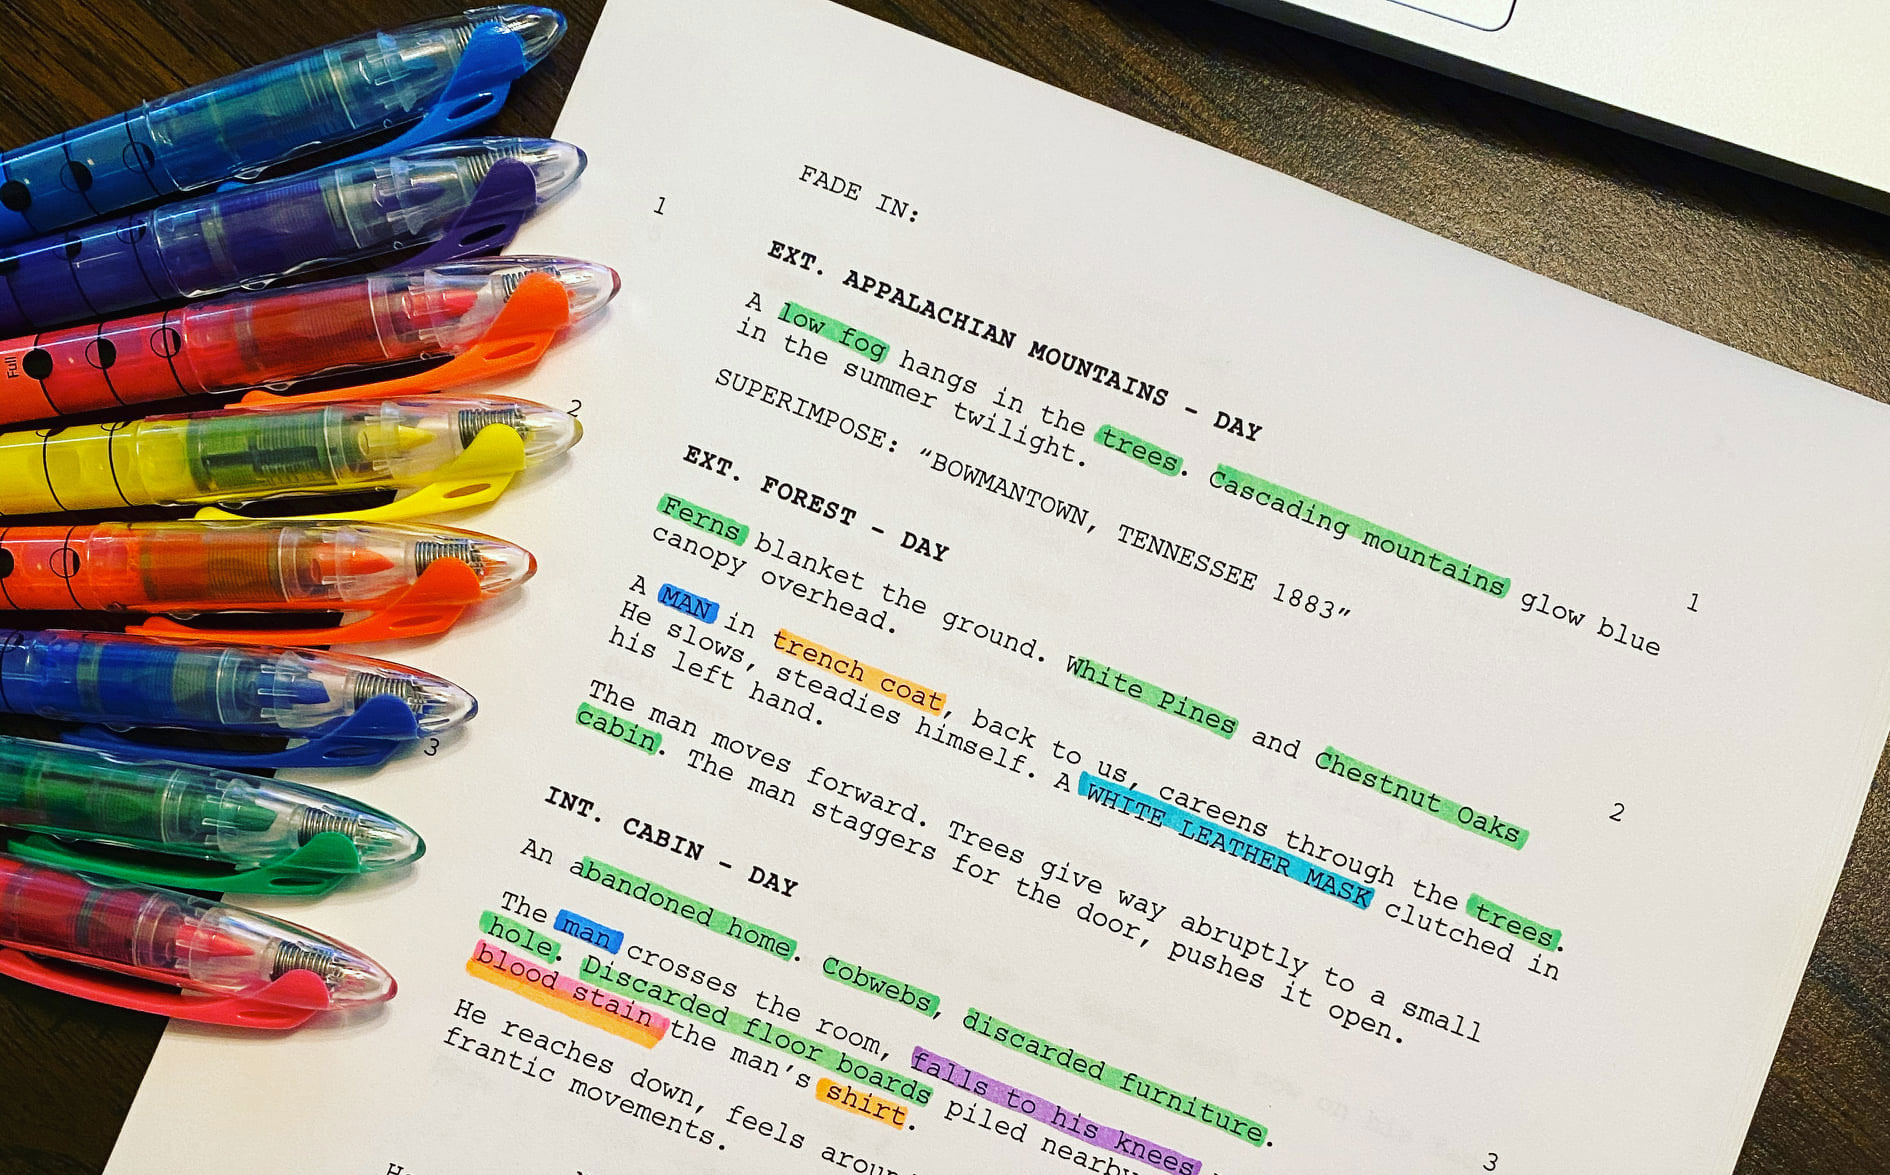
2) Use Highlighters To Identify Items
It’s time to print your script and grab highlighters. This is how you identify all the things that need to be addressed by different departments. With an indie film we are often all departments, but this is still crucial for proper planning. Here are common things you’ll identify in your break down:
Cast Members
Costuming
Props
Stunts (anything other than walking is a stunt)
Animal Wrangler
Set Dressing
Extras
Special FX
Make Up
Locations
There is no official color chart, so you can come up with your own. Just assign a color value to each specific item in your script. For example, if you assign GREEN to locations, then every part of the script that requires a specific location will need a green underline.
*Note: Some parts you will be underlining with more than one color. That’s normal.
3) Fill Out Breakdown Sheets
The final step is to fill out a script breakdown sheet for each scene. On the sheet you’ll list the scene number, location and other important items identified in step 2. I’ve attached a script breakdown sheet PDF that’ll get you going.
Remember, once we move out of development, a scene refers to a physical location. In development a single scene might span multiple locations, but for pre-production and on, it changes. This is because the script has now morphed into the blue print, and we’re planning our shoot based on locations.
4) Inform Department Heads
Now you can distribute the breakdown sheets to appropriate department heads so everyone knows what they need to do during pre-production. The breakdown sheets also assist during production to ensure all people, props, costuming and production design are ready for each day of shooting.
So that’s it! Now you know how to breakdown a script, which is a crucial pre-production task that will save you a lot of stress once production hits.
If you’re new to Write & Direct, we’re an online school for directors. We teach filmmaking from development through post production in a unique that allows directors to learn the craft and begin making movies in less time traditional education routes.